Almost done with another one

believerjoe

Well-Known Member
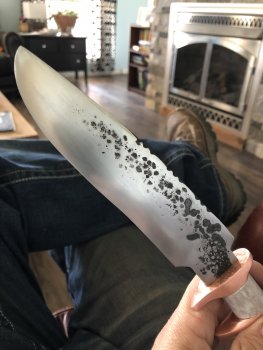
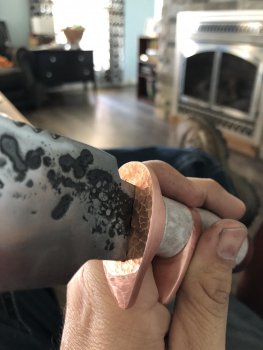
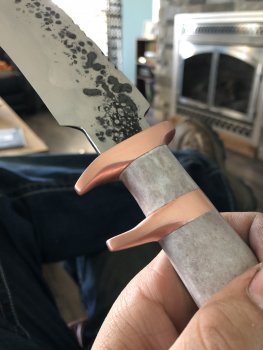
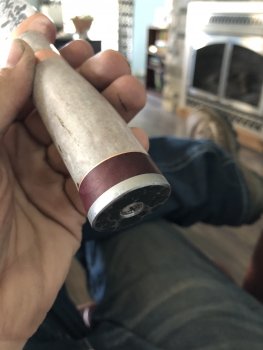
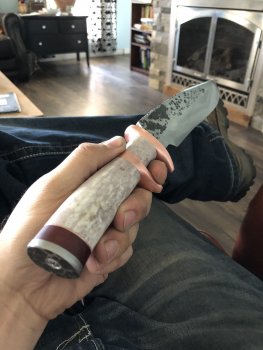
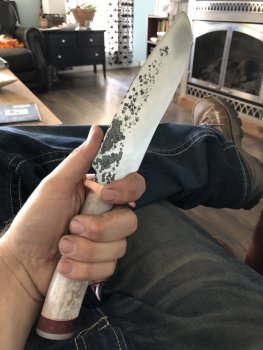
I am still learning, and yes I had an issue with plunge lines. My grinder belt moves, but I just got some ceramic to add to it, but not before I had to turn this into a vanishing plunge line. Lol. I am very close to buying a real grinder. 1095 forged blade, but to me a ton of grinding to fix it. I left some hammer marks on purpose and actually wish there was more. Solid copper guards, elk antler , and Purple Heart. I still have a couple hours of finish work and then it will be done. The screw head will be filed out mostly and then filled with colored epoxy or something. Last thing I need to decide. Leather order is slow getting here, but will have a Sheath soon. I was going to etch the copper with something, but all my tests did not look good enough yet. I also have to set it in the sun for 4 or 5 hours so the purple heart turns purple. Looks a lot better when it has the color. Thoughts? What would you do different? I need to figure out something for spotting guards. That is my least favorite thing to do and this has two of them, although one was easier.
 

Attachments

  • BA0C9A45-2450-4417-A536-CE85FC2AD625.jpeg
    BA0C9A45-2450-4417-A536-CE85FC2AD625.jpeg
    1.3 MB · Views: 22
  • 0C670C75-8C39-4C0C-A18A-4BE42B681E3E.jpeg
    0C670C75-8C39-4C0C-A18A-4BE42B681E3E.jpeg
    1.3 MB · Views: 22
  • D26CFD9F-182D-49C6-BA40-8A5245EE2FC6.jpeg
    D26CFD9F-182D-49C6-BA40-8A5245EE2FC6.jpeg
    1.2 MB · Views: 23
  • 599EDF53-C831-4F56-B775-930055DD166C.jpeg
    599EDF53-C831-4F56-B775-930055DD166C.jpeg
    1.2 MB · Views: 23
  • 044D59BF-C9C2-4E5B-A765-6C66999BADB4.jpeg
    044D59BF-C9C2-4E5B-A765-6C66999BADB4.jpeg
    1.5 MB · Views: 22
  • 22A43CE0-D2DF-4A86-A806-4E3E479B9BEC.jpeg
    22A43CE0-D2DF-4A86-A806-4E3E479B9BEC.jpeg
    1.5 MB · Views: 24
The subhilt and the handle look nice. The outline of the blade is good too. My personal feeling about hammer marks is that they shouldn't be there. I know that they're getting to be the "thing" but I wouldn't buy a blade with the hammer marks left on.

Doug
 
I think you did a really good job. This is a very ambitious design, and you went for it. Well done. The one thing I would change on the next one is to make the line of the spine unbroken into the handle. Having it cut back like that is a unique design choice, and if that's what you want then by all means do what you want. But for many customers this doesn't look quite right. Having the blade drop down from the ricasso looks good, but having the spine line interrupted breaks the lines of the knife. Aside from that, I think you made some really classy design choices. As to the hammer marks, I just had a customer request the same thing. That is quite popular right now. I'm not opposed to it like Doug is, but I completely understand his feelings on it. For centuries, the mark of the accomplished smith was to not have any visible hammer marks. Right now there is a big resurgence in rustic handmade items. The customer of mine actually requested the hammer marks and forge scale because he wanted "obviously handmade" to stand out. I even went overboard in dinging the blade up because I knew a lot of it would be ground out in the process and I need to make sure there were some marks left. Yeah, I felt a little cheesy doing it, but he's a friend and that's what he wanted. I don't rate myself a blacksmith by any stretch of the imagination, so performing an obvious blasphemy didn't cause me to lose any sleep. I'm proud of the end product and people loved it. But I completely and totally understand that a good smith would find it hackish, just like I wouldn't stock remove a knife and then take a needle gun to it to make it look forged.
 
Thanks guys! Again, I don’t mind the critique. As for the hammer marks and forge scale, my friend asked for that after seeing another I made. I do like it myself though as I set out to make rustic looking knives. And it was the first time I had the design like that. I was going to end the knife there and began hammering it down, but the liked the look, so I altered the plan. I do have the spine good on the next one. Ready to slot the guard on it when I get time, but it is stainless and I have to get that line straight this time! Copper is soft and I can’t tell if that makes it easier or harder to do. I will know soon, because this is the first time I have gotten away from copper. I am a copper junkie. The only other thing I like as well is the darkened or brown metal knives. Don’t know how to do that yet.
 
Very nice knife. For a newer builder you have good finish skills. And, that is a fairly advanced knife build. Definitely challenged yourself. Great job!

Thanks! The problem is that I get in a hurry and I want things done, but learning to slow down. I was going to ask how people do some of the finish work. I used files on the guards cause copper responds really well to that, but I spent hours shaping and finally hand sanding to 400 grit. I was going to go higher, but I liked it. No buffing at all for now. I will probably never do another subhilt until I have a better slot technique. The holes were drilled at an angle and not just cut too big. Took a few tries, but finally got it all to line up. I am going to have successful plunge lines on the next one. I was given some tips and hopefully I can get this ceramic attached to my platen. If I could just buy that nice grinder with small wheel attachments than I could take hours out of what I do. The next is all hidden tang, and then will go back to a few full tang knives.
 
Back
Top