Attempting Green Screen Photos

Mark Barone

Well-Known Member
Would like some feedback on this photo. I took a picture of my knife using a Ring light , photo box green screen behind it. I then removed the green using a free program. The difficult part is trying to keep the edges clean enlarging the pixels. I just chose a simple black background from google images.
I’m 07FDDC11-801E-4533-94C5-0BA4FD84FD78.jpeg
 
That is actually not bad at all for green screen. Normally with green there is some reflecting or tinting spilling over on to the knife. I struggled with the issue until I remembered that the reason they mainly use green is to avoid losing human skin tones which have the least in common with green. I switched to a neutral gray and have zero issues with the spillover, it may however require a more sophisticated program to isolate the more subtle differences from some of the tones on the knife. I use the most popular software that we all love to hate, and I won’t mention their name because of how much I now despise them, but let me say that I will never use beyond XX6 because I will not be extorted monthly for my own creative property.

Anyhow, here is my advice to make the image even better. For me removing the old background is just the first half of the problem. For me the secret to the second half is getting the subject (knife) to look like it is part of the new background and not cut and pasted. There is nothing that does this quicker than to show that the subject is affecting the back ground in some way, this immediately fools the human brain into believing the entire image is real. The easiest way to do this is with shadow. You can do this in one of several ways but this is the easiest of the one I use-

While the knife is a cutout, create a duplicate of it in black silhouette then slip it behind the subject and enlarge it to the size of your desired shadow, remembering that larger and more diffuse shadows means the knife is farther away from the background and smaller, refined shadows put the knife closer to the background. I always offset the shadow to show more on the bottom, because if it is evenly centered behind the knife our minds tend to more easily reject it as legitimate. Next, I apply a heavy blurring filter to the silhouette to diffuse if from a silhouette to a shadow, and then lower its opacity until the background shows through, pulling everything together.

The final touch up is to very lightly blur the pixels along the edges of the subject. If you look at a real image very closely, nothing has clean cut edges, they always interact with the background lighting on some level (hence the struggle with the green spill over). By blurring the edges a couple of pixels in you create that natural interaction with the background, making the image as realistic as possible.

Now, one final bit of good news for those editing videos. That unmentioned company also make a video editor that they use to extort those who were loyal who believe they have no choice. I want to say the answer is here! Check out Black Magic’s Davinci Resolve! I have been using 16 for a while now and it was more than a match for that other company, and you can get it for FREE! But Davinci Resolve 17 was just released and it has blown my mind, in fact it hands down blows that other companies video editor out of the water! And the best part- if you want to take your video work to Hollywood level for about the price of one of your modest custom hunting knives you can own the Studio version FOREVER. Video green screen can be touchier than photo work because the subject continually moves. If you have software that takes a single point sample at a time it can be tedious to get the right balance. In Davinci Resolve you take a swipe across the background and it compensates for the range to give you instant background removal. The first time I did that I said “WOW!” and was in love.
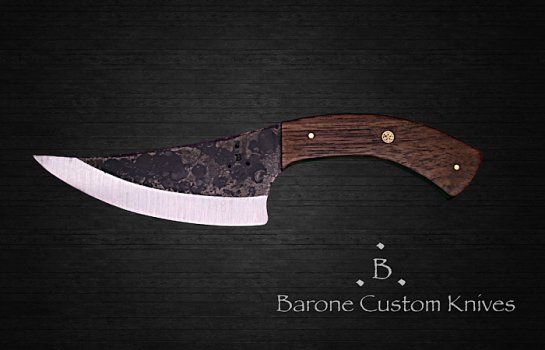
 
That is actually not bad at all for green screen. Normally with green there is some reflecting or tinting spilling over on to the knife. I struggled with the issue until I remembered that the reason they mainly use green is to avoid losing human skin tones which have the least in common with green. I switched to a neutral gray and have zero issues with the spillover, it may however require a more sophisticated program to isolate the more subtle differences from some of the tones on the knife. I use the most popular software that we all love to hate, and I won’t mention their name because of how much I now despise them, but let me say that I will never use beyond XX6 because I will not be extorted monthly for my own creative property.

Anyhow, here is my advice to make the image even better. For me removing the old background is just the first half of the problem. For me the secret to the second half is getting the subject (knife) to look like it is part of the new background and not cut and pasted. There is nothing that does this quicker than to show that the subject is affecting the back ground in some way, this immediately fools the human brain into believing the entire image is real. The easiest way to do this is with shadow. You can do this in one of several ways but this is the easiest of the one I use-

While the knife is a cutout, create a duplicate of it in black silhouette then slip it behind the subject and enlarge it to the size of your desired shadow, remembering that larger and morse diffuse shadows manes the knife is farther away from the background and smaller, refined shadows put the knife closer to the background. I always offset the shadow to show more on the bottom, because if it is evenly centered behind the knife our minds tend to more easily reject it as legitimate. Next, I apply a heavy blurring filter to the silhouette to diffuse if from a silhouette to a shadow, and then lower its opacity until the background shows through, pulling everything together.

The final touch up is to very lightly blur the pixels along the edges of the subject. If you look at a real image very closely, nothing has clean cut edges, they always interact with the background lighting on some level (hence the struggle with the green spill over). By blurring the edges a couple of pixels in you create that natural interaction with the background, making the image as realistic as possible.

Now, one final bit of good news for those editing videos. That unmentioned company also make a video editor that they use to extort those who were loyal who believe they have no choice. I want to say the answer is here! Check out Black Magic’s Davinci Resolve! I have been using 16 for a while now and it was more than a match for that other company, and you can get it for FREE! But Davinci Resolve 17 was just released and it has blown my mind, in fact it hands down blows that other companies video editor out of the water! And the best part- if you want to take your video work to Hollywood level for about the price of one of your modest custom hunting knives you can own the Studio version FOREVER. Video green screen can be touchier than photo work because the subject continually moves. If you have software that takes a single point sample at a time it can be tedious to get the right balance. In Davinci Resolve you take a swipe across the background and it compensates for the range to give you instant background removal. The first time I did that I said “WOW!” and was in love.
Hey Kevin, this is going to be extremely helpful . I know o can do it . I just need advice like this. Thank you. Of course I also have to work on getting the clearest picture possible. I have a Canon 80 D and a few lenses. Macro and others. Thanks again for the help. The. Shadow idea is brilliant. I understand the theory behind it now. That is definitely something I am missing and will try it. Especially on a lighter background like JW suggested .
 
Last edited:
The back ground is too dark, IMO. What about a tan or lighter background?
I’ll try that too. I chose dark because there was a bit of a shadow still left on the image that blended nicely into the dark background. So that’s cheating a little. Lol
 
What are you trying to accomplish? Why a green screen?
It’s just something I’m trying out. I have seen some amazing knife photos on websites that have been taken by professional
Photographers using green screen. Usually charging up to 200 an image. I am building a website and don’t want to publish it until I perfect my images. I also want all my image backgrounds to be consistent in the shop section. That can be accomplished with green screen technology.
 
By the way, if anybody does their own photography to submit to the publications this background removal stuff can be VERY important. I have submitted a lot of images over the years and just wrote a feature article for Knives 2021. If you flip through that book, and its predecessors for the last five years, or more, you will notice that the are no backgrounds. I personally despise this trend, but it is reality that all your creative efforts on tasteful and artistic backgrounds are completely a waste of time for the knife publications, as they will cut them out anyhow.

But here is the question- do you want that underling at the publisher who has fifty other knife photos to butcher today in order to meet the deadline, to do the job? Or would you prefer to do it yourself while taking the time and care that you will with your own work? Moreover, if you shoot the image from the start with background removal in mind, the subject (the knife itself) can be made to look as good as possible in a standalone situation.

Because of all this, I believe that approaching the process with background removal to be advantageous in the digital age. What I now do is submit a couple of versions of the image, but one will be a tiff (usable by both PC and MAC) where I have dropped the cut out subject onto a pure white background with no working of the edges. This will allow even a complete neophyte with that magic want tool to lock onto my knife, as I determined, with one click. It is easier for them, and is safer for me.

The other advantage is in internet work and other distribution. It is generally a bad idea to submit or recycle the same tired images and, before the trend of cutting out the backgrounds, all the knife publications would tell you that they would prefer images that had not been published elsewhere. By saving work in tiff with no background, you have a high quality image that can be quickly dropped in front of any background and thus get a couple more uses out of it on the internet in what appears to be a new image.
 
I have one final thing before leaving the soapbox, but I feel it is a very important message. Please, please , please keep an archive of at least one very high resolution image of each of your knives that you would care to have remembered!

Until recently, I wouldn’t have given this a second thought, but the age of Instagram is relegating a lot of talented makers to obscurity to be forgotten in a couple of years. When I was writing the article for Knives 2021, there were certain new makers and older legends in our business that I wanted to include but couldn’t because they had no images above common internet resolutions, and the publisher must have better than that to work with.

I had legends in this business who had not kept digital copies of older prints when they gave all they had to publishers, images that are now gone, except in grainy old publications. And I had very talented new makers who had nothing of their own, that they didn’t crudely snap with their phone, for a quick social media post. I couldn’t believe the number of makers who got professional photography done and never got, or kept, a high-resolution copy. If it was too big for Facebook or Instagram, they felt they didn’t need it. Some assumed the photographers would archive these images for them, but sadly that was not always the case.

I am very sorry to say that there were some incredible makers that I wanted very badly in that article, but when I asked for useable images, they ether didn’t have them, or it would have taken too long to track a copy down. So please keep high resolution images of any work that you want to be remembered for. Yes- images that are too big for social media posts, are needed. They are your master copies that can be worked with in editors for future publication, and you can always knock off a low resolution copy in about 30 seconds for internet work, but you will have the good one when you need it.
 
Just to add to what Kevin presented about video editors..... I totally agree that Resolve is the top choice for a free editor with awesome functionality and features. A couple others with less of a learning curve are Wondershare's Filmora9 (you can get it free via torrent), and one that is less heard of, but is awfully close to Resolve.... Shotcut. I use all three of these video editors..... each for different reasons. For quick and easy, I go with Filmora9. For tutorial type videos, I prefer Resolve, mainly because it has above average voice over capabilities. And for when I need a lot of "extras" Shotcut is what I use.

A couple of simple softwares that are one click type photo editors.... Photomizer3, and Simply Great Pictures 5. Both are purchased software, but the price is right for what they do. Again.... these can both be free via torrents. Just sayin.
 
Back
Top