Basketweave stamp problems

P J 234

Well-Known Member
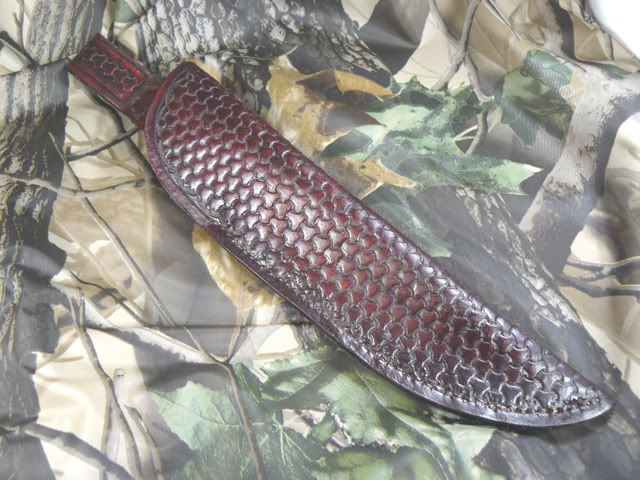
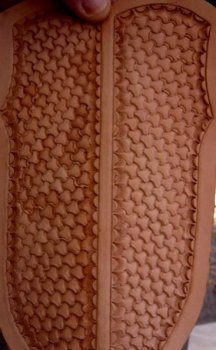
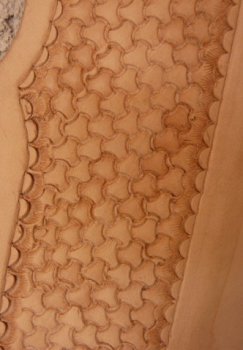
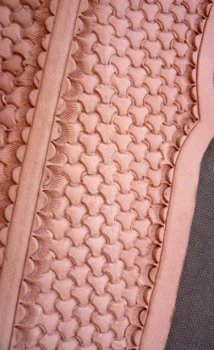
I'm having trouble keeping my basketweave stamping aligned properly and I'm not sure what I'm doing wrong. Can anyone help troubleshoot by looking at these photos?

The leather is Wickett & Craig 7/8 oz shoulder, which seems to take the tooling much differently than the Tandy (leather) that I had before. The left side was done first, and it was probably too wet which could be at least part of the problem. I also made the impressions nice and deep, and this gave me problems trying to line up the stamp in the previous mark because of the differences in height between stamped and unstamped areas (if that makes sense.)

The right side was allowed to dry to a more properly 'cased' condition before stamping, and I also first went over it lightly to try to keep everything straight and aligned, but when I went back over it the second time to make the impressions deeper, I had the same problems with overlapping and/or underlapping (is that a word???) impressions.

One more thing is the border camoflage stamp...some of the half circle portions of the stamp have a line or cut in them. Is the stamp perhaps bouncing and causing this to happen?

I'd appreciate and value anyone's suggestions on what I may be doing wrong!
 

Attachments

  • P1020178.jpg
    P1020178.jpg
    34.6 KB · Views: 169
  • P1020168.JPG
    P1020168.JPG
    82.1 KB · Views: 159
  • P1020177.jpg
    P1020177.jpg
    47 KB · Views: 164
Last edited by a moderator:
I just watched the duayne Duchane video because im trying to learn the basket weave better. Your alingment starts with your first row and your depth should be the smae everywhere, you need the leather damp not wet. Duayne say when its almost back to its original color its ready to stamp. If it drys out to much lightly dampen a sponge or rag and keep going but if you wet it too much you have to wait. I can see where the leather is sqwishing out sorts speak from between stamongs marks. If you can get a copy of that video its worth it he is really good....
 
Last edited by a moderator:
...

Kelly, I have the Chuck Burrows DVD but have not seen the one you mention. I do think the leather was too wet for sure on the first side, but I also think it was a problem with alignment. I first drew a straight line (probably faintly visible in one of the pics), and stamped that row first. The stayed pretty straight, but when I started doing the adjacent rows and tried to match them to the first is when I had trouble. They either seemed to overlap or 'under'lap, and it was very hard to 'feel' the stamp matching up to the part already stamped.

Thanks for the help!
 
Last edited by a moderator:
He says that in the video that once you lay your first row down it gets easier unless you stamp to deep then youll have problems....I will say this that some of the stuff ive got is better than anything out their and in Can ada they are rated really high on the list. Ihave got stamps and tools that busted because of me I mention it and they send me new ones and allow me free shipping because of the problem. I normally buy double shoulders and tell them to pick me out a good one and they do now after getting a few bad pieces. I have the chuck burrows volume1 and 2 its actually one of the first sheaths he does is the basket weave. kellyw
 
Last edited by a moderator:
Gosh, I certainly did not intend to engage in 'brand bashing' with my comment about the Tandy leather. I was just trying to convey that the quality of the piece I had from them seemed to be lacking in most ways as compared to the new material that I was working with and therefore seemed to work and take tooling much differently. I will try to be much more cautious about how I word things in the future, and I will edit my original post of that wording if you wish.

No worries P J, its just something we have to nip in the bud before someone gets their dander up and goes on a crusade. :p

Its darn near impossible to convey true feelings in the written word, and the opposite, read very very easy, to convey everything but what you intended. Believe me, I've been there plenty times over my years on the boards, heck, even before there were boards. [Insert appropriate "old timer" joke here] :)
 
I see several problems, but the casing problem has been already stated.Damp and cool to the touch only, too wet and your in trouble, too dry and your impressions will be too light.Use more than one guide line until you get proficient,it will definately help, and PRACTICE,PRACTICE, PRACTICE.

I suspect the marks you are seeing are fingernail marks as you are stamping, especially since they are intermintent.believe it or not common problem.Dave:)
 
Thought the same thing about about fingernails. I do it all the time and never remember to be careful. This has been a helpful thread for me.
 
Hmm, I'll have to think about the fingernail thing. I (try to) play guitar, so I have very short nails on my stamp-holding hand and longer (some would say creepy long) ones on my hammer hand. I'll have to check my technique to see if I'm doing that somehow.

Thanks!
 
I stamped a sheath once never noticed till I was done and my baby finger nail left nasty marks all over the sheath lol
 
I think most points have already been covered.
I did a sheath with that pattern and found that I had to put a mark on the handle of the stamp (where I put my thumb) making sure that I always used the stamp the same way.
I didn't do that when I first tried and found that the stamp couldn't have been exactly symetrical and the pattern didn't match exactly

Aldi029.jpg


Chris:)
 
I did that too chris its so hard to keep them square so I flattened one side square . I cant believe I never mentioned that cuzz that is so important. kellyw
 
One thing no one mentioned is to use a slicker on your leather before you lay out the sheath. It compresses the leather and it will move less during stamping and give you a cleaner more uniform impression. If you need pics of a couple types of slickers I can get one on photobucket maybe. (not to good with this new computer)

1st post here. not much of a bladesmith but I make my livin stamping leather.
 
I have an 'edge slicker', but I'm pretty sure that's not what you are talking about here. If you had a pic handy, I would love to see it.

Thanks for the suggestions!
 
I slicked the right side of this scrap of 12 oz skirting, then stamped both sides. The right side is compressed to about 10oz after the slicking. It is firmer than the left side and the stamping a hair sharper.
The leather is outta the butt, so both sides are pretty crisp. I didn't have a shoulder scrap, it would be a bit mushy and the difference might have shown up better in the picture.
You use the slickers when the leather is wetter than it should be to stamp, pushing at about a 45 degree angle. It compresses the top grain and it takes a stamp better.
After slicking you let it dry all the way and re case or lay your project out and stamp it when it drys to perfect case for stamping.

One of the slickers is heavy glass, the other is Ligminvite ( miss spelled I'm sure)
saddle007.jpg

saddle009.jpg
 
Doug, I was hoping it would show in the picture, the leather is a hair darker on the slicked side. I did give it a light coat of neatsfoot oil hoping it would show up better.
 
Roughcountry, beautiful work there and thanks so much for the pictures! I have not seen or heard of a slicker like that before but I think I grasp the concept of what it does.

I am a little confused on one point though...do you use this tool every time you tool the leather, or just when it's too wet, or ...?

Thanks again for the help and the pics!
 
P J I don't use the slicker on big peices like saddle seats, but use it on most all small projects and especialy on things that have to fit exactly. Stamping will swell the leather and slicking it will cut down on that. Special projects that require the best grade of stamping will get slicker treatment. Also some of the best leather in a side will not need slicker treatment because it's allready real firm ( the butt and a foot deep strip right up the backbone about to the halfway point)

Bigger stamping projects that can't swell at all because of fit get contact paper on the flesh side before stamping. Small items like sheaths you can use shipping tape on the flesh side. Use it just prior to staming and peel it off just after.

You want the leather to be a little wetter than when you stamp when you slick it and the moisture should be clear thru the leather for best results. Then lay it on your bench untill it dryes to perfect stamping case. ( it's called casing the leather when you get the moisture right for stamping)
You can play with scrap to find what perfect case is for krisp stamp impressions.
It will also brown when the moisture is good.

Different tannery's leather take some playing with to find the perfect case for stamping. Hope this helps. Robin
 
Back
Top