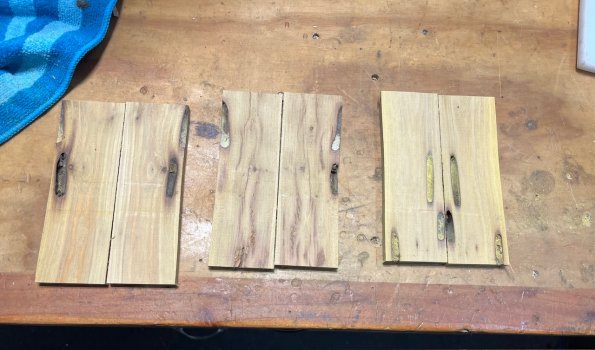
I processed some Osage Orange logs today into scales from a fence post that was cut about 20 years ago. It at 8% moisture and I have a lot more to process still and guessing I will have several hundred sets of scales when done. There are quite a few worm holes in some of it and need some advice filling them. I was thinking of tinting some epoxy brown or layering it with brown CA glue. Best CA glue for that? Any other options out there? Can i tint my regular g-flex or would a different epoxy work better? Thanks for any insight!
You are using an out of date browser. It may not display this or other websites correctly.
You should upgrade or use an alternative browser.
You should upgrade or use an alternative browser.
Filling worm holes in Osage Orange
- Thread starter Pn8hall
- Start date
Chris Railey
Well-Known Member
I have used black-dyed regular epoxy to fill grub holes just like those in Walnut. It worked fine for me, although I have found that some epoxies only cure to a hard rubber consistency which was really hard to shine up when doing finish work. If I were going to do some more, I would use casting resin and not be afraid to dye it like ocean blue or fluorescent green and not just brown. If the grub hole is in the right place it could make a good highlight for the handle. Just do not cut your raw scales too thin for your end use. Remember, you will have to sand the resin flat when it is cured in most cases. It also goes without saying but make sure to clean out any loose material in the larger grub holes before filling.
opaul
Well-Known Member
I didn’t see the long bore holes. Yeah - that’s going to require some work. I was thinking pin holes.I have used black-dyed regular epoxy to fill grub holes just like those in Walnut. It worked fine for me, although I have found that some epoxies only cure to a hard rubber consistency which was really hard to shine up when doing finish work. If I were going to do some more, I would use casting resin and not be afraid to dye it like ocean blue or fluorescent green and not just brown. If the grub hole is in the right place it could make a good highlight for the handle. Just do not cut your raw scales too thin for your end use. Remember, you will have to sand the resin flat when it is cured in most cases. It also goes without saying but make sure to clean out any loose material in the larger grub holes before filling.
In the first image, the right most scale the grub worm holes show up nicely. I've got lots of spalted pecan the same way. After I stabilized the grub worm is pretty solid and polishes up pretty good. Osage Orange isn't going to need stabilizing, so test one scale by soaking with a good thin CA glue and see how that turns out.

Thanks guys. Gonna take some work for sure but I think it will turn out great when done since I will have hundreds of these. Not all will have worm holes but still gonna take some effort. And yes some of the holes are quite long. The casting resin tinted green or blue is a great idea and could really make some of them pop for sure.
chrisstaniar
Well-Known Member
If you do test out epoxys, add as little colorant to the epoxy as possible. Too much and it may not harden properly and it will be "rubbery" as Chris described above.
I've had more trouble with the liquid colorants. The powdered ones or using really fine saw dust from the same wood doesn't seem to get "rubbery"
I've had more trouble with the liquid colorants. The powdered ones or using really fine saw dust from the same wood doesn't seem to get "rubbery"
Oldnretired
Well-Known Member
I've only used the powered pigments and fine sawdust/bone dust etc. and have never had any problems. I am careful to not add anymore than needed for the effect desired. If using sawdust I dry it in the oven at the lowest setting on a low humidity day for awhile and use it as soon as it cools enough. Probably being too anal about it though. I once did alot of woodwork and watching the humidity levels is just second nature for me.If you do test out epoxys, add as little colorant to the epoxy as possible. Too much and it may not harden properly and it will be "rubbery" as Chris described above.
I've had more trouble with the liquid colorants. The powdered ones or using really fine saw dust from the same wood doesn't seem to get "rubbery"
Chris Railey
Well-Known Member
The last time I cut rough-sawn wood into scales, I cut several of the actual grubs on my bandsaw because I could not see them. After a few of them, it makes a bit of a sticky mess.
I will probably sell some once I get them all cut up and inspected. I will reach out when I get further along.Unless they are huge which I can’t tell I’d leave as is. Let me know if you are selling any.
Oldnretired
Well-Known Member
I like the powered pigment from K&G. I use their epoxy as well. I mainly use the black powder, a little goes a long way and it doesn't seem to affect cure time or strength much, at least in my experience with it.What brand of the powdered pigment do you guys like?
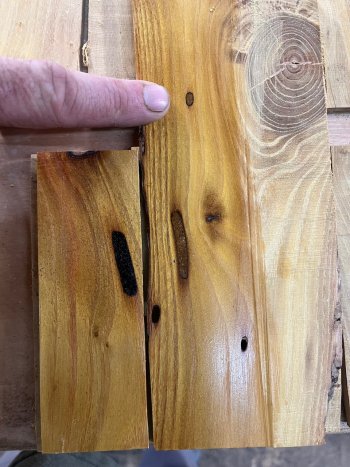
Thx I will look into it. I did a small test today with tinted epoxy and sawdust & CA glue. I used 5 min epoxy so the air bubbles show thru and would use a diiferent slow cure one if I go that route. Gonna order some different colors and play around with it. I think either option could be very serviceable. Left side is epoxy and right is sawdust. I did both the long tunnels and 1 small hole on right that I am pointing at. Has 1 coat of Tru-oil on it and only sanded to 220.I like the powered pigment from K&G. I use their epoxy as well. I mainly use the black powder, a little goes a long way and it doesn't seem to affect cure time or strength much, at least in my experience with it.
Attachments
They probably make pigment out of grubs....or epoxy...or chewing gum or red jello.The last time I cut rough-sawn wood into scales, I cut several of the actual grubs on my bandsaw because I could not see them. After a few of them, it makes a bit of a sticky mess.
Those are pretty.I processed some Osage Orange logs today into scales from a fence post that was cut about 20 years ago. It at 8% moisture and I have a lot more to process still and guessing I will have several hundred sets of scales when done. There are quite a few worm holes in some of it and need some advice filling them. I was thinking of tinting some epoxy brown or layering it with brown CA glue. Best CA glue for that? Any other options out there? Can i tint my regular g-flex or would a different epoxy work better? Thanks for any insight!
I think you've found a solution - I sorta like the left scale better, but both work. Just adds character to the scale. I think the finer filler is better (for me), rather than sawdust, perhaps sanding dust for a finer grain?Thx I will look into it. I did a small test today with tinted epoxy and sawdust & CA glue. I used 5 min epoxy so the air bubbles show thru and would use a diiferent slow cure one if I go that route. Gonna order some different colors and play around with it. I think either option could be very serviceable. Left side is epoxy and right is sawdust. I did both the long tunnels and 1 small hole on right that I am pointing at. Has 1 coat of Tru-oil on it and only sanded to 220.
Yeah i think I like the epoxy better as well especially for the longer holes. Gonna try some fine sanding dust as well still though. This round was done with sawdust from bandsaw and was pretty fine but i know sanding dust will be finer for sure.I think you've found a solution - I sorta like the left scale better, but both work. Just adds character to the scale. I think the finer filler is better (for me), rather than sawdust, perhaps sanding dust for a finer grain?
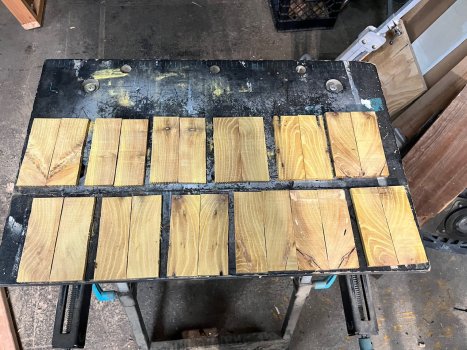
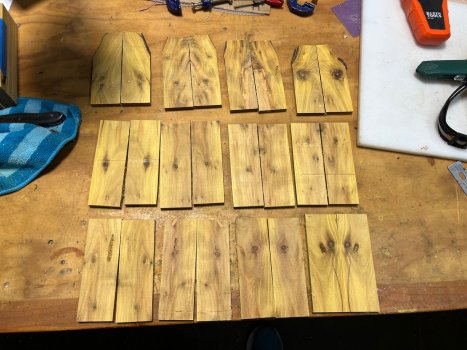
So far I have 56 sets of scales at 5/16” x 1 3/4” x 5” with some a little longer than 5”. Not quite as many worm holes to fill once I got to the meat of the log. This is all from 1 section of log about 5” round and 32” long. Some of them have awesome patterns.
Attachments

chrisstaniar
Well-Known Member
The finer the better as it changes the color of the epoxy rather than just looking "grainy" with the bigger chunks. I'll take a piece of scrap and grind it down on my 4x36 sander with 120 or greater grit. Then gather up the dust that I just sanded off and mix it in. It will tend to be darker as the normal color of the epoxy will darken it. Or maybe consider keeping it clear and it's just a unique piece?Yeah i think I like the epoxy better as well especially for the longer holes. Gonna try some fine sanding dust as well still though. This round was done with sawdust from bandsaw and was pretty fine but i know sanding dust will be finer for sure.
The sawdust method works great for patching voids in burls, when gluing pins to minimize the "glue line" around a pin, or between accents.