Forge building questions

wall e

Well-Known Member
I came into posession of a defunct 15 gal air compressor and decided to cut one end off and look at building a forge from it.
The dillema is the 11.5" dia and the 30" length are making this newb scratch his head and ponder cutting it down and or cut a door in the other end of it.
I do know its going to require 35" of 1" thick kaowool and atleast a bag of satanite to seal it. Three burners to heat it about 7"apart roughly Im guessing?
If any one with the firey wizardry knowledge could shed a bit more light on this feat I would greatly appreciate it.

My plan for this forge is to be able to ht and forge blades and learn to forge weld as well.
Thanks in advance
 
I think you would be ok with 2 burners. 2 layers of kaowool is better, but 1 will do. If you plan on forge welding you may want to fabricate a disposable pan of some sort in the bottom. Borax is hard on the forge. Kerosene isn't. Depends on the flux you decide to use
 
Wayne I will check the tutorial out now and definitely get in touch with you if I have questions.
Thank you both.
 
In my experiece, a forge body of about 18" is the most you can get away with using a single burner... especially if you wish to use to for forge welding. My advice would be to cut a 16-18" piece out of it, and use that for your forge body. Personally I would use firebricks on each end..... "doors" on a forge are simply a pain. In order for a forge to run well, its got to "breathe". If you use a "door" that closes tightly, it always causes issue.
 
Personally I would run a Ribbon Burner It might take a little more time to build your forge, but you will get the heat you want from a single 6-8 inch blown Ribbon Burner. If you use Facebook there is a pretty complete set of postings on building the ribbon burner and the forge in this group: Blacksmith Forges, Gas, Coal, and Alternative Fuel Forges. Here's the direct link, it's a closed group so you may be asked to join:

https://www.facebook.com/groups/345550495601819/search/?query=Ribbon Burner
 
I would recommend coating the Inswool with a castable refractory rather than Satanite. Satanite is a mortar and it doesn't hold up well to pointy things. You'll be poking through it all the time and having to patch frequently. Also something like Mizzou refractory stands up to borax flux a lot better.

Doug
 
Thanks Rome, will join the group to find out more info.
Doug, whats the price difference between the two?
 
Satanite might be a little cheaper but Mizzou is not expensive. Go to Wayne Coe's web site or to High Temperature Tools and Refractory and take a look. I know that the latter can split it into smaller bags and ship it in flat rate boxes. I imagine that Wayne can do the same but I've never been to his site.

Doug
 
For HT and welding, you really need separate forges.

I have built forges that will cope with all 3: HT, forging and welding, but only did so to see if it could be done economically. I don't really think it is economic, as I can build a better HT/forging forge and a better welding/forging forge for the same cost in time and materials.

HT needs a very large chamber to be held at a very even, finely-adjustable, temperature. Welding needs a much smaller workspace at a much higher temperature, with even heating more of a "nice to have" than essential.

The most important part of an HT forge is the burner. Do some research and bear in mind that HT needs almost the opposite burner chacteristics to welding.
 
I built mine with an old propane bottle that measured about 18" high by 12" diameter. I used two layers of kaowool, sealed with two coats of Metri-Kote. I laid firebrick in the bottom on top of the Kao-wool to protect against flux-drops. I have had to touch up the Metrikote in a couple of spots. You don't want to run the forge with no coating over the Kaowool because it will give off fibers that are very dangerous to breathe. The Metri-kote also helps build heat. From what I read, you should invest in a couple of pairs of UV bocking glasses- their pretty cheap. I built two burners- venturi-type from ideas/designs I gleaned from forums, etc. WayneCoe was very helpful and I think I got my firebrick, metri-kote and Kaowool from him. I left most of the front open and cut a vent hole in the back end. I had to enlarge the back hole due to excessive flame out the front. I'm very pleased with it, for what I do. I've forged knives, heat-treated, and welded with what I thought were good results. I had thought in the beginning I would be able to just run one burner if I wanted, but learned quickly that it would overheat the idle burner due to heat escaping up through it. So, I didn't try that anymore. Good luck with it Walt, if you go forward with it, I'm sure the guys here will guide you through the project. And, I found Wayne Coe to be very helpful. Go for it!
 
Thanks fellas, I do know from the reading and research so far that the kaowool is fiberglass and thats some bad stuff. Did hvac for 4 yrs and dealt with it on a daily basis. I have a set of cutting goggles I scored for .25 at a garage sale that were never used. my neighbor is checking on getting me some firebrick from his work this weekend. If it works out I may be able to use the bricks and fill the gaps w wool mabbe? If I split the tank into two seperate forges can make one for each procedure.
 
Heres my idea for the way it will sit minus the burner and tinware in the dragonsbreath zone. Old bbq base w wheels so can move the forge and store the bottle underneath when not in use.
uploadfromtaptalk1434828770663.jpg
 
Thanks fellas, I do know from the reading and research so far that the kaowool is fiberglass and thats some bad stuff. Did hvac for 4 yrs and dealt with it on a daily basis. I have a set of cutting goggles I scored for .25 at a garage sale that were never used.  my neighbor is checking on getting me some firebrick from his work this weekend. If it works out I may be able to use the bricks and fill the gaps w wool mabbe? If I split the tank into two seperate forges can make one for each procedure. 

Kwool is even nastier than regular fiberglass ever thought of being, one because of the stuff that makes it fire resistant. And two the fibers float when installing, and unless sealed will continue to float when it is heated. Once it has seen a firing or two you will not see the fibers but they will find there way into the air and your lungs and once breathed almost impossible to expel as the attach to the lining of the lung. The heat makes them expel from the Kwool every used. Use a mask or the best step, a respirator when installing and I have no recommendation I feel safe to recommend to those who do not seal when using it to line a forge. if you do not coat and decide to use that way, get you a nice life insurance policy, cause its not if but when! I see pics on these sites all the time of forges with unsealed Kwool and other such products. Some will say well the forge itself is lined, what you are seeing is a little I stuffed in at the opening.
I don't care if it is exposed to the heat the fiber are becoming air born, seal over it with some kind of heat resistant material!!!!!I know of several knife makers who have had lung surgery do to inhaling contaminants when knife making! This not confined to Kwool, steel grindings and dust from knife handles are just as bad in some ways. You only have one set of lungs and taking care of them is not a secondary thought!
 
Heres my idea for the way it will sit minus the burner and tinware in the dragonsbreath zone. Old bbq base w wheels so can move the forge and store the bottle underneath when not in use.
View attachment 55491

Wall e will say not a bad idea.
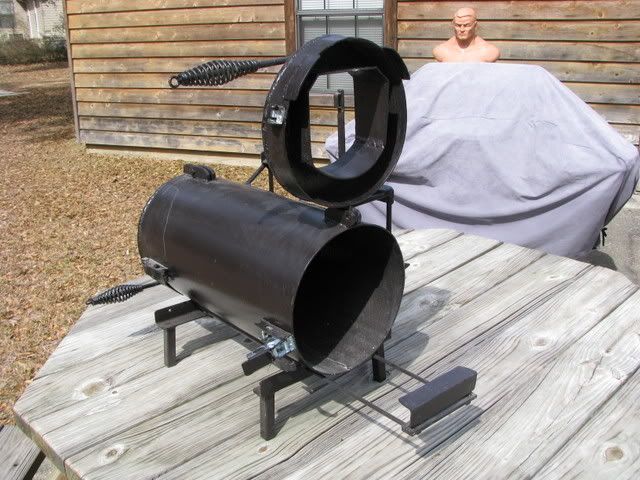
Here is one I built!

Grindercart003.jpg


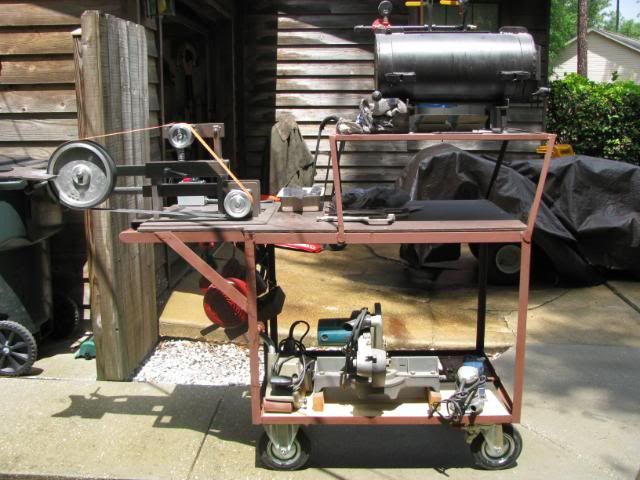
It is a similar setup so will give a couple of recommendations! Once lined with two layer of Kwool and santite, it gets very heavy! I have a lower back fussion years ago so everything in my shop is on wheels for easy movement! I had mine just setting on the top of the cart, (my thought was it so heavy why mount it) bad idea! I rolled the forge out of the shop to use one day and something was laying on the drive way and I failed to see it. The cart rolls very easily the way I designed it! It rolled over whatever was laying on the driveway which rocked the cart, I was able to catch the cart from going over but, the forge rocked over on that side as well. As you can guess the forge came off of the tops since it wasn't mounted down! It crashed to the concrete breaking up the coating inside as well some of the fittings. It is now mounted to the cart and I put several heavy tools at the bottom on the cart as well now i store all my steel down on the bottom which counter balances the load! You will need enough weight at the bottom to counter the weight of the completed forge, (for reasons now obvious to me) LOL

This forge has been re-worked several times as my needs have changed! As you can see in the top pick both ends were hinged at the top and big suitcase type catch holds them shut. The hinged ends allow for the chamber to be more accessible for initial build and repair/ inspection! The ends have two layers of Kwool and are coated as well.
My thoughts behind the hinged ends was in case this I now have a use-able 20" chamber, in the middle, without opening the other end. I figured I can flip the one end up and contain the heat with a stack of firebrick if necessary at the other end. The other end has a gate which can be lowered if I need to contain the heat more, under normal use the smaller the opening the quicker the forge gets up too heat!!
If you are thinking of down the road longer knives or swords the hinged end is defiantly the way to go. For that matter a long chamber is nice but as Ed said you will probably need two burners.

Another thing I have seen done is on longer chamber, a fellow maker made a plate that is the correct size for his chamber and it can be slid in and out thru the raised in. In effect when you only need a short chamber you can slide it in the chamber and use only one burner. Don't have a pic but think plate turned on its side with a bottom leg that will keep it from turning over. You can slide it inside the chamber and make the chamber any length you want! Of course it will not seal tight but it does reduce the heat loss at that point inside the chamber.

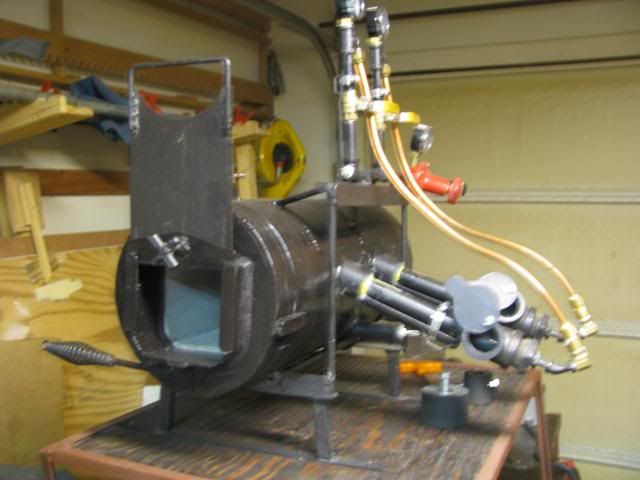
Here is a pic of that gate. The plumbing has all been reworked in the latest version of my forge. Ed Caffery is the one who suggest the up-turned angle of the burners, one to eliminate a hot spot on the material and two to create a vortex, and it works well!

I kind of consider a forge a work in progress! I put a material support on this forge when building it. You can see it in this pic of when I first started my build.

IMG_0612.jpg


Then reworked it so I could adjust the height, something that can be necessary for weird situations concerning the material you are heating. Normally it lines up with the fire brick i used in the bottom for welding but shortly after I began using the forge I had a piece that was thicker that the part in the heat, so to get it to lay flat in the forge I had to have some height adjustment as well built into the material support! It also slides in and out of two tubes welded into the framework for adjustment on how far out I need the support!

forge004.jpg


So as I said this has been a work in progress. Most will tell you there is always something that I wish I had done differently and I as well. I have gone back and changed some of the things since the initial build and some were necessary to do after the accident when it came off the cart. Live and learn!!!!

Good luck with your build a forge is a fun item that lends itself to pushing you into new areas of knife building!! One of the things that helped me the most was advice from other builders as well as looking at pics and deciding, "hey that is a good feature I want on mine!

I am having PC troubles today so had to go back and include a photo that didn't post. Feel free to ask myself and the others if there is anything that is on your mind! Don't consider my info to more important than other but don't mind sharing!!
 
Last edited:
Thanks C Craft,
I had no intention of ever firing the forge uncoated. I am planning on either two venturies or one 12" ribbon and blower. Wayne is a firm believer in the ribbon burner being better.
My issue as well as most hobbyists is what I can afford.
At the moment in my town there is a fire closure of mowers weed eaters at 12pm. So cutting steel is a no go.
 
Back
Top