Little help with an inlay

Meridian Blades

Moderator - Knife Maker
Whats the best way to get nice clean solid edges on the "windows" for the inlay on a sheath? Sandpaper? Needle files? I was thinking that gum tragacanth would work to smooth it once it was cleaned up a bit?

What say you ??? Thanks Larry

inlay001.jpg


inlay002.jpg
 
I´d say a clean cut if you asked me.
Plus proper use of an edge cutter (not sure that is the correct term ? )
 
Is there a tool for cutting a cleaner edge? If there was something like a mat cutter for leather, that would be great, but I don't know what that would be...

Thanks Larry
 
I would suggest slightly damping the leather before you cut it. You can use one of the small replaceable knife cutters with a hooked blade to make sure you get in the corners better.
 
Mike if the leather is cut when its wet it will leave a cleaner edge? I used an exacto knife to cut out the squares the first time, but as you can see the edges / corners are a little ragged.

I left these small cuz I figured they might need to be trimmed and cleaned up a bit.

Thanks Larry
 
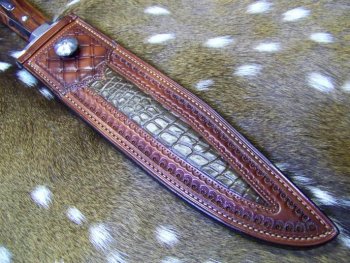
Most of this I will cover when I do my tutorial, so you'll have to read it twice.For starters, I do all my marking on the flesh side of the leather and if you do any marking on the grain side use a red pen and press lightly, the darker dyes will cover it right up.I first design the "windows" on a piece of manila folder.I then cut out the template using a single edge razor blade and #11 blade in an X-acto.Using the red pen I transfer the "window" to the flesh side, and cut out window using the razor blade.I do not cut all the way to the corners.When all sides have been cut, I carefully use the #11 blade to cut to the corners.This is all done dry.After cutting trim up any spots you may have missed and if necessary use a little sandpaper or file to clean it up.I then dampen the inside edge and burnish with various sizes of antler tips(a bone folder, small round wood paint brush handles,etc. will work also)till the edge is smooth and hard.At this point I dye just the inside edge( this keeps the chances of getting dye on your inlay to a minimum).I also at this time use dividers to mark my stitch lines using the inside edge.Hope this helps and if you need anything just let me know.Dave2thumbs
 
Sandy Morrissey taught me this one.
To cut leather, use a plain old utility knife. A fixed one is better but I use a retractable. Sharpen the blade with a convex edge to razor sharp using your grinder. Give it a good polish and then buff it up. It will just glide through leather and give you a very nice, clean cut.
 
I think with it damp, you compress the fibers as you cut it to help it look cleaner. You can slightly dampen after the cuts and use saddle soap in the cuts and rub with a hard material to smooth it up.
 
I use a 15 ton leather clicker. to cut my leather, the only problem is that you have to have dies made for ever thing you cut...but it cuts real nice....
 
Thanks guys

Wow,
Thanks guys. I'm glad I stopped and asked, and at worst all that will be lost is that top piece, and the other practice pieces until I get it clean. I'm looking forward to seeing your tutorial Dave, thanks for the help everyone.

I dunno if any of you have ever cut matting for picture frames, but if you could do a beveled edge that was smooth like that, it would be sweet. Hmmm new jig?

Thanks Larry
 
Larry,
I'm pretty sure JJS is refering to an "Edge Beveler". It's a neat little tool that will put a nice beveled edge on the top of the cut leather. As others mentioned a good straight cut is essential for good looks.

As far as the rough or fuzzy looking edge goes that is just the nature of leather. As Dave said wetting and burnishing will take care of that. I just wanted to add that I have burnished before and my edge got just a little fuzzy again after drying. Burnishing again would have solved the problem so you may want to let your burnished edges dry before beginning final assembly.

-Josh
 
Thanks Josh,
I will keep that in mind before final assembly. I keep going back and forth if a beveled edge would be better or just a straight edge. Trial and error for me on this one. Thanks for the tips...

Larry
 
Larry,
IMO the edge beveler is quick easy and ensures a nice even bevel, however the exact same effect can be created while burnishing. Begin by burnishing flat against the edge and as you go slowly roll your burnishing tool over the top edge while continuing to burnish. Going this route you can get from very little "Roll over" to alot depending on how far you roll the tool over the top edge.

Use your burnishing tool rapidly back and forth with some decent pressure like your trying to build up friction heat on the edge and you'll be just fine.

Don't forget to let us know how it goes.

-Josh
 
Here's a technique for you guys to chew on. I have a splitter, but I also buy 2/3 oz. leather that exactly matches the 7/8 oz. leather I regularly use in my sheaths.

The sheath in the picture below is several layers of leather counting the front, Chevron, welt and back. The chevron and the sheath top layer front are 2/3 oz. the window cuts out VERY easily with a nr.1 Exacto with a nr.11 blade. Very neat and crisp because the leather is so light. Also the edges of the window are so nice and thin that the discussion about how to smooth them is a non issue because you don't have to.

Top to bottom: 2/3 oz. top layer chevron on top of that. then 7 oz. top sub layer, then welt, then 7 oz. bottom or back piece.
I did not address the lining that goes into all my sheaths here because so many of you do not line your work which is okay too.

A picture could be worth a thousand words at this point, so: Click the thumbnail to get it big enough to see!
 

Attachments

  • 100_1309.jpg
    100_1309.jpg
    100.9 KB · Views: 34
Last edited:
I have been drilling a small hole at each corner of the top piece and then cutting from hole to hole for the cutouts. Don't know if this is the right way to do it but it has helped me to get better, straight corners.
 
Back
Top