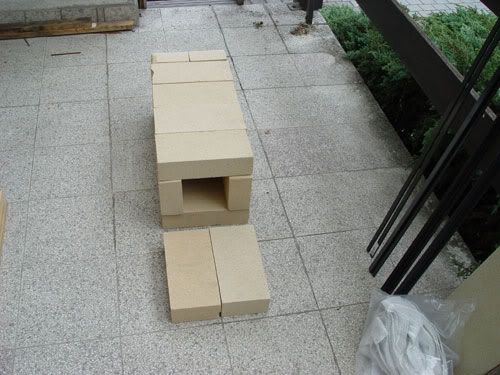
I recently got into cooking knives and my older HT oven was too small, so I did build a bigger one.
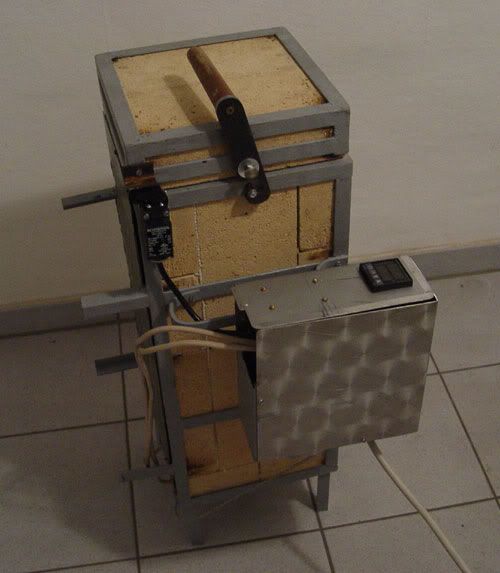
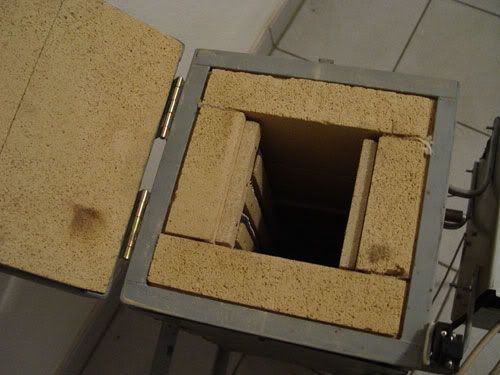
Not the prettiest of sorts and still missing the outer shell ,but works excellent.
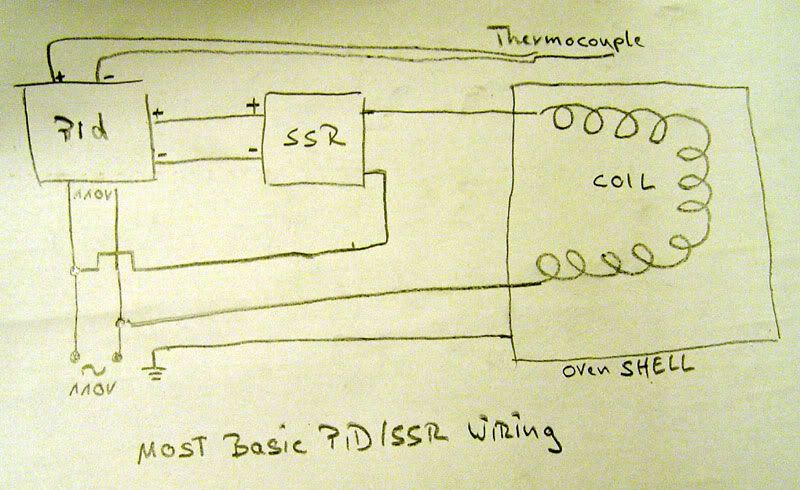
Some Data: Interior 50cmx12cmx12cm (approx 19,7`x4,7`x4,7` sorry I am a metric guy") ) up to 800°C (1475 F) in 15 min, up to 1100°C (2000 F) in 35 min. 2300 Watts element from 1,3mm Kanthal A1 resistance wire. Initially I wanted to use a stronger one but I finally settled at 2300W. Regulated with programmable PID+SSR and relais + door contact switch for safety reasons. It was made using a minimum of tools and was fairly easy to construct. Can be used horizontal and vertical for hanging longer or thinner blades to minimize warp.
) up to 800°C (1475 F) in 15 min, up to 1100°C (2000 F) in 35 min. 2300 Watts element from 1,3mm Kanthal A1 resistance wire. Initially I wanted to use a stronger one but I finally settled at 2300W. Regulated with programmable PID+SSR and relais + door contact switch for safety reasons. It was made using a minimum of tools and was fairly easy to construct. Can be used horizontal and vertical for hanging longer or thinner blades to minimize warp.
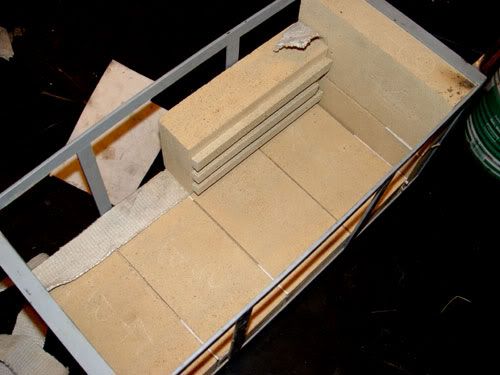
The oven is easy to disassemble in case of element change or possible repairs. Thats why the friebricks are not mortared together.

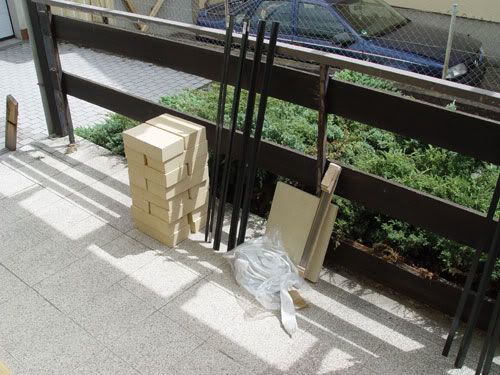
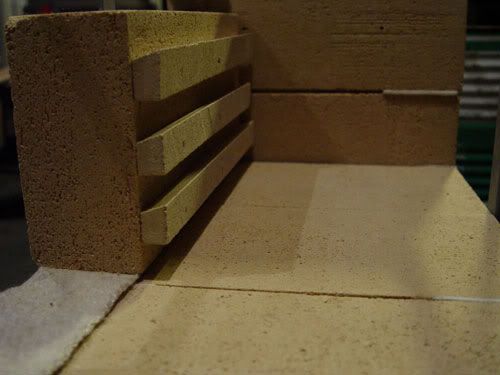
I used 16 firebricks, some angle Iron for the frame, ceramic strip between the bricks to prevent any gaps, vermiculite board for element holders pinned to the brick. for ease of construction I did not want to put grooves into the bricks because this is messy and the bricks break easily when the heating coils are tightly spaced and you are not careful. Because the oven is to be used vertically I did also pin the elements with U-shaped pins from smaller Kanthal wire to the bricks so they cannot fall into the chamber when used upright. Vermiculite board is easy to work, cheap and for me readily avaliable, its max temperature rating is 1100°C (2000 F) so if you are doing mainly stainless it would be operated constantly at its upper limit, as I do mostly carbon steels and only the occasional SS Blade I think it will hold up fine. This is the first time I did use vermiculite so far no changes detectable but I cannot comment on how it will hold up in the longer run. If you want to stay on the totally safe side put grooves in your bricks. My woodstove uses the same for the firing chamber and the boards have to be replaced after 2 winters. during winter the woodstove is in almost constant use ,so if it lasts anything nearly like this in my HT oven I am good to go.
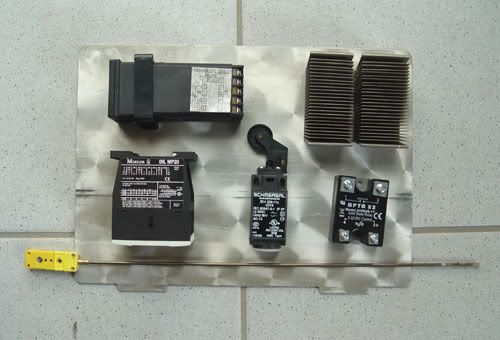
Because the oven has exposed elements its advisable to be sure no current/voltage is in your elements when you open it. On my former oven I did always pull the plug before opening but I found it to be very annoying and so with the new one I use a door contact switch an a power relais in conjunction with the PID+SSR so the elements are completely separated from the line when the oven is opened. It works perfectly and I found it to be much more convenient in use. power relais and door contact switch are shown in the lower left and middle of the pic.
To connect the elements i used ceramic connectors and thick copper wire cable. Initially I thought it would get very hot at the connectors but it does not.

I recessed the elements a little at the door to have some space to insert a blade holder when hanging blades in the upright position so the door closes without problems.
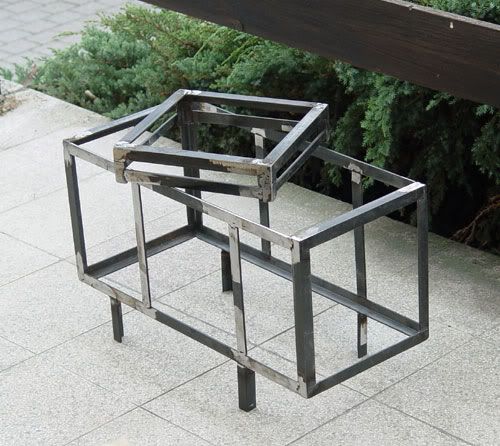
Just wanted to show you my new toy an so you can see you dont have to spent high dollars or have a fully equipped workshop to make something like this. I used a cordless Drill, a Drill press, a Hacksaw and the cheapest welder avaliable. But the frame could be also screwed or pop riveted together.
On how to properly design the used heating element look at my other thread here: http://knifedogs.com/showthread.php...-to-design-and-calculate-the-heating-elements
Thanks for looking.
Not the prettiest of sorts and still missing the outer shell ,but works excellent.
Some Data: Interior 50cmx12cmx12cm (approx 19,7`x4,7`x4,7` sorry I am a metric guy
) up to 800°C (1475 F) in 15 min, up to 1100°C (2000 F) in 35 min. 2300 Watts element from 1,3mm Kanthal A1 resistance wire. Initially I wanted to use a stronger one but I finally settled at 2300W. Regulated with programmable PID+SSR and relais + door contact switch for safety reasons. It was made using a minimum of tools and was fairly easy to construct. Can be used horizontal and vertical for hanging longer or thinner blades to minimize warp.The oven is easy to disassemble in case of element change or possible repairs. Thats why the friebricks are not mortared together.
I used 16 firebricks, some angle Iron for the frame, ceramic strip between the bricks to prevent any gaps, vermiculite board for element holders pinned to the brick. for ease of construction I did not want to put grooves into the bricks because this is messy and the bricks break easily when the heating coils are tightly spaced and you are not careful. Because the oven is to be used vertically I did also pin the elements with U-shaped pins from smaller Kanthal wire to the bricks so they cannot fall into the chamber when used upright. Vermiculite board is easy to work, cheap and for me readily avaliable, its max temperature rating is 1100°C (2000 F) so if you are doing mainly stainless it would be operated constantly at its upper limit, as I do mostly carbon steels and only the occasional SS Blade I think it will hold up fine. This is the first time I did use vermiculite so far no changes detectable but I cannot comment on how it will hold up in the longer run. If you want to stay on the totally safe side put grooves in your bricks. My woodstove uses the same for the firing chamber and the boards have to be replaced after 2 winters. during winter the woodstove is in almost constant use ,so if it lasts anything nearly like this in my HT oven I am good to go.
Because the oven has exposed elements its advisable to be sure no current/voltage is in your elements when you open it. On my former oven I did always pull the plug before opening but I found it to be very annoying and so with the new one I use a door contact switch an a power relais in conjunction with the PID+SSR so the elements are completely separated from the line when the oven is opened. It works perfectly and I found it to be much more convenient in use. power relais and door contact switch are shown in the lower left and middle of the pic.
To connect the elements i used ceramic connectors and thick copper wire cable. Initially I thought it would get very hot at the connectors but it does not.
I recessed the elements a little at the door to have some space to insert a blade holder when hanging blades in the upright position so the door closes without problems.
Just wanted to show you my new toy an so you can see you dont have to spent high dollars or have a fully equipped workshop to make something like this. I used a cordless Drill, a Drill press, a Hacksaw and the cheapest welder avaliable. But the frame could be also screwed or pop riveted together.
On how to properly design the used heating element look at my other thread here: http://knifedogs.com/showthread.php...-to-design-and-calculate-the-heating-elements
Thanks for looking.