Working With Mammoth Tooth

Randy Lucius

Well-Known Member
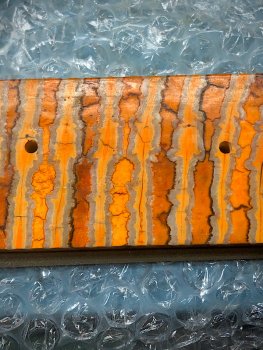
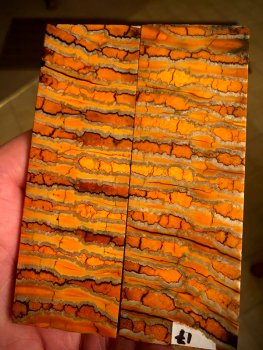
I've been advised to stay away from mammoth tooth but I'm stupid and stubborn so I'm gonna give it a try. I've read a lot on working with it ie: use sharp belts, don't get it hot, go slow. The scales I have are a little thick and I would like to thin them down some. Problem is an 80 grit belt won't touch them. I'm out of 36 grit belts at the moment but I'm not sure they would do any better. Anybody have any experience with this?

mammoth_800X600.jpg

Here's a test etch of the blade I want to put them on.

blade_800X500.jpg
 
WEAR your respirator! The dust is NASTY! BTW, nice blade. You still gotta give me the
low down on your etching procedure.!
Yep. Wearing the respirator. Stuff stinks. That was just a quick etch. When I get ready to put it together I'll do a WIP on it. Not any secrets. Just a standard etch followed by a coffee etch and some careful sanding.
 
I've made a couple of knives with mammoth tooth. It's not so bad to work with really. Respirator is a must. I found that new ceramic abrasives work best, but other abrasives will get the job done, just more slowly. Use water to keep it cool. Drilling is really tricky as those different colored sections of the tooth have different hardness to them. Bits tend to wander, so use sharp ones and go very very slowly. Also, back the tooth up with something while drilling as it has a tenancy to fracture as the bit exits the back side of the hole. You can also back drill from the other side to avoid the chip out. Good luck and can't wait to see the finished knife. Should be very striking indeed.
 
I've made a couple of knives with mammoth tooth. It's not so bad to work with really. Respirator is a must. I found that new ceramic abrasives work best, but other abrasives will get the job done, just more slowly. Use water to keep it cool. Drilling is really tricky as those different colored sections of the tooth have different hardness to them. Bits tend to wander, so use sharp ones and go very very slowly. Also, back the tooth up with something while drilling as it has a tenancy to fracture as the bit exits the back side of the hole. You can also back drill from the other side to avoid the chip out. Good luck and can't wait to see the finished knife. Should be very striking indeed.
Thank you so much for the advice. Just remembered I have a pretty aggressive ceramic refill for my 9” disk sander. I’ll put that on tonight and see what it will do.
 
In addition to the backing recommendations, I've also read that Ca glue, stabilizing, (and I think Alumilite) can really help to keep things from chipping, cracking, etc. There were a couple of threads on other forums talking about various tricks.
 
What Dennis said.That man probably forgot more about that material than Knifedog members collectively! Check out his web site great pics on some of the restoration and stabilization of these types of material! I dont blame you I think that stuff looks amazing! It's just so expensive and I'm afraid to mess it up!! LOL!!
 
No, you don't want to get those wet. There are three layers there. The pith is the softest. It's the light brown and dark brown material. It will absorb water and swell. Then your scales will start to pop apart. another layer is the dentine. It's light brown and medium in hardness, about the same hardness as ivory, in fact it is ivory. The hardest part is the enamel. It's white to grey colored, I sometimes see blue in undied teeth. It's what raises hell with your abrasives.

Don't get them wet, don't get them hot.

Sand from both sides to equalize the the heat from friction and the associated warping.

Use only sharp abrasives. The courser the better. Ceramic is the best.

If you have a variable speed sander/grinder, slower speeds are better. Disk sanders are not the best because they generally go much faster than belt sanders because they are direct drive. Speed on mammoth tooth wipes out your abrasives fast.

For drilling you need carbide drill bits. For a band saw you will need carbide or diamond grit blades.

Teeth are made of cracks. Yours have already been stabilized and filled. They will probably crack while you are working them so keep some wax paper, CA glue and a flat surface close. When they crack, fold the paper over shiny side out, so you have two layers. The shiny side of wax paper has more wax on it and your teeth will have less tendency to stick. CA. glue goes through one layer of wax paper almost immediately. Put the paper on a flat surface and glue your pieces back together. Spay with accelerator and go back to work. If the wax paper sticks, just sand it off instead of trying to peel it off.

Alternate pieces while sanding so they don't get too hot. Set them aside and do something else when they get warm.

Let them cool for several hours before you put them on the knife to make sure they do not try to warp or shrink after they are glued onto the knife.

Nice looking steel, is it your own?
 
Last edited:
No, you don't want to get those wet. There are three layers there. The pith is the softest. It's the light brown and dark brown material. It will absorb water and swell. Then your scales will start to pop apart. another layer is the dentine. It's light brown and medium in hardness, about the same hardness as ivory, in fact it is ivory. The hardest part is the enamel. It's white to grey colored, I sometimes see blue in undied teeth. It's what raises hell with your abrasives.

Don't get them wet, don't get them hot.

Sand from both sides to equalize the the heat from friction and the associated warping.

Use only sharp abrasives. The courser the better. Ceramic is the best.

If you have a variable speed sander/grinder, slower speeds are better. Disk sanders are not the best because they generally go much faster than belt sanders because they are direct drive. Speed on mammoth tooth wipes out your abrasives fast.

For drilling you need carbide drill bits. For a band saw you will need carbide or diamond grit blades.

Teeth are made of cracks. Yours have already been stabilized and filled. They will probably crack while you are working them so keep some wax paper, CA glue and a flat surface close. When they crack, fold the paper over shiny side out, so you have two layers. The shiny side of wax paper has more wax on it and your teeth will have less tendency to stick. CA. glue goes through one layer of wax paper almost immediately. Put the paper on a flat surface and glue your pieces back together. Spay with accelerator and go back to work. If the wax paper sticks, just sand it off instead of trying to peel it off.

Alternate pieces while sanding so they don't get too hot. Set them aside and do something else when they get warm.

Let them cool for several hours before you put them on the knife to make sure they do not try to warp or shrink after they are glued onto the knife.

Nice looking steel, is it your own?
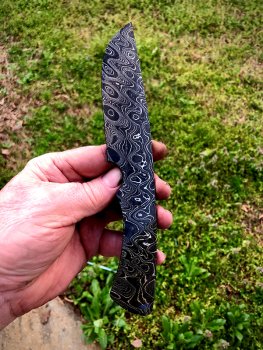
Thanks Mark for the information! That's a lot to think about. I'll need to get some carbide drill bits. I don't have any. My disk sander is variable speed so I'll keep the speed down. Need to order some 36 grit belts. Might throw a 24 grit in there too. I'm in no hurry to get this knife done. It's a personal side project I'm working on when I have time. The steel is Alabama Damascus. I would like to do my own but I work out of my garage. My neighbors would not appreciate all the beating and banging. Just had a chance to look at your website. Not sure how I missed it but man what some beautiful work! Just incredible. Thanks again for the info and I may bug you when I really get started on this.
 
Just a question, would the lower grit belts (say below 60) be a good idea? I was mainly wondering if the vibration from them would cause more cracking than a slightly higher grit?
 
Thanks Mark for the information! That's a lot to think about. I'll need to get some carbide drill bits. I don't have any. My disk sander is variable speed so I'll keep the speed down. Need to order some 36 grit belts. Might throw a 24 grit in there too. I'm in no hurry to get this knife done. It's a personal side project I'm working on when I have time. The steel is Alabama Damascus. I would like to do my own but I work out of my garage. My neighbors would not appreciate all the beating and banging. Just had a chance to look at your website. Not sure how I missed it but man what some beautiful work! Just incredible. Thanks again for the info and I may bug you when I really get started on this.
I thought I recognized the steel. Yes, 24 grit belts would be good too. With that much surface area you need big rocks to thin the mat'l. Go boldly my friend.
 
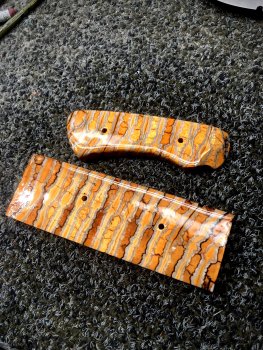
Managed to get one of the scales roughed out without any major disasters.

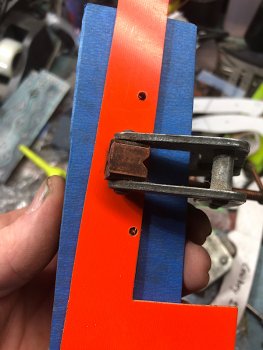
Laid out the pin holes so they went through the softer more consistent part of the scale.
4FDD904A-F76F-4F37-B960-55CFFC9FCC76.jpeg

Backed the drilling with a scrap piece of G10 liner to help avoid chip out. Worked well had a very minor chip that will disappear when I thin the scales.
046E1C12-D4AF-4E04-9DC0-5BDA85084BD5.jpeg

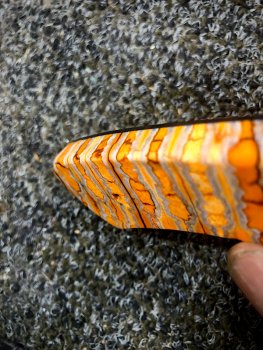
Rounded the edges some so when I do thin the scales it won’t grab a sharp edge and rip a chunk out.
6E34EBD8-F601-4BB1-AEDB-BA8177DF3CE1.jpeg

86388C47-030F-414F-9DF6-32BCCAAA3F91.jpeg
Got some belts on order. May lay this aside until they come in.
 
Last edited:
Back
Top