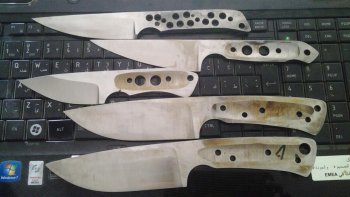
about finishing a knife

SHOKR

Well-Known Member
How do you guys go about finishing the knife?
I know after HT i clean tang and grind bevel, attach handle, shape it then do the profile.(btw what grit do you finish the profile with? Same as blade?)

Some parts however i dont know where to fit into all that.
Ex: after shaping the handle i hand sand it to round the sharp edges with 120 or 220 grit (i have no slack, the only slack is above the top wheel of platen and that just throws dust in my face), this puts scratches on the profile (altho now that i think about it maybe the better sequence would be to finish shaping then profile last)
Another one is the lower part of the ricasso (between handle and pkunge cut)
And im guessing there are other things im not yet aware of...

So can anybody give me details of how they go about finalizing the knife?

Thanks
 
20121025_122548.jpg

bit of eye candy to go with this

2 of the 4 of a kind set, two knives that were pretty much remainder of a billet all taken to 400 grit and hand sanding comes next, and my first finished hollow ground blade (the small one) finished with scotch brite
 
As a not-even-beginner thinking about tinkering with knife making, I look at those and think no way can I do anything close to that. Beautiful blades. Wish I could offer help with your questions, but that's all I got. :3:
 
I like to clean-up my profile first after attaching handle material. I kinda base my handle shaping on the final profile so I like that done first. I also finish the spine and bottom of the ricasso before finishing the bevels. It's a bummer if you put a scratch on your bevels while fininshing the spine afterwards, ask me how I know ;)

Profile finished to the same level as the blade. Bottom of ricasso too.

Slack-belt- Is your platen permanently attatched to the tool arm ? If I want slack more than between the top idler wheel and platen I take the platen off (KMG)

-Josh
 
i try to get everything except final sharpening done before putting on handle. usually hand sand all metal with 400grit. i always put tape on the blade before attaching and working on the handle. Scotch Blue painters tape works best. put on scales and pins with epoxy and let sit at least over night. shape handle.
this next step takes the longest, mostly waiting. hand sand handle if wood till no visible scratches. if i am going to use rubbing oil, hand sand to 400grit at the least. apply oil and let sit over night. go over handle with dry rag first, then light buff with 0000 steel wool. repeat till you have at least 3 coats. if using polyurethane, sand to 220grit, make sure there are no scratches. apply. i use water base Varathane for floors that has a dry time of 90minutes. let dry. light sand with 400grit. wipe with dry rag. repeat except use 1000grit. i like at least 3 coats, have done as many as 8. when handle finish is done, take tape off blade, put tape on handle. do final sharpen, sand and polish. I sand to 2000grit wet, then polish with green(chrome oxide, about 6500grit).
hope this gives you some ideas. good looking knives. i like the second from the top the best.
scott
 
I have bad habit of flipping the blade up to see the grind when doing bevels and in the process nick the spine, so that gets finished after bevels, but i think Josh has a good point and will finish the bottom of ricasso before from now on.
 
Don, thanks and im still starting too :) its not that hard really, but still not so easy to be boring. if that makes any sense

Josh,thanks, the platen is not perminant, but i always feel its a huge thing to remove it, but i guess i better eventually. and i think i actually finished the spine before the handle before, hence the scratches that come when shaping the handle... wont these be worse when doing all the shaping with the grinder?

scott, thanks but most of that is titsy bit advanced for me now, but i will get to it and i'll have your tips waiting ;)

thanks Mark
 
I also do EVERYTHING on the blade to finish,except the final edge.
Then tape her up and mount the scales. After 24 hours for epoxy to set I then sculpt the handle by taking out the Platen and using the slack belt.

You are a knife maker now! :sad: No crying, You need to learn how to use everything on that machine unless you enjoy spending un-tolled hours with hand sanding on those handles?
Take out that darn platen and learn how to use that slack belt!!


Laurence

www.rhinoknives.com
 
lol yes sir Laurence sir!

actually i just round the handle sharp edges, that doesnt even take 5 mins, but yeah i get i need to get more active!!
 
If your grinder is like the KMG style just take the platen off for some slack belt action. I made my own grinder, so I can slide the platen backwards to get the slack belt effect.
I get my blade pretty much done before I attach the handles. Tape off the blade and then epoxy the handle in place over night...much the same as everyone else.
 
I will finish the blade as completely as I can then wrap up in tape to help protect it before putting the handle on. On full tang knives like the one you have pictured (they look nice by the way!) I will scribe a line on the handle and cut them out close to shape then drill the pin holes and then pin the handle together so I can shape and finish the part of the handle next to the ricasso before glue up. Good luck finishing your blades they should look really nice when you're done.
 
Laurence speaks truth !

If I had to make an educated guess as to how many times I've removed my platen in the last 4 years I'd guesstimate 1200 to 1500 times. NOT A MISPRINT :) Often multiple times in a couple hour session in the shop.

Often though slack belt grinding is not necessarily a super precision even in which case just run the grinder in reverse and use the slack area between the top idler and tracking wheel. Using reverse will throw the dust/sparks away from you.

I keep a ratchet with a deepwell socket and a 1-2-3 block laying beside the grinder. It is annoying to change stuff up so much but I can remove platen and reinstall back to square in under 30 seconds so it's just annoying not a real problem. It's nearly as quick as swapping a tool arm so while I'd be happier if I had a second tool arm for slack belting it really wouldn't save me any signifigant amount of time which is why it hasn't been a priority for me. The 1-2-3 block is for re-squaring the platen to the work rest if I change the angle of the platen.

Embrace the versatility of your machine and set yourself up for success by configuring it the best way for the operation at hand.

When you finish your profile also finish the profile of the scales at the same time. Shouldn't need to get close enough to the tang while handle shaping for an problems. Make a few knives and you'll figure out these little details in no time flat.

-Josh
 
thanks a lot guys! really appreciate it

Josh, i seriously can't believe i never thought of running it in reverse for that part... maybe because i tense up when i'm working with handles... i clenched up the past few times! i had to keep reminding myself i do this because i enjoy it not because i have to!

and you're right about the platen, its annoying not impossible... God willing i'll get there, i guess im still not entirely used to my grinder yet (and it is KMG yes, for those who were wondering)

i wanna buy 1-2-3 blocks actually!! but i bought (havent arrived yet) a digital angle gage, that should make things a lot easier :)


i did finish profile after attaching handle, but then wouldnt it get scratches while shaping the scales? specially on a slack? (so far it didnt happen while shaping the handle on grinder, but i barely used the slack part also)

maybe i just need more tutorials/videos on handle shaping( or maybe just more practice)... (Josh yours from the military build was awesome, taught me few things i wish i learned sooner)
 
I have a 3x21 belt sander, a dremel, and several finishing sanders that i use for handle work. I may sound like a broken record but, PLEASE tape up the blade before handle work. This is not just to protect the blade, it is to protect you. If you are sanding the handle, you are going to be holding the blade. If something gets stuck or caught, steel at Rc60 wins over flesh every time.
Handle work is not that difficult, it just takes time.
scott
 
Shokr,
There weren't any videos for the most part when I started making. I learned to use every bit of belt and wheel on my Coote 2 x 72" by doing.. Feather the edges of your belts with a piece of ceramic rod or a broken piece of china plate or cup/mug works fine.

It's only two 1/2" nuts to take off the Platen on a KMG. You get sent to bed without dinner tonight! :s12137:

It's natural to be tense at first when doing something new that can be dangerous, take your time and be careful.

Laurence

www.rhinoknives.com
 
thanks Scott, was planning on it next time, but might not have a good tape (one that wouldnt 'stick') so will probably tape paper towels or something

Laurence, its not the nuts! its adjusting the platen... specially since i suffered the dent at the top of the platen... wanna keep things as they are, but you and Josh are right, i cant just keep doing this forever :)
 
For taping blades I use blue painters tape also. I like the 2" wide roll so it covers the blade way past the spine and below the edge. My blade is generally oiled with Ballistol and the tape doesn't really stick to the steel much, if at all. However, the tape sticks to the tape VERY well in those areas above the spine and below the edge. After that I wrap a 1" piece around the ricasso and everything stays in place and protected.

If this isn't perfectly clear holler and I'll snap a few pics.

-Josh
 
no, thats great, except we don't have the blue tape here :D

i plan on experimenting tho, got one type (not so sure if its the one called masking tape or not, its bit paper-ish) and looking for others, hopefully will find a good one, everybody is closed now tho (national holiday)

thanks Josh
 
To a certain extent tape is tape for this purpose and makers use various kinds of tape. Bruce Bump uses electrical tape.

I like the painter stuff because it doesn't leave any adhesive residue on the blade. That's the up side. The down side is it's about $9 a roll I think but a roll lasts awhile.

If you find the masking tape not durable enough stick a piece of cheapo Duct tape on both sides on top of the masking tape. That'll do the trick for sure.
 
thanks Scott, was planning on it next time, but might not have a good tape (one that wouldnt 'stick') so will probably tape paper towels or something

Laurence, its not the nuts! its adjusting the platen... specially since i suffered the dent at the top of the platen... wanna keep things as they are, but you and Josh are right, i cant just keep doing this forever :)

Take off the Platen and round the top angle of it on that slack belt just a few degrees. You also need to refine your touch and not put pressure within about 1- 1/2" of the top of the Platen. No more dents!

There has to be a painter's supply or Auto body work store in Egypt? Ask for non-stick painter's masking tape or I used regular white masking tape for years.
Laurence

www.rhinoknives.com
 
Back
Top