You are using an out of date browser. It may not display this or other websites correctly.
You should upgrade or use an alternative browser.
You should upgrade or use an alternative browser.
BrandantR's KITH WIP
- Thread starter BrandantR
- Start date
BrandantR
Well-Known Member
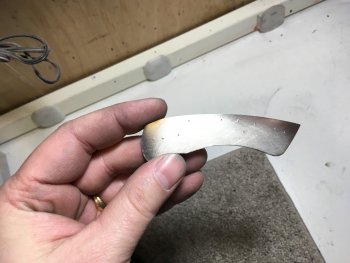
Let's continue on with this build. Hopefully I haven't bored anyone yet.

The patterns for the liners, bolsters, spacer, and scales have been laid out on the raw materials with a handy dandy sharpie.

All the parts have been cut out on the band saw to rough shape.

In order to determine the thickness of the spacer I take a measurement of the thickness of the blade plus the two washers. Knowing this dimension, I can surface grind the spacer to the proper thickness.

Here is the spacer after being ground to thickness. I have also lightly surface ground the bolsters.

The profile of the liners has been refined. I give the liners a quick spin on the disk grinder to remove the bur from grinding and to clean up the surfaces.

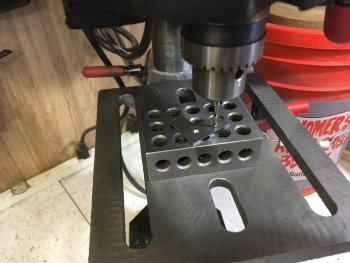
I use a paper pattern and a center punch to locate the holes that will be drilled through the liner. I don't drill the stop pin or the detent ball hole at this time. I'll drill them once everything is zeroed in.

On to the drill press to drill the holes.

A quick spin on the disk grinder to remove the bur from the holes.

I clamp the first liner to the second and use the first liner as a template to get the holes to match up perfectly from one liner to the next.
The patterns for the liners, bolsters, spacer, and scales have been laid out on the raw materials with a handy dandy sharpie.
All the parts have been cut out on the band saw to rough shape.
In order to determine the thickness of the spacer I take a measurement of the thickness of the blade plus the two washers. Knowing this dimension, I can surface grind the spacer to the proper thickness.
Here is the spacer after being ground to thickness. I have also lightly surface ground the bolsters.
The profile of the liners has been refined. I give the liners a quick spin on the disk grinder to remove the bur from grinding and to clean up the surfaces.
I use a paper pattern and a center punch to locate the holes that will be drilled through the liner. I don't drill the stop pin or the detent ball hole at this time. I'll drill them once everything is zeroed in.
On to the drill press to drill the holes.
A quick spin on the disk grinder to remove the bur from the holes.
I clamp the first liner to the second and use the first liner as a template to get the holes to match up perfectly from one liner to the next.
Attachments
BrandantR
Well-Known Member

With the same technique, the spacer gets clamped to a liner in order to locate the holes.

Next, it's on to fleshing out the handle. I start by positioning the scales on the liners in order to get the hole alignment correct.

With the holes drilled through both scales, I pin them together and grind off the edges so that both scales are even.

I grind a 30 degree bevel on both ends of the scales in order to get a dovetail fit between bolsters and scales.

Here are the scales pinned together in order to verify that they match up. Looks good.

Each of the four bolsters gets beveled at 30 degrees in order to mate up with the scales.
 The scales get pinned to the liners and the bolsters get clamped in place, taking care that there is no gap between scale and bolster. The screw holes will then be drilled through the bolsters.
With the liners clamped together, I drill and ream the pivot hole at the mill.
Attachments
BrandantR
Well-Known Member

With all of the holes through the liners in place, I tap the screw holes with a 0-80 tap. this tapmatic has taken what use to be an hour long process of hand tapping a bunch of holes down to less than a minute to tap them all. Plus, I don't break taps any more which can be really frustrating. It's definitely one of my favorite tools in my shop.

The screws that will pass through the spacer which holds the handle halves together need to be countersunk so that the hidden screw heads are below the surface. I use this little gauge to set the countersink depth and set set the depth stop on my drill press spindle.

Here is a flat head screw in place to show how the head sits below the liner surface.

The button head screws as purchased are too long and need to be shortened. Here is the little jig that I use to shorten the screws. I have surface ground this piece of steel to the exact thickness and drilled and tapped a bunch of holes through it. Now, all I have to do is to insert a bunch of screws and grind off the backs down to the jig. I will even polish the screw heads on the buffer while they are still attached.

Here are the handle halves after been fastened to the liners. As you can see, the scales and bolsters have been countersunk as well. It looks kind of like something out of a Frankenstein movie right now, but after a few minutes at the grinder, things will shape up nicely.

Here are the handle halves after being profile and surface ground. Looks much more like a knife handle now.

And here's a look at that dovetail feature that I've been working to achieve. I think it's worth the effort to get this look.
That's it for now. I hope to make some more progress this next weekend.
Motor City Mike
Well-Known Member
Outstanding WIP.
I can see where I would have done things differently and LESS efficiently.
Well done. Really liking this thread.
I can see where I would have done things differently and LESS efficiently.
Well done. Really liking this thread.
Kevin Zito
KNIFE MAKER
This is gonna be super fine!
BrandantR
Well-Known Member
Thanks for the kind remarks, folks! I hope you're enjoying following along. I didn't get much time out in the shop over the weekend, but I still managed to make some progress. Here's what I was able to accomplish.

I drill a small pocket in the back sides of the front bolsters to conceal the pivot pin screws.

I use this great little Knifedogs pivot lap to reduce the length of the pivot pin and the pivot bushing to precise dimensions. It's a great little tool.

I insert the part into the lap and use my horizontal disk grinder to grind down the part. Works great.

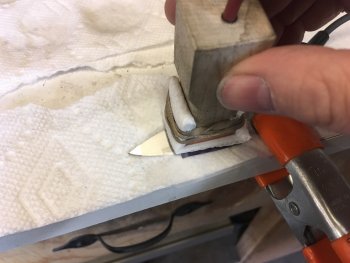
The next step is to grind the lock ramp into the blade tang. I set up my tool rest at 10 degrees for this step using my wooden gauge block.

Grinding in the lock ramp. I'm very careful to make sure I grind the ramp on the right side of the knife.

I mount the pivot bushing onto a drill bit and give it a light spin on the buffer to get it polished up for a nice, smooth action on the pivot.

Next, it's time to set the open position of the blade. I assemble the parts as shown and while holding the blade in the desired position, mark the spacer with a razor blade.

Grinding down the tip of the spacer.

This pic shows the blade in the open position. At this point I mark out the location of the lock bar with a razor blade.

Here is the liner with the lock bar scratched in and holes drilled on either end to aid in cutting in the bar.
I drill a small pocket in the back sides of the front bolsters to conceal the pivot pin screws.
I use this great little Knifedogs pivot lap to reduce the length of the pivot pin and the pivot bushing to precise dimensions. It's a great little tool.
I insert the part into the lap and use my horizontal disk grinder to grind down the part. Works great.
The next step is to grind the lock ramp into the blade tang. I set up my tool rest at 10 degrees for this step using my wooden gauge block.
Grinding in the lock ramp. I'm very careful to make sure I grind the ramp on the right side of the knife.
I mount the pivot bushing onto a drill bit and give it a light spin on the buffer to get it polished up for a nice, smooth action on the pivot.
Next, it's time to set the open position of the blade. I assemble the parts as shown and while holding the blade in the desired position, mark the spacer with a razor blade.
Grinding down the tip of the spacer.
This pic shows the blade in the open position. At this point I mark out the location of the lock bar with a razor blade.
Here is the liner with the lock bar scratched in and holes drilled on either end to aid in cutting in the bar.
BrandantR
Well-Known Member

I cut the lock bar at the mill with a thin cutoff disk.

Cutting in the lock face. I leave this slightly longer than my mark so I can zero in the fit later on.

After the lock bar is cut in, I clean it up with some cloth-backed sandpaper.

Here's my high tech lock bar bender. It's just a piece of wood with a notch cut into it that fits over the lock bar. This way I can bend the lock at the precise location.

I like to add a little bling to the liners by jeweling or engine turning the inside surfaces. It's a subtle detail that I think is worth the effort. I do this at the mill with a Cratex rod, making circular patterns at regular intervals.

Here are the finished liners. Looks pretty good.

Now it's time to set the closed position of the blade. I assemble the knife as shown and clamp the blade at the desired closed position. I drill a hole for the stop pin at the concave area at the bottom of the ricasso. This hole will then get transferred over to the other liner for proper pin alignment.

Here's a closeup of the stop pin. The pin just floats in place since it really doesn't take any force and the bolsters keep it in place.

Here's how I fit up my lock. With the knife assembled and mounted as shown in my vice, I wedge open the lock and file the lock bar face to fit. I use a piece of folded up 3x5 card to protect the liner as I file. Fitting the lock this way takes only a few minutes and doesn't require that the knife be disassembled and reassembled a hundred times.

The lock is set. It's got a nice, early lockup. The lock face will be carbidized in a later step which will prevent the lock from becoming "sticky" or hard to disengage.
BrandantR
Well-Known Member

With the knife still assembled, it's time to set the detent ball location. I mark this location with a center punch on the lock bar. I will then drill a hole with a small carbide drill through the lock bar and into the blade.

Here's the blade with the detent hole in place. I soften the edge of this hole with a slightly larger carbide drill to give it a slight chamfer. This creates a smooth release and a stronger detent.

The ceramic dentent ball gets pressed in at the arbor press. I use a couple of spacers in order to get the ball set at the proper depth.

Here is a pic of the first full assembly of the knife. From here we go to the grinder to grind the parts down to their final dimensions and to achieve a fine, seamless fit.

Here's a bottom view of the profiled knife. The small wheel attachment makes this process much easier.

Here's a look at the spine of the knife and a good view of the dovetail bolster detail. The knife is shaping up very nicely. That's it for now. Let me know what you think or if you have any questions or comments on my technique.
Motor City Mike
Well-Known Member
Great WIP. Very interesting
I'm going to have to put some thought into that lockbar/lock up technique
I'm going to have to put some thought into that lockbar/lock up technique
Entropy762
Well-Known Member
Very cool. I'm thinking of attempting a folder. Thanks for taking the time for sharing your process.
Jake
Jake
BrandantR
Well-Known Member
I made a little more progress on the KITH knife build that I thought share. Here are a few pics of that progress.

Here's where I'm at with the handle. It's been contoured and polished up to 1500 grit on the grinder.

I put a 600 grit satin finish on the bolsters. I'm not sure if I'll keep the current finish on these parts, but I'll mull it over for awhile.

I decided to add a little texture to the titanium liners. I do this with a diamond burr in my rotary tool. It' looks pretty good once done.

Here are the finished liners. Kind of hard to capture the look in this light with my cell phone.

I use a 3/32" bit to scratch a center line on the edge using my surface plate. This will give me a reference when I grind the blade bevels.

I have the blade mounted in my cheap little guide so I can get the plunges correct. I have also scratched in a guide line for the grind termination. I didn't get much time in the shop, so this is as far as I got. I'll be ready to grind the blade the next time I make it out to the shop.
Let me know what you think and if you have any questions.
Here's where I'm at with the handle. It's been contoured and polished up to 1500 grit on the grinder.
I put a 600 grit satin finish on the bolsters. I'm not sure if I'll keep the current finish on these parts, but I'll mull it over for awhile.
I decided to add a little texture to the titanium liners. I do this with a diamond burr in my rotary tool. It' looks pretty good once done.
Here are the finished liners. Kind of hard to capture the look in this light with my cell phone.
I use a 3/32" bit to scratch a center line on the edge using my surface plate. This will give me a reference when I grind the blade bevels.
I have the blade mounted in my cheap little guide so I can get the plunges correct. I have also scratched in a guide line for the grind termination. I didn't get much time in the shop, so this is as far as I got. I'll be ready to grind the blade the next time I make it out to the shop.
Let me know what you think and if you have any questions.
BrandantR
Well-Known Member
Time to finish up this knife. Here are the final pics of this build. Hope you enjoy.

If you recall, we left off last week with marking the grind lines on the blade and fastening the blade in my file guide. Here I am hollow grinding the bevels on the blade. I freehand my grinds, but I do like to have my tool rest in place to give my hands a little support.

After grinding in the bevels on the blade, it's time to do some hand sanding. I finish my blades up to 600 grit.

The blade is all finished with a nice 600 grit satin.

I like to put the edge on my blades before I assemble them. There is less of a chance of messing up if I do it this way. I wrap a piece of tape around the ricasso and tang to protect those areas.

The obligatory arm hair shave. It's sharp!

Here is my anodizing setup. It consists of an electrolyte bath (water and borax), a DC power source, and a pair of leads. The negative lead gets attached to an old piece of O1 steel, which is actually a failed liner from my first folding knife ever, and placed in the bath. The positive lead gets attached to the liner that will be anodized.

And here are the liners after being anozided a deep bronze color. Nice!

Here is my setup for putting my maker's mark on the blade. I use a power source that I build from online plans. With my maker's mark stencil taped to the blade, I use my setup to etch the mark into the blade.

Here I am etching the mark on the blade. I use a piece of folded up paper towel for my etching pad. I've found it works as well as the commercially available pads but cost much less.
If you recall, we left off last week with marking the grind lines on the blade and fastening the blade in my file guide. Here I am hollow grinding the bevels on the blade. I freehand my grinds, but I do like to have my tool rest in place to give my hands a little support.
After grinding in the bevels on the blade, it's time to do some hand sanding. I finish my blades up to 600 grit.
The blade is all finished with a nice 600 grit satin.
I like to put the edge on my blades before I assemble them. There is less of a chance of messing up if I do it this way. I wrap a piece of tape around the ricasso and tang to protect those areas.
The obligatory arm hair shave. It's sharp!
Here is my anodizing setup. It consists of an electrolyte bath (water and borax), a DC power source, and a pair of leads. The negative lead gets attached to an old piece of O1 steel, which is actually a failed liner from my first folding knife ever, and placed in the bath. The positive lead gets attached to the liner that will be anodized.
And here are the liners after being anozided a deep bronze color. Nice!
Here is my setup for putting my maker's mark on the blade. I use a power source that I build from online plans. With my maker's mark stencil taped to the blade, I use my setup to etch the mark into the blade.
Here I am etching the mark on the blade. I use a piece of folded up paper towel for my etching pad. I've found it works as well as the commercially available pads but cost much less.
Attachments
BrandantR
Well-Known Member

The finished blade. Looking good.

For a finishing touch, I like to carbidize the face of my lock bar. I use my etching unit for the power supply and a Dremel vibratory engraver that I have wired up and an old carbide cutter installed. Twenty seconds later and the lock face has a layer of carbide deposited on it that will keep the lock from sticking.

The last part I need to build is the thumb stud. I chuck up a small rod of 416 into my lathe.

After drilling a blind hole into the bottom of the stud, I thread it for a 0-80 screw.

The shaped and finished thumb stud. It's a little out of focus, but it's a tiny part.


And here are a few pics of the finished knife. Looks pretty darn good to me. It should make for a nice and durable EDC knife. I hope whomever receives this knife in the drawing will be pleased with it. Let me know what you think. I'm always open to constructive criticism.
Motor City Mike
Well-Known Member
I love it. Looks fantastic!