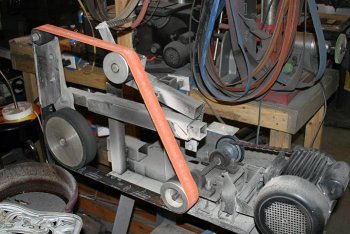
My question is how hard is it to change the drive belt from one pulley to another? I have looked but can't find any vids or descriptions.
I'm using the power twist link belt from USA knifemaker and was wondering if it was worth mounting the engine in such a way that I can unlock it and have it pivot or slide so the belt could be switched quickly?I am assuming too, that just to allow for the different sized pulleys the engine position or length of the belt would need to alter.
Already two responses with the same mounting suggestion!
For sure, hinging the motor plate will be your quickest way to change speeds.
If you did not receive instructions with your belt, then Fenner Drives (the manufacturer of Power Twist belts), has a website.
Here is the link to the instructions:
http://www.fennerdrives.com/assets/ptpinstall.pdf
Concerning the changing from one belt location to another, the hinged motor option is the quickest if you can provide for that, since you simply lift the motor and relocate the belt.
I need to mention something that usually doesn't apply to us, but needs to be mentioned anyways, since anyone and everyone reads this stuff.
The "hinge option" needs a little modification if one is using a larger (heavier) motor than typical.
Here's a typical scenario: "Wow! I just got back from Grandpa Georges' and he said I could have this 5-horse motor off that old broken bandsaw in the barn! Not only do I have a free motor, but it's a big'un, too!"
There
is such a thing as
too much belt tension, and a huge motor freely tugging on the belt is a surefire way to get it. Remember, excess tension on the belt also means excessive strain on all other components in the drivetrain. Belts, pulleys, and bearings.
For those in this situation, the easiest fix is to simply place an adjustable stop under the hinged motor plate, allowing you to control how much motor weight is on the belt. Some use a simple wedge; I like using a bolt.
But most of us use the motors in the 1.5-2 HP size, so we can dispense with that worry. So, back to our regularly scheduled programming.:biggrin:
If you don't want to (or for some reason cannot) hinge the motor for quick changes, remember that the link belt can be rolled from one sheave to the next one over.
This is a huge "no-no" with standard v-belts, but that's because those types of belts have "tension cords" in them. The stress of rolling the belt over the pulley will break those cords, resulting in a belt that no longer holds tension.
"I've got the motor tightened all the way to the end of the adjusting slot, but the belt still keeps slipping! I
know it's the right size belt!" Ever heard that one before?
But the Power Twist belts do not have that type of construction, so it's perfectly safe to move the belt by rolling over the side of the pulley. Matter of fact, rolling is the manufacturer's suggestion for the "tool-free" installation method.
Forgot to mention that they also have a video showing this done. Mostly advertising hype, but it shows the procedure.
http://www.youtube.com/watch?v=npgZREgQBIM&list=UUE64O_xf7mdObXOkivDurJg&index=8&feature=plcp
(Hope this link works.)
You mentioned a concern about the belt length needing to be changed when switching ratios. That's a valid concern.
There are calculations you can do to determine if it's a problem or not. You'll need to know things like center distance, pitch diameters, etc.
Avoiding all that, let's see what we have.
Tracy recommends a minimum of 3' of belt in his plans. With the pulleys you have selected, that belt would accommodate a center distance of 12 inches, so we'll use that as an example. (By the way, center distance is the distance between the center of the drive
r sheave and center of the drive
n sheave. For perspective, it gives us an idea of how far away the motor is from the driveshaft.)
1st ratio (2-5) calls for a belt length of 34.40"
2nd ratio (3-4) ................................34.23"
3rd ratio (4-3) .................................34.23"
4th ratio (5-2) .................................34.40"
A mere difference of
.17"; easily within range of your adjustment mechanisms.
"But I ordered 4' of belt instead of 3'. Will using the longer belt still keep the differences within my range of adjustment?"
If space permits, I prefer to use longer belts. The reason is because longer center distances mean a
slight reduction in bearing loads. Considering the longevity of the link belts, I like to spend a little more up front on the belt in hopes of possibly increasing bearing life.
So a 4' belt will accommodate a center distance of 18". Let's see if we can still stay within range of adjustment.
1st ratio.....46.34"
2nd ratio....46.22"
3rd ratio.....46.22"
4th ratio.....46.34"
A difference in belt length of
.12"; don't think that really changed anything, do you?
My experience working with step pulleys has led me to belive that although you may have
slight differences in belt length between the ratios, it's not enough to warrant major concern providing you have some sort of adjustment mechanism in place.
In this example, you could have the motor locked solid and roll the belt to effect the change in ratio. True, belt tension will be altered. But considering that most of us still use the old thumb deflection method (3/16" deflection per 12" span)to check our belt tension, that minor change will cause no trouble.
But rolling the belt is not for the inexperienced or faint of heart- pinched fingers are no fun, and it's bound to happen sooner or later.
All the more reason to consider using a hinged setup.
Hope it helps.
Good Luck,
Rob