Its the little things in life!

Bill Hubbell

KNIFE MAKER
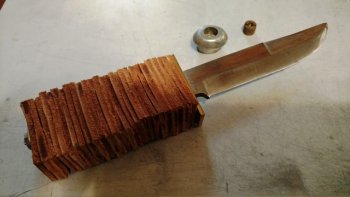
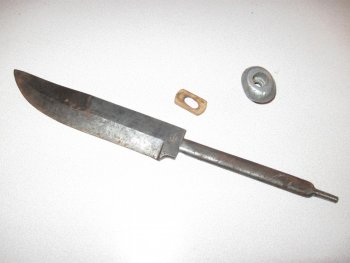
About a year ago, I saw an old friend at a restaurant. We hadn't seen each other for about a year, and he said "Oh! I have something for you out in my truck". I followed him out and he gave me this old E.C. Solingen 24X. All that was left was the blade, pommel/butt cap, and one of the thin spacers from the handle. I was very appreciative that he had thought of me when he got it. I told him I would restore it for him, but he refused to take it back. The blade had had a little unskilled sharpening done, and showed signs of some use, but wasn't too bad. . I cut and punched the leather washers, and read Ausbrooks tutorial on an old hatchet he restored (thanks, Ausbrook!). I roughed out a brass guard and ordered a nut for the pommel, but when it came it was the wrong thread, and wouldn't have really fit the cap very well anyway. Then, the knife just got stuck away in a drawer for about a year.
Then the other day, I saw my friend again, and he said, "Oh! I have something for you". We went to his truck and he dug around for awhile, and produced a dirty old ziplock bag with the original nut for this knife in it. I was amazed. So, anyway, getting that little nut has spurred me on, and Lord willing, I'm hope to get the handle epoxied up this weekend!
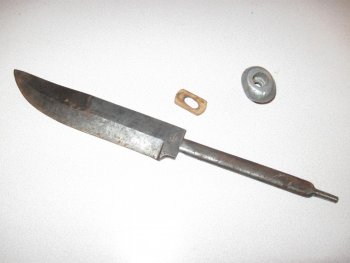
Side View Resized.jpgWashers Stacked - Resized.jpg
 
Can't wait to see what you do with it! I have an old KaBar my dad wants me to restore and I've never done a stacked leather handle. I'm kind of nervous about it.
 
Bill

Nothing better than old friends and old knives. Good for you.

Ausbrooks is the man of restoration. He has shown some really nice ones here on KD.

DeMo
 
Thicker leather is in fact fairly easy to work if you have a belt sander of some sort.I believe for leather handles some thin CA glue can be a great thing to help the leather pieces keep their size.
Frank
 
Bill YW and great start on that restore. Loved the nut story- that's most the battle, getting it apart and back together like it was supposed to be. That should finish out nice with some epoxy or like Frank says CA. I usually stain the leather prior to finish as well just to get the 'aged' look.
Dennis, having not ever been 'the man' of anything I may let this go to my head for a couple hours before realizing how much I have to learn. Thanks though!
 
Thanks for all of your tips and encouragement everyone. I still didn't get it epoxied, but now I figure you guys will hold me accountable, so I better get it done! I will keep you posted.
Bill
 
This was a good read. I'm looking forward to seeing this finished now! Come on Bill....don't keep us waiting! :p :D
 
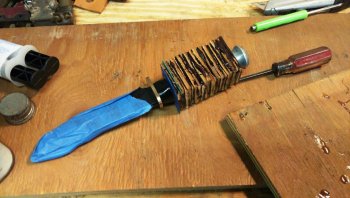
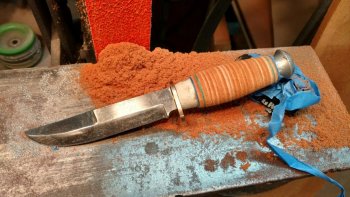
I made a little more progress on this one. -Got it roughed out with a 36 grit belt- to about 1/8" from where it needs to be. Epoxied.jpgRoughed Out.jpgHow fine of a grit do you guys like to go to on stacked leather?
 
Looks nice Bill. I haven't done very much with stacked leather but one I did up to 400 grit and then burnished it with the backside of a piece of sandpaper and it looked pretty good to me.
 
400 grit. I will stain and seal with tru oil like any porous handle material too, and give it a light buff.
 
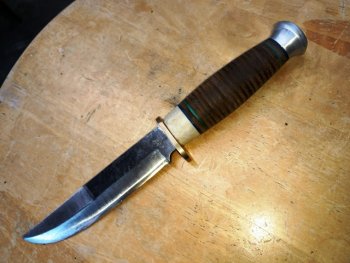
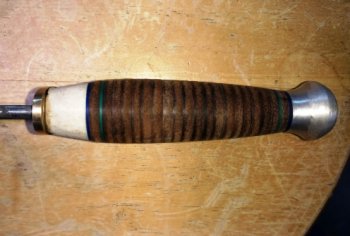
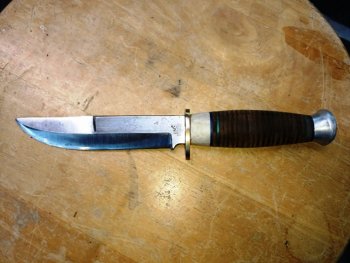
I know I took forever to get this posted but, here's the finished restoration project, guys (well almost finished- you probably can't see it with the low quality pictures, but I need to do a little polishing on the pommell and guard. Now I need to get into sheath-making mode- I have four that need sheaths. Thanks for your advice and encouragement.
BillFinished 1 - Resized.jpgFinished 3 - Resized.jpg
 
I really enjoyed the project and am pretty happy with the end result. But it was a learning experience for me- mainly from dumb mistakes I made.
I used a 'Honey' wood stain, which I should have known better. I didn't dilute the stain and ended up with a very dark almost black brown. I then remembered doing that with a sheath once. I guess that learning from past mistakes only works if you can remember them. I wasn't crazy about the CA look, especially with the very dark leather. That may have been in keeping with the original, but not the look I wanted. The next morning I sanded everything down past the stain, and discovered I liked the more slender handle profile better anyway. I then used Tru-Oil for a less shiny look, leaving the leather at the shade it was at that point.
Mistake #2: I will probably be little more adept next time at predicting how much texture will be left on the stag after shaping. I ended up with basically no texture on the stag- but I can live with that.
Dumb mistake number 3: In the future, if I'm replacing a handle, I will study the knife far more closely. When you build a knife from scratch, you get to know it intimately. On this knife, even after having the leather stack and pommel off numerous times for fitting, I didn't notice that the pommel had a cant to it. Of course, even with a 50/50 chance, guess which way it got installed. After the epoxy was hard, I noticed it immediately- go figure. If this was someone else's knife, I would be holding the bag for sure. I chose to re-shape the pommel a little, and doubt that anyone will notice (but I see it every time I look at it).
Okay, so I'm no Einstein when it comes to knifemaking- but I thought I'd pass on my flub-ups, so hopefully someone else will avoid similar problems (like on your father's Kabar, John). From Kris Paranto: "I never lose- I either win or I learn." I kind of feel like I did a little of both on this one. Bill
Side View Resized.jpgFinished 2 - Resized.jpg
 
Back
Top