You are using an out of date browser. It may not display this or other websites correctly.
You should upgrade or use an alternative browser.
You should upgrade or use an alternative browser.
Pass around!!!
- Thread starter franklin
- Start date
J S Machine
Well-Known Member
I got the knife yesterday and brought it to work this morning. I have very good lighting in my office so I was able to get a good look. I first stated in the thread that I would do a full on review and performance test, but since so many other people have done it, I think I will focus on the areas that I think need the most attention. 440C has a good rep anyway, and this knife seems to be right in line with the performance characteristics, from what I've read in this thread of the use people have put it through.
Let me start off by saying I believe these reviews should be honest, and that the makers would never send these knives out if they were not ready for anything that reviewers may find. That being said, I will not hold back because I believe that any tips other makers have for me would be a gold mine. Let me also say that I am not so much a stickler for the way a knife feels in the hand or the way it fits in my hand. I have big hands too, but when I encounter a small knife I see it as a small knife. I tend to get the impression that some people expect small knives to feel exactly like large knives. Smaller knives are not meant to fit perfectly in the hand or be 100% comfortable to use, so I respect that. Personally I tend to like smaller knives because they are not so noticeable and easier to conceal. I asked two guys in the shop to check it out..and these guys are not makers. They are just knife enthusiasts and I wanted their input. Right away, both guys did not like how small the handle was. Again, refer to the previous paragraph about how that is not a big deal to me. The handle felt good in my hand. I do agree with some of the other posters about how they say it could have been rounded off a little more. That's really the only thing I see comfort wise.
Now, I'm going to put your feet to the fire on the details, lol. One of the things that I strive every day for as a maker is attention to detail. It can be very difficult to round out every single thing on one knife. There is often so much going on that it is easy to lose two or three things that really count. I have yet to make a knife that I was 100% satisfied with. Every knife is a learning process, and I often look at other maker's knives and wonder how they do it so well. No doubt, much of it is simply from learning from mistakes and doing it better on "the next one". The problem I have with that personally is that I do not make a whole lot, so it is not as easy to remember all the small stuff that really adds up to the big picture on the ones I do make. I believe that fit and finish should be a main priority for custom makers. The reason I say that is because when people pay the kind of money that custom or handmade knives demand, they don't want to see defects. My feelings are easily hurt when I pick up a $10 knife that someone bought at walmart, and the gaps, grinds, and finish are better than something I spent a month on. This really hits home with me. Not only do I have the responsibility of making a quality knife with good heat treating and edge retention, I have to make it look as good or better than a $10 knife. That's difficult. The only thing that contradicts this is that some people don't have a problem with a small flaw here and there, because they believe it shows that the knife is hand made..and it gives it character. I can promise you though, when it comes to paying customers, the small stuff can cost you a sale.
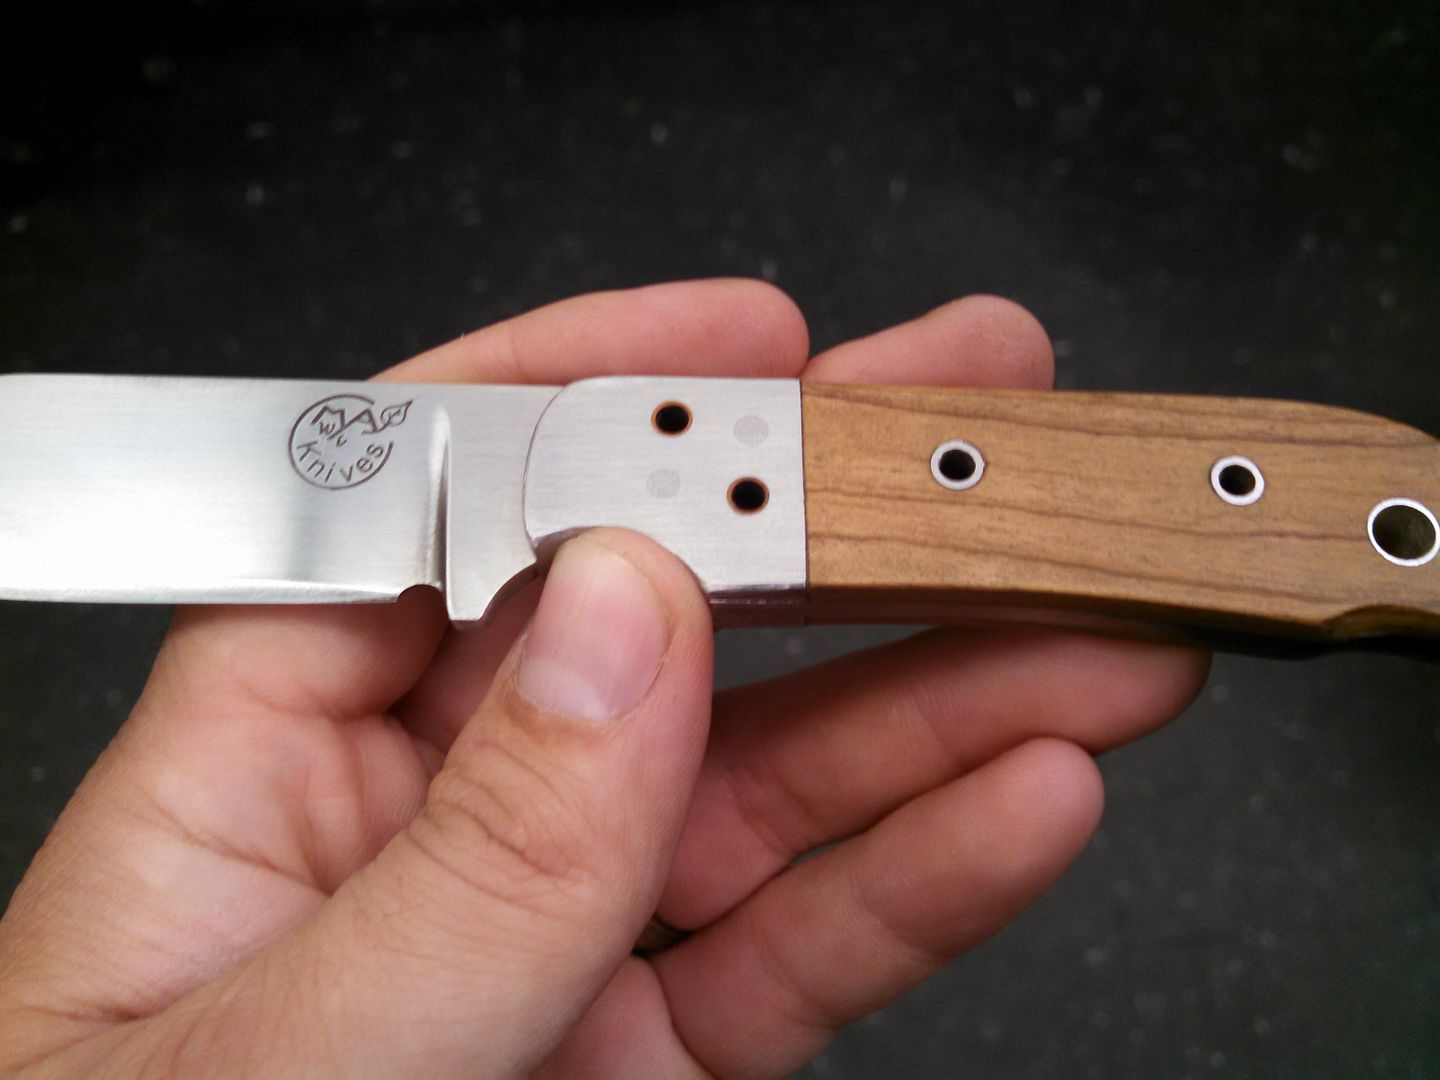
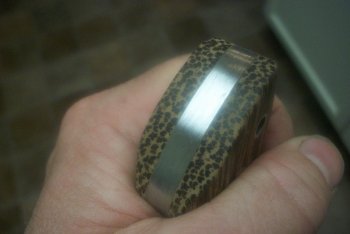
To start with. The knife is very nice overall. You did a good job putting it together and for the most part, everything looks good from a distance. When I get up close though, that's when I get concerned. The overall side profile looks great. You did a good job on your handle to bolster gaps. The hand sanding on the blade looks really good, but I think you needed to go just a tad further back. The tang area of the blade right in front of the bolster shows some of the deeper sanding marks, like where they did not get taken out fully. They are mostly noticeable on the side of the blade that doesn't have the mark. Look closely when you get it back and you'll see what I mean. The only other thing that stands out to me in this first picture is the pins on the bolsters. I'm not sure if these were unintentionally not the same material or what, but they stand out. Hidden pins are supposed to be hidden, and these are clearly seen. Sometimes the pins will give you problems, even when using the same material. Most of the time though, if the same material is used, they are hidden pretty well. Your maker mark looks amazing. I think some other folks commented on how well it was done. It really looks great.
In this next picture, I was trying to point out the very faint vertical sanding lines that were still present right up near the top. Hold it in the light and you will see them. They stand out against the other 99% horizontal sanding scratches that are the hand finished blade.
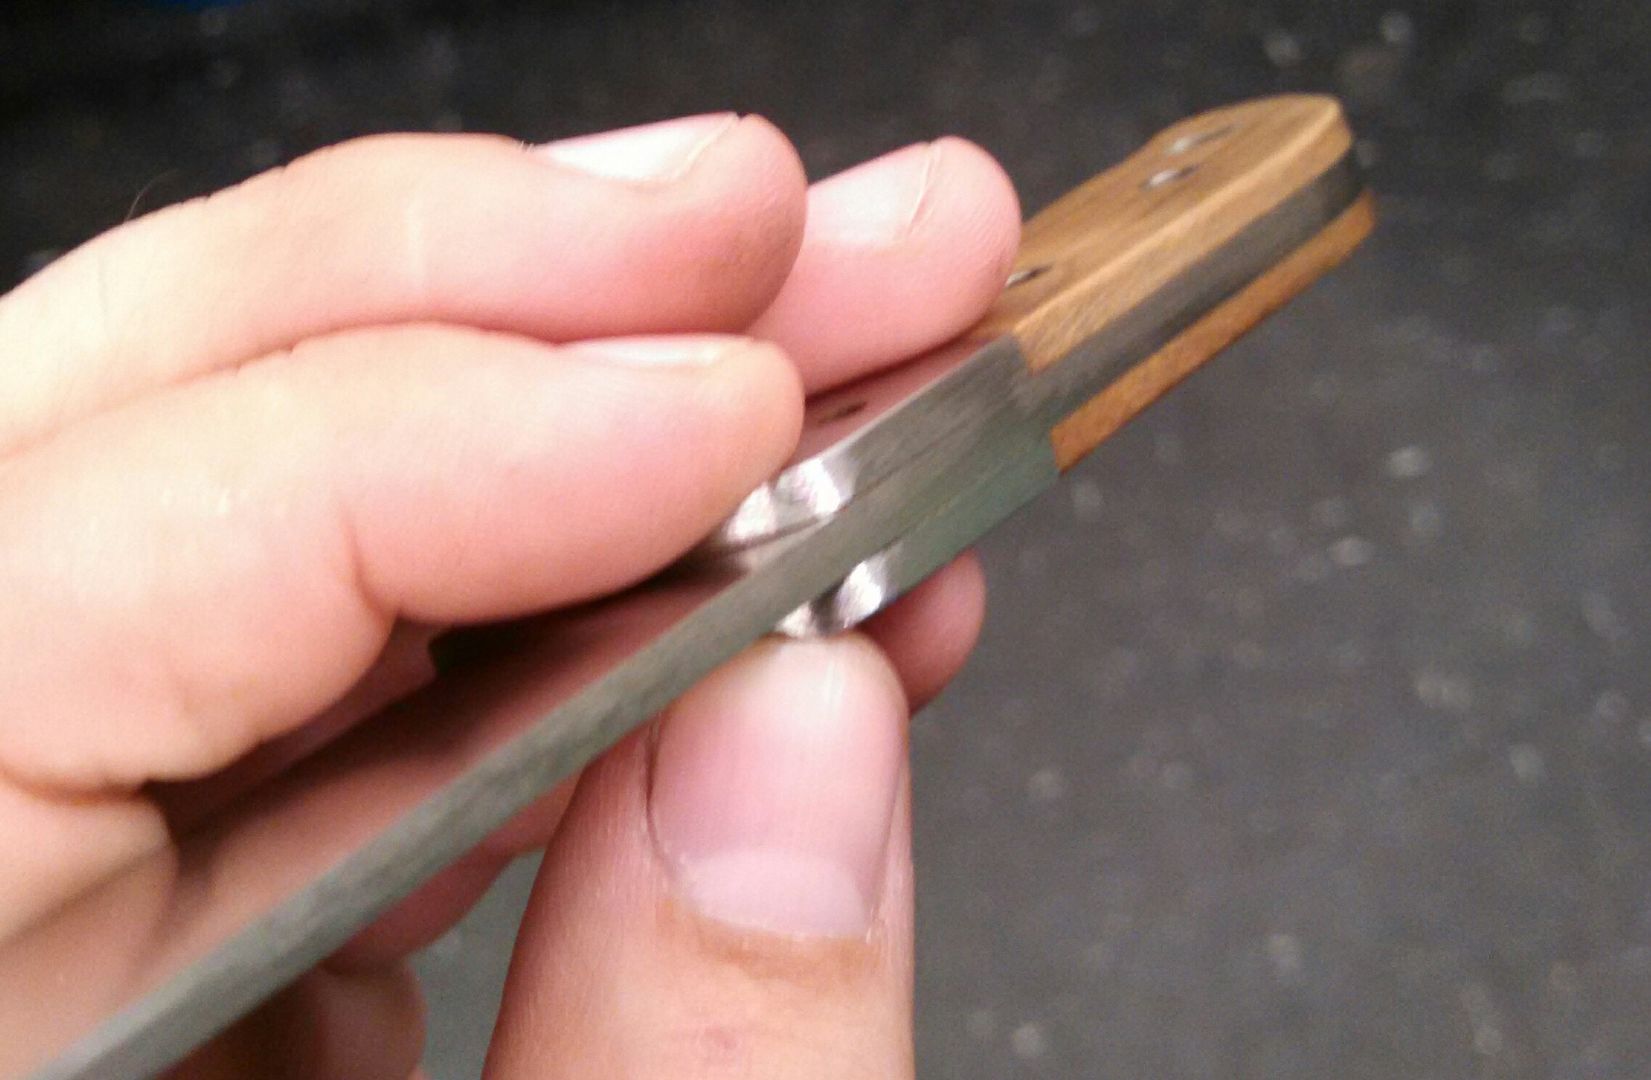
Next on the list are the edge bevels. These are too tall in my opinion. Hard to explain what I'm trying to say, but there is too much bevel. This gives the appearance that it took a whole lot of grinding or work to get down to that edge. The edge should be there, but not so noticeable that it stands out as one of the first things you see. The blade thickness at the start of the bevel is around .030" up near the tang and bolsters, but increases to as much as .045" at the tip. This is most likely the reason the edge bevel appears to get larger as it approaches the tip. On the side of the knife where the maker mark is, the edge bevel near the tip is close to .125" tall, or 1/8". On the opposite side, it is about .070". Its inconsistency was noticed by one of the guys I had handle it, before I even had a chance to point it out.
Now for a good picture of the mark nearly every person in the thread has mentioned. Here it is. My thoughts here are pretty much consistent with everyone else. It would not leave my shop like this.
This is a real problem area. For your first attempt at bolsters, you did really good. However, this grinding job on the fronts of these could be way better. This often gets many new makers. Simply because they think they have them looking pretty good and then they pin everything together. The problem then is that you cannot get to the fronts anymore to touch them up or finish them without hitting the blade. A tip here is to take those bolsters, and put your pins through them before you actually fix them to the blade. Work them on your grinder or sander and get them looking really good up front. work your way down through the grits and even polish if you so choose, but have it done before you mount them to the blade..because as stated, afterwards, there is nothing you can do really.
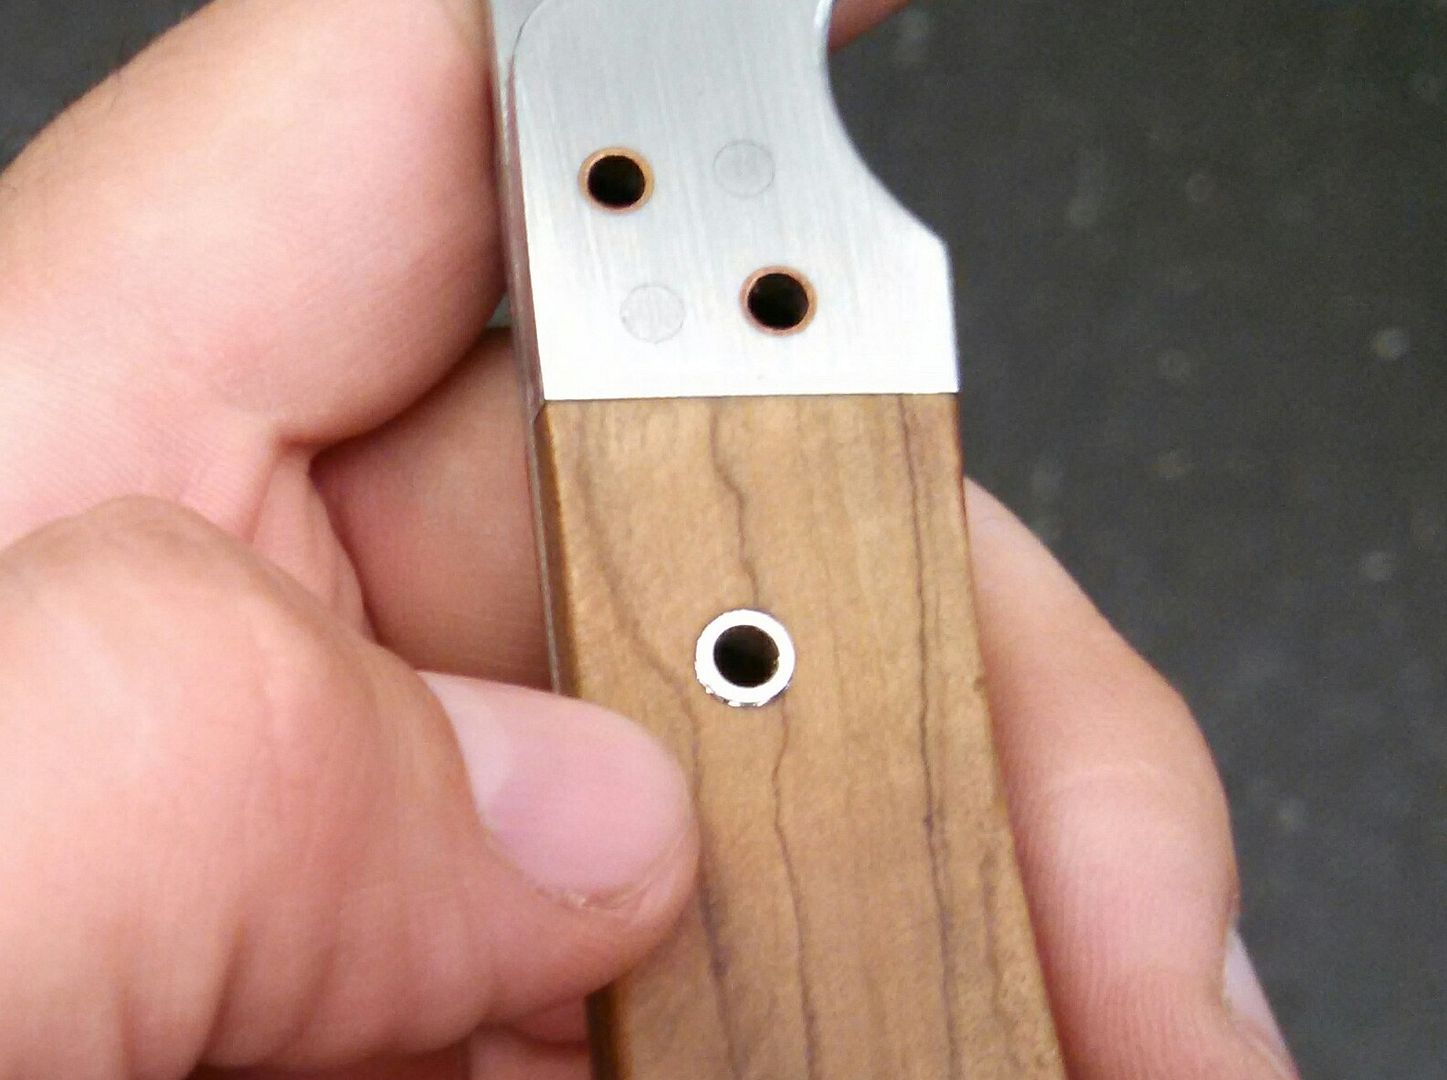
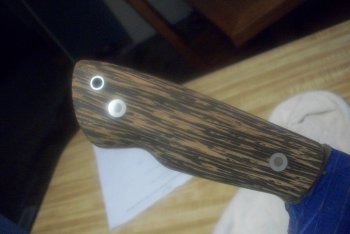
And finally, the first thing that hit me when I took the knife out of the box. I saw this before I ever took it out of the sheath. These pins in these handles still have "flash" from grinding. You can see it here right in front of my thumb. Flash is where you have ground something and the excess rolls over the edge. If not closely aid attention to, it will remain. I find that working my way down through the grits will eventually get rid of this. truth be told, the 400 grit you said you used probably would have done it, but you would simply have to spend more time concentrating on the pins. Always be sure to remove this. I can feel the pin sticking up slightly above the handle surface, so there is still some there to grind. Give it a shot and see if you can get that flash off.
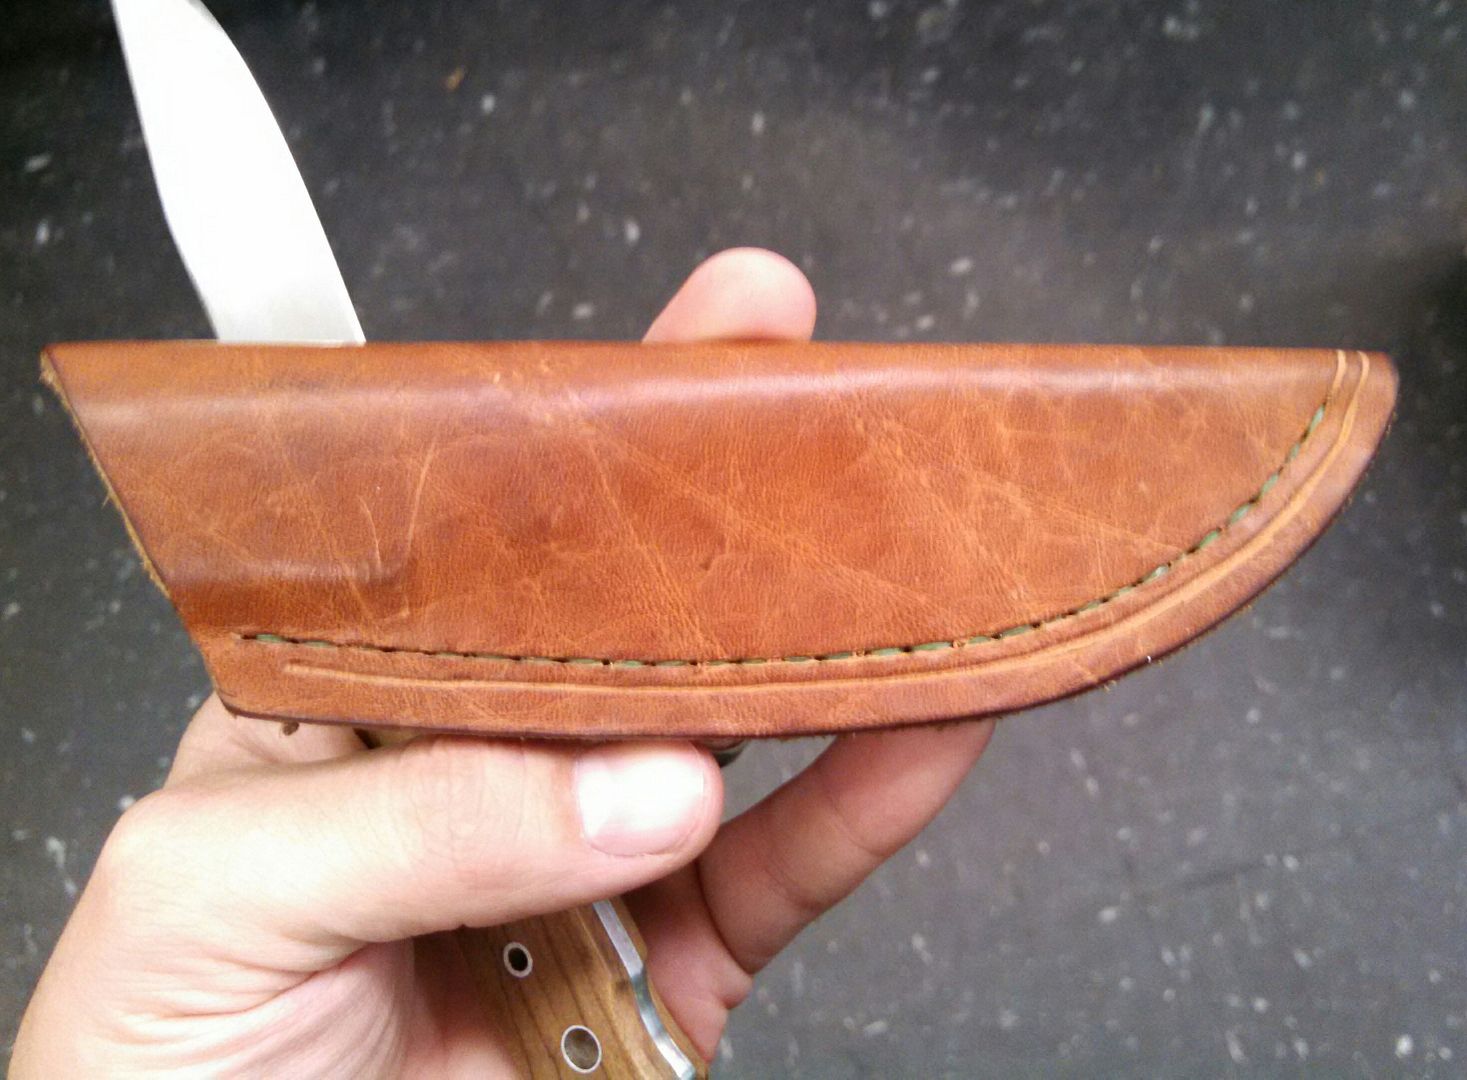
The sheath. It looks good and has a great fit. I'm not gonna hold your feet to the fire on this because I don't build sheaths. I think the trend you see with the majority of makers is that they put most of their efforts in their knives, and sheaths are kind of an after thought. Very few sheaths made by the actual knife maker really impress me. But again, I am looking more at the knife, not the sheath. Functionality is what would make the difference to me, and this sheath does a fine job of that. Both of the guys here in the shop also commented about how nice the knife fit down in there. Good job. I do see the wandering tooling line that others pointed out..but hey, practice makes perfect. Keep working at it and you'll get better.

My final thoughts are that the overall finish of the knife seems rushed. The sanding marks on the top of the blade (the spine) all the way around the handle to the the bottom in the index finger groove are really rough. I can even see chatter marks from your grinder, which is where the knife bounces as it is being moved over the surface. It leaves very small wavy marks..hence the name "chatter." This is present on the blade tang on the top and bottom of the handle. I also see it up on the spine towards the tip of the blade. These marks are still big enough to grab a fingernail. Again, work your way down through the grits and try to remove these unsightly marks. Remember, attention to detail.
I hope my thoughts don't seem harsh. I simply pointed out the things that concern me the most. I believe that a makers reputation means everything. Always ask yourself what people would think of something, and like you have done here, do pass arounds to get unbiased reviews. Ever maker will have different opinions about what they consider a priority..but remember that eyes will pick your knives apart every time it is held. It is your job to try to do the best you can do to keep those eyes from finding anything to speak about. Keep up the good work. You will only get better and better with experience. I hope this has been helpful")
Let me start off by saying I believe these reviews should be honest, and that the makers would never send these knives out if they were not ready for anything that reviewers may find. That being said, I will not hold back because I believe that any tips other makers have for me would be a gold mine. Let me also say that I am not so much a stickler for the way a knife feels in the hand or the way it fits in my hand. I have big hands too, but when I encounter a small knife I see it as a small knife. I tend to get the impression that some people expect small knives to feel exactly like large knives. Smaller knives are not meant to fit perfectly in the hand or be 100% comfortable to use, so I respect that. Personally I tend to like smaller knives because they are not so noticeable and easier to conceal. I asked two guys in the shop to check it out..and these guys are not makers. They are just knife enthusiasts and I wanted their input. Right away, both guys did not like how small the handle was. Again, refer to the previous paragraph about how that is not a big deal to me. The handle felt good in my hand. I do agree with some of the other posters about how they say it could have been rounded off a little more. That's really the only thing I see comfort wise.
Now, I'm going to put your feet to the fire on the details, lol. One of the things that I strive every day for as a maker is attention to detail. It can be very difficult to round out every single thing on one knife. There is often so much going on that it is easy to lose two or three things that really count. I have yet to make a knife that I was 100% satisfied with. Every knife is a learning process, and I often look at other maker's knives and wonder how they do it so well. No doubt, much of it is simply from learning from mistakes and doing it better on "the next one". The problem I have with that personally is that I do not make a whole lot, so it is not as easy to remember all the small stuff that really adds up to the big picture on the ones I do make. I believe that fit and finish should be a main priority for custom makers. The reason I say that is because when people pay the kind of money that custom or handmade knives demand, they don't want to see defects. My feelings are easily hurt when I pick up a $10 knife that someone bought at walmart, and the gaps, grinds, and finish are better than something I spent a month on. This really hits home with me. Not only do I have the responsibility of making a quality knife with good heat treating and edge retention, I have to make it look as good or better than a $10 knife. That's difficult. The only thing that contradicts this is that some people don't have a problem with a small flaw here and there, because they believe it shows that the knife is hand made..and it gives it character. I can promise you though, when it comes to paying customers, the small stuff can cost you a sale.
To start with. The knife is very nice overall. You did a good job putting it together and for the most part, everything looks good from a distance. When I get up close though, that's when I get concerned. The overall side profile looks great. You did a good job on your handle to bolster gaps. The hand sanding on the blade looks really good, but I think you needed to go just a tad further back. The tang area of the blade right in front of the bolster shows some of the deeper sanding marks, like where they did not get taken out fully. They are mostly noticeable on the side of the blade that doesn't have the mark. Look closely when you get it back and you'll see what I mean. The only other thing that stands out to me in this first picture is the pins on the bolsters. I'm not sure if these were unintentionally not the same material or what, but they stand out. Hidden pins are supposed to be hidden, and these are clearly seen. Sometimes the pins will give you problems, even when using the same material. Most of the time though, if the same material is used, they are hidden pretty well. Your maker mark looks amazing. I think some other folks commented on how well it was done. It really looks great.
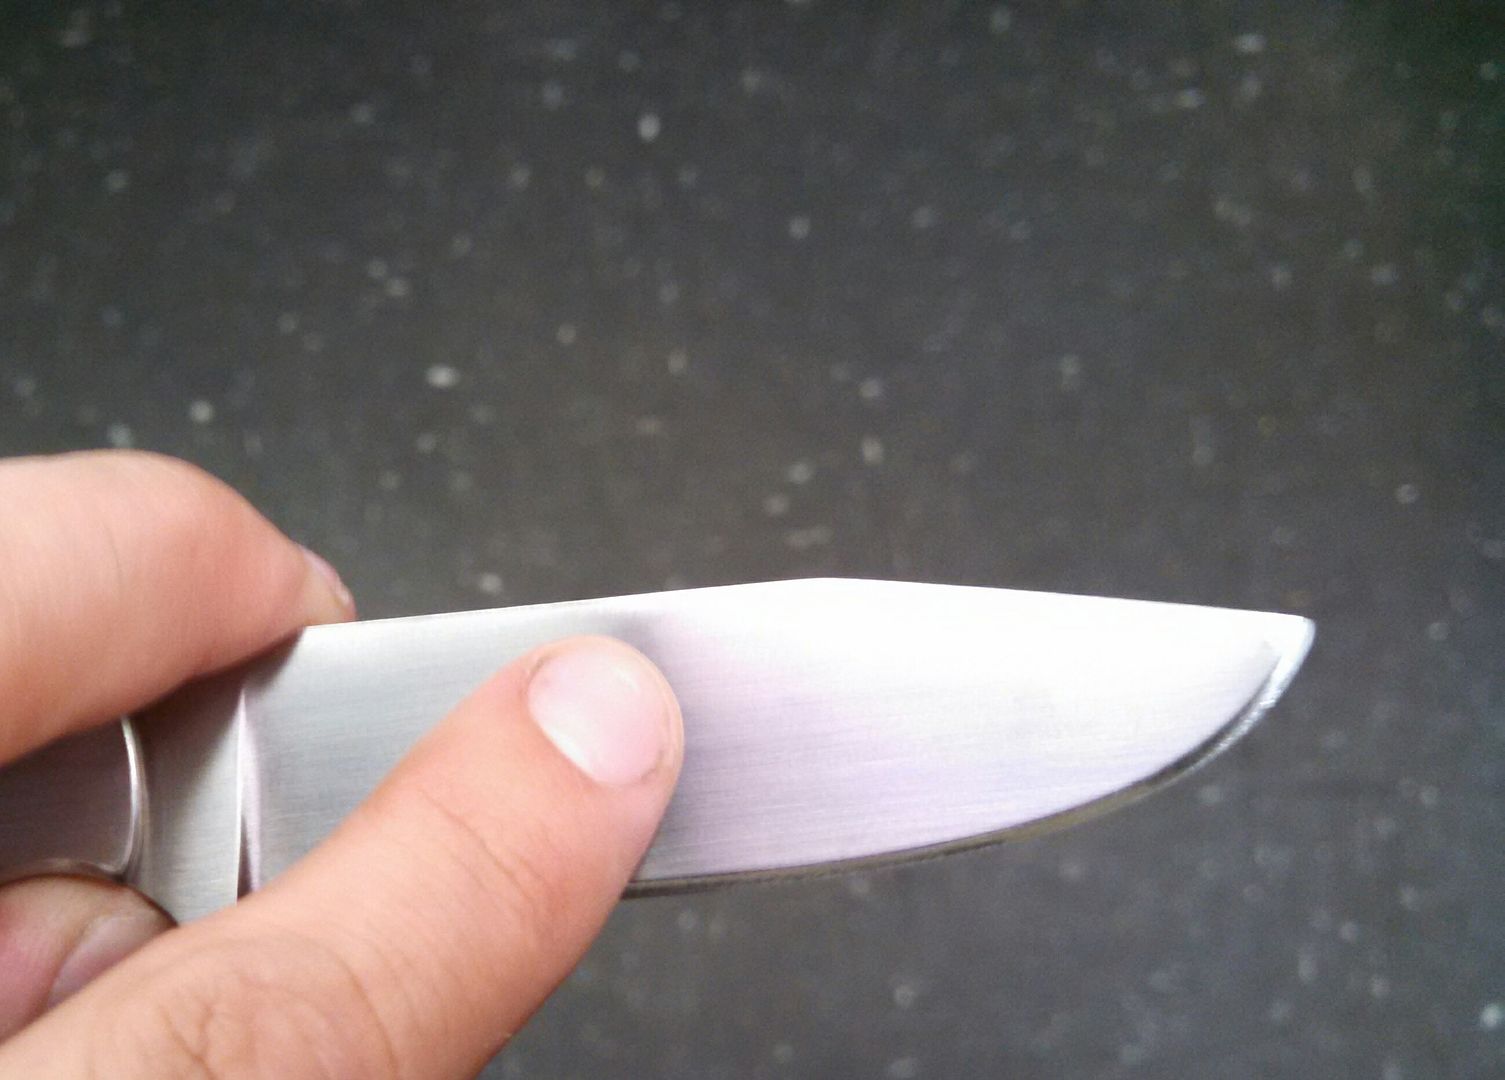
In this next picture, I was trying to point out the very faint vertical sanding lines that were still present right up near the top. Hold it in the light and you will see them. They stand out against the other 99% horizontal sanding scratches that are the hand finished blade.
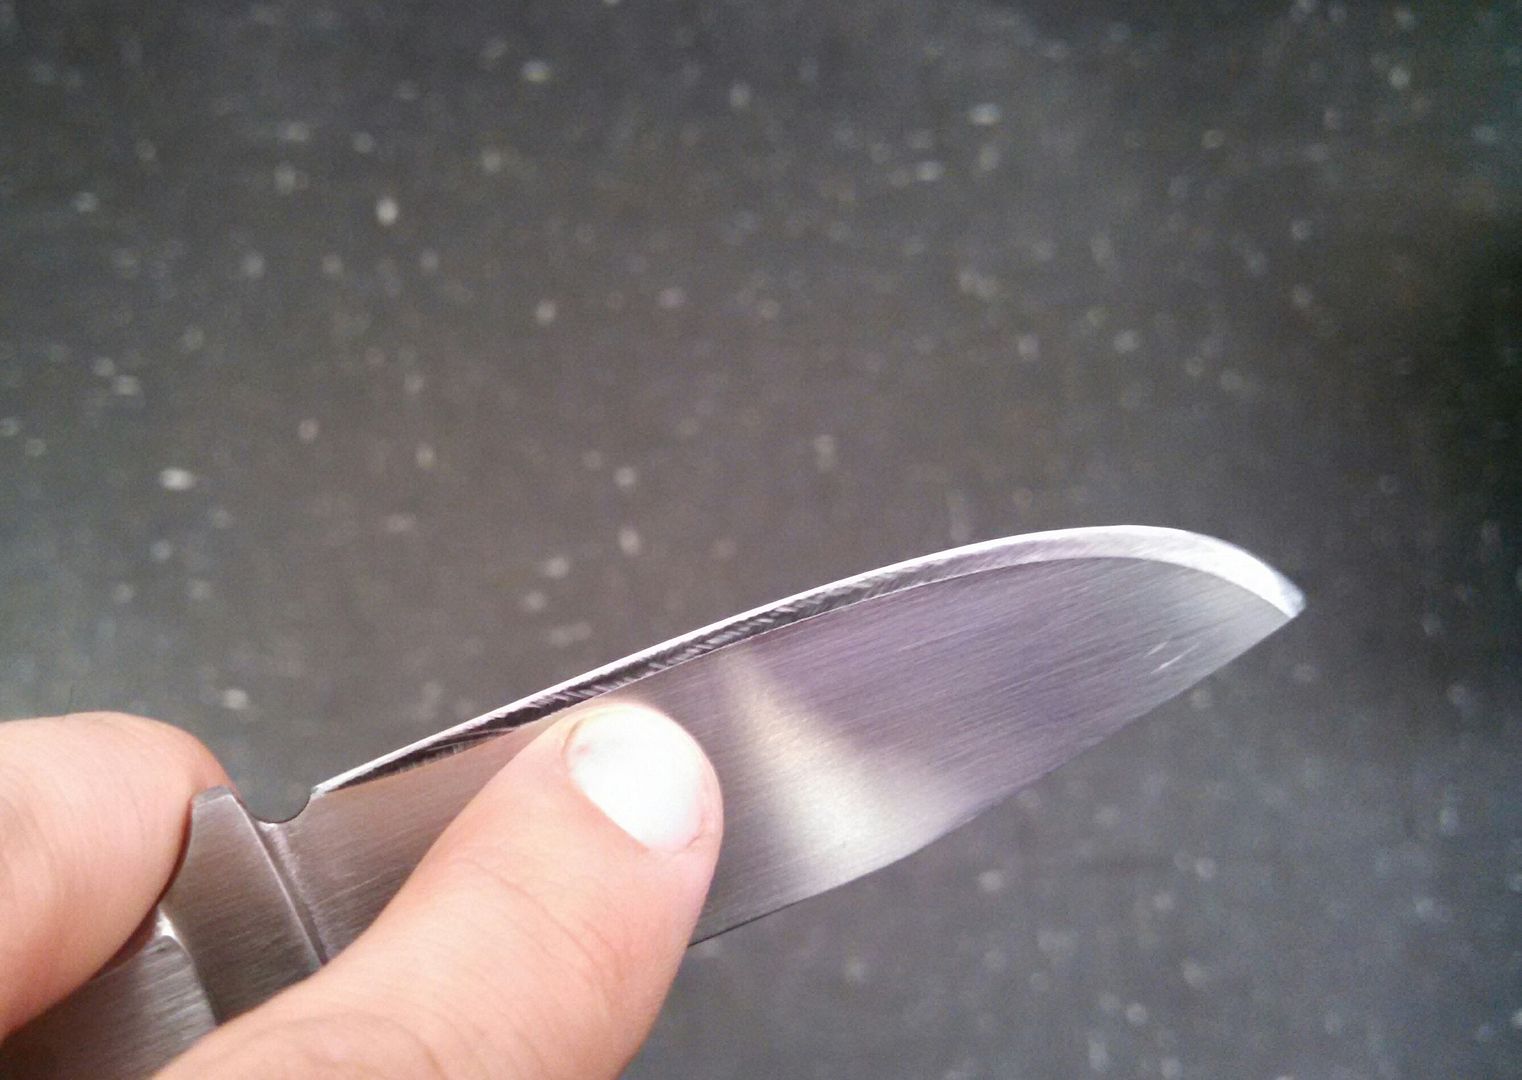
Next on the list are the edge bevels. These are too tall in my opinion. Hard to explain what I'm trying to say, but there is too much bevel. This gives the appearance that it took a whole lot of grinding or work to get down to that edge. The edge should be there, but not so noticeable that it stands out as one of the first things you see. The blade thickness at the start of the bevel is around .030" up near the tang and bolsters, but increases to as much as .045" at the tip. This is most likely the reason the edge bevel appears to get larger as it approaches the tip. On the side of the knife where the maker mark is, the edge bevel near the tip is close to .125" tall, or 1/8". On the opposite side, it is about .070". Its inconsistency was noticed by one of the guys I had handle it, before I even had a chance to point it out.
Now for a good picture of the mark nearly every person in the thread has mentioned. Here it is. My thoughts here are pretty much consistent with everyone else. It would not leave my shop like this.
This is a real problem area. For your first attempt at bolsters, you did really good. However, this grinding job on the fronts of these could be way better. This often gets many new makers. Simply because they think they have them looking pretty good and then they pin everything together. The problem then is that you cannot get to the fronts anymore to touch them up or finish them without hitting the blade. A tip here is to take those bolsters, and put your pins through them before you actually fix them to the blade. Work them on your grinder or sander and get them looking really good up front. work your way down through the grits and even polish if you so choose, but have it done before you mount them to the blade..because as stated, afterwards, there is nothing you can do really.
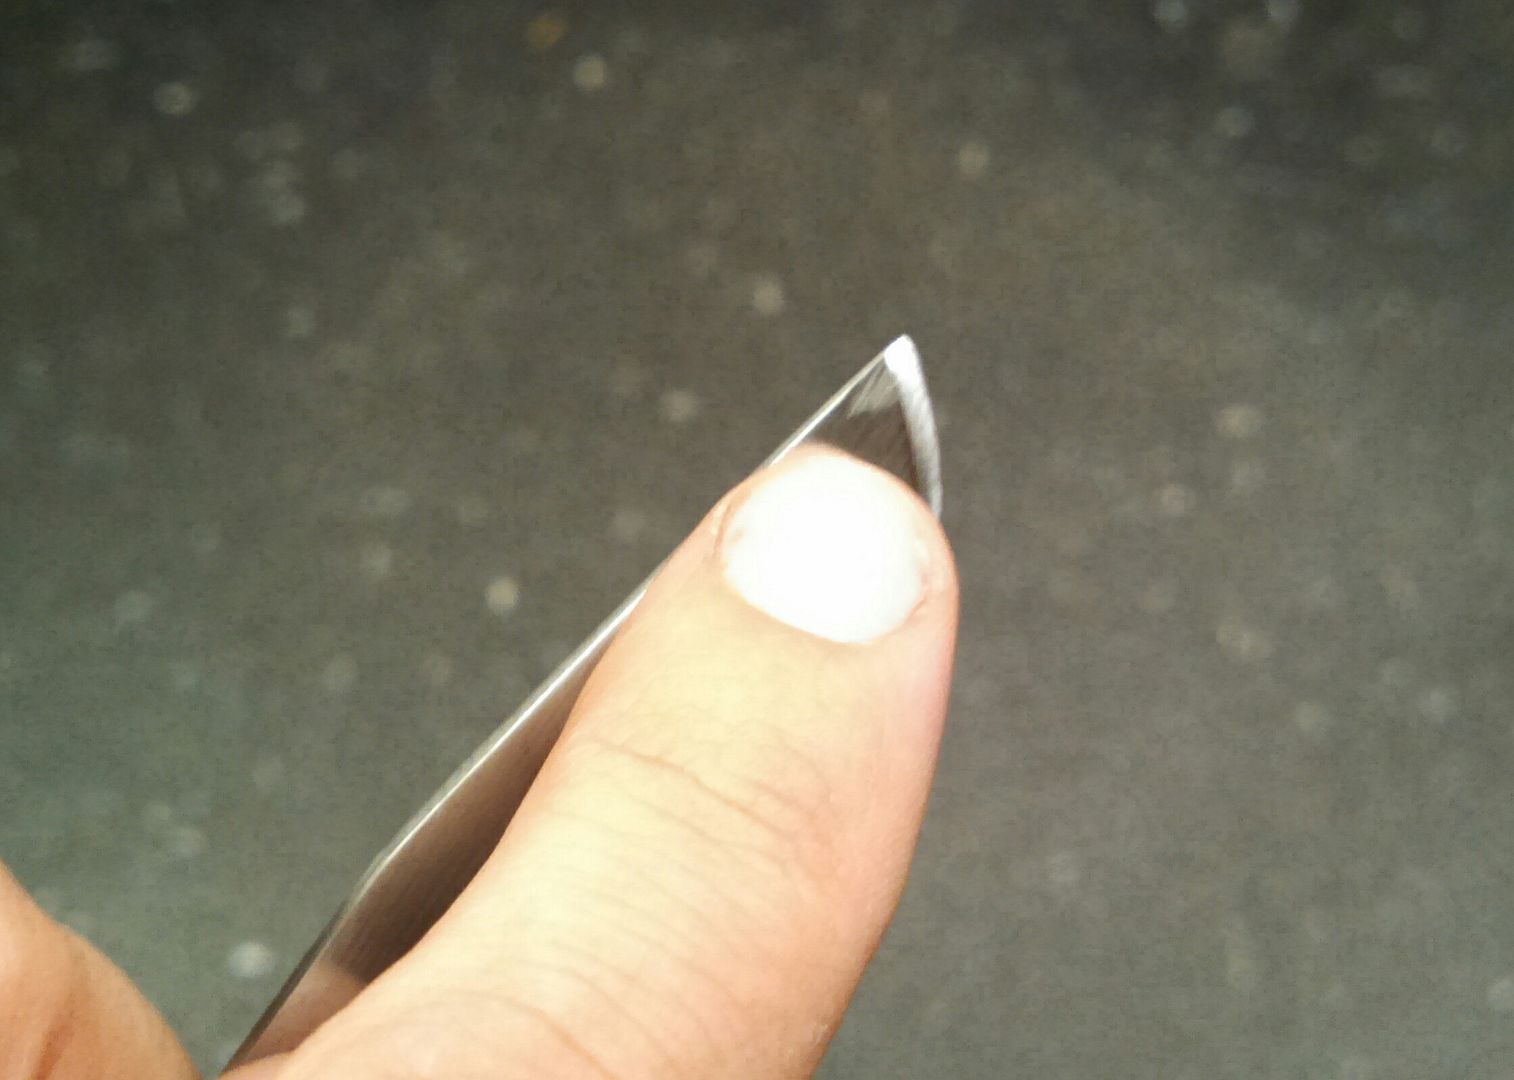
And finally, the first thing that hit me when I took the knife out of the box. I saw this before I ever took it out of the sheath. These pins in these handles still have "flash" from grinding. You can see it here right in front of my thumb. Flash is where you have ground something and the excess rolls over the edge. If not closely aid attention to, it will remain. I find that working my way down through the grits will eventually get rid of this. truth be told, the 400 grit you said you used probably would have done it, but you would simply have to spend more time concentrating on the pins. Always be sure to remove this. I can feel the pin sticking up slightly above the handle surface, so there is still some there to grind. Give it a shot and see if you can get that flash off.
The sheath. It looks good and has a great fit. I'm not gonna hold your feet to the fire on this because I don't build sheaths. I think the trend you see with the majority of makers is that they put most of their efforts in their knives, and sheaths are kind of an after thought. Very few sheaths made by the actual knife maker really impress me. But again, I am looking more at the knife, not the sheath. Functionality is what would make the difference to me, and this sheath does a fine job of that. Both of the guys here in the shop also commented about how nice the knife fit down in there. Good job. I do see the wandering tooling line that others pointed out..but hey, practice makes perfect. Keep working at it and you'll get better.
My final thoughts are that the overall finish of the knife seems rushed. The sanding marks on the top of the blade (the spine) all the way around the handle to the the bottom in the index finger groove are really rough. I can even see chatter marks from your grinder, which is where the knife bounces as it is being moved over the surface. It leaves very small wavy marks..hence the name "chatter." This is present on the blade tang on the top and bottom of the handle. I also see it up on the spine towards the tip of the blade. These marks are still big enough to grab a fingernail. Again, work your way down through the grits and try to remove these unsightly marks. Remember, attention to detail.
I hope my thoughts don't seem harsh. I simply pointed out the things that concern me the most. I believe that a makers reputation means everything. Always ask yourself what people would think of something, and like you have done here, do pass arounds to get unbiased reviews. Ever maker will have different opinions about what they consider a priority..but remember that eyes will pick your knives apart every time it is held. It is your job to try to do the best you can do to keep those eyes from finding anything to speak about. Keep up the good work. You will only get better and better with experience. I hope this has been helpful
Last edited:
franklin
Well-Known Member
To Js and every one who took part in the pass around I thank you for your time and honest reviews.
Js great write up I saw what you call flash just did not now how to fix so thanks for the tip on that, The pins were different I thought they would off set the tubes. Now latter, I think maybe solid copper pins would have looked better. Again thank you all for helping me become a better maker and to see the things I need to pay closer attention to and learn new ways to do a better job. This will not be my last pass around this had many firsts
on this knife and was intended to make me stretch and grow my skills. So my final thought is I will be getting this knife back and
matching up to the reviews and learning to do better in those spots again thanks to all this helped out big time
Larry franklin (mya knives)
J S Machine
Well-Known Member
Larry, I meant to say I'll have it returned to you in a few days. Please pm me your address again if you don't mind.
franklin
Well-Known Member
Hey guys just a quick check in to let you guys now I took every one's reviews to heart and am trying to get better at all the things that were brought to my
attention. The hardest for me is the spine area for I do not have small wheels as of yet on my grinder so I use a dremel so I did this one buy hand. Thanks to Js I fixed the flashing thing and I went with a reamer to help with the gap thing with the pins. here are some pics of the things I am improving on.
attention. The hardest for me is the spine area for I do not have small wheels as of yet on my grinder so I use a dremel so I did this one buy hand. Thanks to Js I fixed the flashing thing and I went with a reamer to help with the gap thing with the pins. here are some pics of the things I am improving on.
Attachments
J S Machine
Well-Known Member
Looks a lot better, Larry. Keep working at it. Never stop improving!
backtines
Well-Known Member
Wow! Big difference .. Definitely on the right road.. Sometimes the smallest detail will send the whole knife in a different direction.. Good job !
Ya ya know what Larry? I bet you will never make a knife again without paying attention to those details provided in the comments listed above.
Keep up the good work!
Ya ya know what Larry? I bet you will never make a knife again without paying attention to those details provided in the comments listed above.
Keep up the good work!
bushcraftbasics
Well-Known Member
...I never will either! thanks for the tips guys