Slipjoint

Sean Cochran

Well-Known Member
Here is my second slipjoint, Im hooked on making folderscool 1.

This one is ATS34 and elk with n/s bolsters.
Ok, tear it up guys, let me know what I can do to improve.
BTW this is also my first time using the lightboxunsure so some photo tips would be appreciated.

Thanks
Sean
 

Attachments

  • elksmaller1.JPG
    elksmaller1.JPG
    61.6 KB · Views: 68
  • elksmaller2.JPG
    elksmaller2.JPG
    68.3 KB · Views: 49
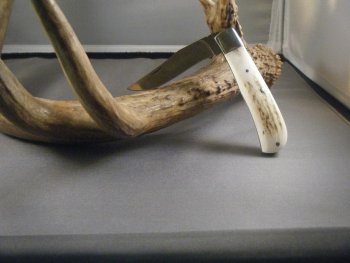
Looks good from here. The Elk is a nice touch! cool 1

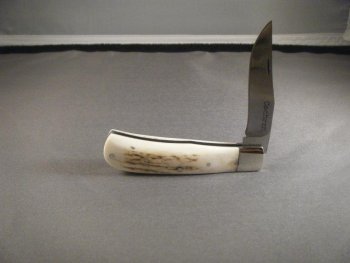
I would move your first liner pin toward your bolster and your second liner pin down toward the edge of your stag. The end pin should hold your stag in place in the back, but that Elk could move a bit near the bolster and where your fingers wrap around the handle.

As for fit and finish...like I said from what I can see it looks good. Here are some questions that I ask myself when I make a slip joint.

How is the action?
Is there any play in the blade when the knife is open.....or closed?
Does it open and close smoothly?
Does it have a good snap?
What about the spring in all three positions... is it flush?
Is the blade centered?
Are all the corners smooth?
How does it feel in the hand?
How does it feel in the pocket?
Can you see any scratches with a magnifying glass?
Are there any gaps between the spring and the liners when I hold it up to a light?

I try to pick it apart before it ever gets chicken eyed by anyone else. I always miss something...or see something after its to late to fix. But that just fuels the fire in me to make another one ;)

Keep up the good work!
 
Last edited:
standard rule of thumb for lighting is 1/3 from the front, 2/3's from the back.
The lights should be like a Sun - high and aiming down at an angle. Don't be afraid to move them if a stray reflection is blowing out a part of the picture.
Change your lighting often and see where the shadows are.
Look at the focus. Both of your pictures are quite soft. If you have manual focus, always use that. Use a tripod. Use Daylight colored fluorescent bulbs.
No props. You rarely see pro's use props for their pictures and if they do, they have mastered everything else first.
Work on lighting and focus before anything else. I just spent 15 minutes trying different lights, flash, on/off, angles and such for 1 shot on just plain old wood. I took at least 30 pictures and I am shooting tethered shots which means the pictures go from my camera to my laptop so I can look at them real time.

Lighting and focus. Software processing is down the list 3rd of 4th.

good pictures = more money.
 
Last edited:
Brent,
Thanks for the help. I am really enjoying folders, but man are they challenging.:eek:. Ill answer your questions, maybe you can see something I missed. Again thanks so much for the help.
BTW I looked at your work, great looking knives.


How is the action?
Is there any play in the blade when the knife is open.....or closed?
No play in the blade.
Does it open and close smoothly?Yes, I buffed the corners of the tang. Is that a good idea?
Does it have a good snap?Probably the best part of the knife, I was really happy.
What about the spring in all three positions... is it flush?Yes. Although my thumbs are sore from test fits.
Is the blade centered?:mad:No. Could I have gotten a pin not drilled straight?.
Are all the corners smooth?yep
How does it feel in the hand?pretty good.
How does it feel in the pocket?Not too good, I left the scales way too thick. Next time when I think they are thin enough Ill go just a little morecool 1
Can you see any scratches with a magnifying glass?didnt check, looks good to the naked eye
Are there any gaps between the spring and the liners when I hold it up to a light?nope
 
Bossdog
Thanks for the photo help. I think I had my lights too low. Should the subject be right in the middle?
 
That's great Sean! I'm just offering what I have picked up along the way...I am no expert. (I am not sure I would even call myself a knife maker yet! I got a long way to go.)

I thought I would address some of your statements. Take this for what it's worth.

:Yes, I buffed the corners of the tang. Is that a good idea?

I will buff the bottom corner of the tang quite a bit but the top I just knock the sharp edge off so its difficult to break over.........to close.

Is the blade centered?:mad:No. Could I have gotten a pin not drilled straight?.

That is always a challenge. Be sure to grind the blade to a center scribe line. Check your drill press table, be sure it's perpendicular...and drill under size then use a reamer. Do you use bushings...that helps. http://boseknives.com/pvtbushing/

How does it feel in the pocket?Not too good, I left the scales way too thick. Next time when I think they are thin enough Ill go just a little more cool 1

That gets a little scary. When I remove stock from scales I take them down to where I almost feel I've ruined them, and even then they some times come out a little to thick.

Can you see any scratches with a magnifying glass?didn't check, looks good to the naked eye

If you use a magnifying glass while your finish sanding you can catch the stuff that might show up in different lighting.....sometimes I'll take the knife out side just to see if any flaws show up in the sun.

Like I said your doing great! Make another one and do it better than the last one;)
 
Last edited:
Thanks for the help, Brent Ive got the next one on the bench.
I thought about bushings but didnt know how they would work on a slippie, thanks for the link.
 
standard rule of thumb for lighting is 1/3 from the front, 2/3's from the back.
The lights should be like a Sun - high and aiming down at an angle. Don't be afraid to move them if a stray reflection is blowing out a part of the picture.
Change your lighting often and see where the shadows are.
Look at the focus. Both of your pictures are quite soft. If you have manual focus, always use that. Use a tripod. Use Daylight colored fluorescent bulbs.
No props. You rarely see pro's use props for their pictures and if they do, they have mastered everything else first.
Work on lighting and focus before anything else. I just spent 15 minutes trying different lights, flash, on/off, angles and such for 1 shot on just plain old wood. I took at least 30 pictures and I am shooting tethered shots which means the pictures go from my camera to my laptop so I can look at them real time.

Lighting and focus. Software processing is down the list 3rd of 4th.

good pictures = more money.

Tracy,
Where is the best place to get the lighting I need? I am using a cheap portable light box and the lights that came with it. I tried using a work light but the light seems to harsh.

Thanks
Sean
 
Back
Top