The "Pride" Folder WIP

BrandantR

Well-Known Member
For the last couple of years that I have been following along on this forum, I have greatly appreciated those who have taken the time to share their talents, insights, and techniques with the rest of us. As a new knife maker, I have tried to absorb as much info from other people's posts as humanly possible, as well as apply that knowledge to my own skills and procedures. After all I have taken from this site, it's about time for me to start giving back to the community. So, I decided to share this build with my Knife Dog friends. I hope you enjoy following along with me on this build. I just hope it doesn't end in catastrophic failure. That would be embarrassing :p.


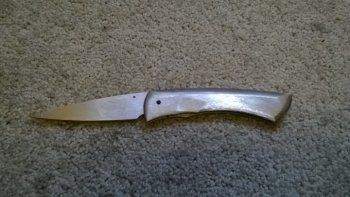
This is a new design that I'm really excited about. I settled on the name of "Pride" for this knife design. I hope I can look back when this is all said and done and experience the pride that is this knife's namesake. I'm going to try something a little new for me on this build too which should be interesting. I'm going to make this knife with no visible hardware (except maybe a thumb stud screw); just pins and a lot of peening. I will use screws inside for the "guts" of the knife to make it easier to get the lock and workings fit properly, but, in the end, no screws will be visible. Let's get started.

WP_20150724_11_37_15_Pro.jpg

Here is the birthplace of all my knives; the raw materials that will be ground and shaped until everything that is not the knife is removed. That's what we call the "stock removal" process. I have the paper pattern cut out, a bar of CPM 154 for the blade, a chunk of 416 stainless that will become the scales and a sheet of 6al4v titanium for the liners.

WP_20150724_13_11_56_Pro.jpg

After gluing the patterns onto the metal (I just use Elmer's Rubber Cement), I cut the parts out to rough shape on the band saw. The two scales get glued together temporarily with a couple drops of superglue. This way, when the are profile ground, they will be exactly the same shape. The liners get the same treatment. Since this is a prototype with a new pattern, a piece of titanium gets glued to the blade and an additional liner is added to the stack for use as patterns for the next time I make a knife of this same design, if everything works out that is.

WP_20150724_16_04_52_Pro.jpg

All the parts shown above have been profile ground. With the paper patterns still attached and the parts still superglued together, I drilled all the holes through the various parts. After giving the stacked parts a couple of sharp taps on a solid surface, the glue just pops off. The leftover glue gets dissolved by a little acetone and each part gets a few strokes on the surface plate to flatten everything up nicely and to remove any burs. The holes that will receive screws get threaded and countersunk as well.

WP_20150724_17_23_44_Pro.jpg

After popping the blade into the heat treat oven for hardening, I made a quick trip to the store and picked up some dry ice and a small Styrofoam cooler. The dry ice is used in a sub-zero treatment on the CPM 154 steel to convert as much leftover Austenite to Martensite as possible, producing the best possible conditions for the blade. While the blade was still in the oven, I made this little box out of the Styrofoam cooler using the handyman's secret weapon, Duct Tape! Some folks use a liquid such as acetone or glycol and add the dry ice to the liquid. I've found that simply crushing up the dry ice and embedding the blade in the "snow" works just as well without all the hassle of dealing with a liquid. This little box worked like a charm.

WP_20150724_17_23_54_Pro.jpg

Here's a look inside the little "sub-zero" box. Pretty simple construction. Just two layers of Styrofoam taped together.

WP_20150725_16_00_24_Pro.jpg

Once the blade was done with the sub-zero treatment, it went through two temper cycles to draw back the hardness to about a 59 HRC. The above photo shows the spacer screwed to the right liner, the stop pin pushed through the liner, and the pivot pin, bushing, and washer in place. The pivot pin is only temporary as it will be replaced with a 1/8" piece of 416 stainless that will be peened in place later on. If you look closely, you will see the tip of the spacer has been colored black with a marker and a fine line scratched into it. This scratched line shows where the spacer needs to be trimmed back to so that the blade swings to the proper "open" position.

WP_20150725_16_09_43_Pro.jpg


The spacer has been ground back and the blade stops in the perfect open position.

WP_20150725_16_09_51_Pro.jpg

With the open position dialed in, the closed position gets adjusted. This is done by grinding away the blade tang with a 1/2" wheel until the point of the blade drops down far enough that it will not be protruding beyond the liner. As seen in the photo above, the closed position is just right.

WP_20150725_16_21_32_Pro.jpg

Next, the lock bar gets cut into the right liner. In the photo above, the vertical scratch in the black ink is where the blade tang ends and where the lock face will begin. This gets cut into the liner using a small, thin cutoff wheel mounted in my drill press. I've shown this process before on my blog, so you can scan back through previous posts here http://robinsonedge.blogspot.com/ if you are curious. I do want to mention that I leave the lock bar face a little long so that I can dial in the lock a little further on in the build.

WP_20150725_16_40_01_Pro.jpg

After the lock gets cut into the liner, I use some cloth-backed sandpaper to remove any burrs and to polish up the inside of the cut. I use a shoe-shine action on the paper to accomplish this task with the liner fastened into my vise.
 
WP_20150725_17_09_25_Pro.jpg

Here is my surface plate with a piece of 220 grit sandpaper (poor man's surface grinder). I use rubber cement to keep the paper attached to the plate while I lap all of the mating surfaces, making them absolutely flat. This is essential so that there is no gap between parts. The glue cleans easily off the granite slab with a little bit of acetone.

WP_20150725_17_16_19_Pro.jpg

Here is the first trial fit of the knife. The scales have been temporarily fastened together with pins. This is the first look at what the knife will look like once it's finished. I think this design is going to be a real keeper.

WP_20150725_17_29_05_Pro.jpg

With the scales, liners, blade and spacer fastened together temporarily, I am able to grind the whole profile of the knife to its final dimensions and blend all the parts in seamlessly together.

WP_20150725_17_29_16_Pro.jpg

This is a photo of the spine of the knife. You can see how everything is blended in nicely. No gaps here. I am going for a really elegant and sleek look with this knife, so there will be no file work on this piece. I do, however, plan on trying my hand at carving and texturing the scales to add some nice embellishments to the knife. That should be a fun challenge.


WP_20150727_18_19_08_Pro.jpg

Here I have given the handle the beginnings of its shape using the slack belt attachment on my grinder. At this point I'm keeping the shape very basic. It will be refined later on as the build progresses.

WP_20150731_14_14_32_Pro.jpg

Now it's time to focus attention on grinding the blade. The edge gets painted with some Dykem and a center line scratched in for reference to help keep everything symmetrical.

WP_20150731_15_54_40_Pro.jpg

Here's the blade after it gets its hollow grind. I have a 6" contact wheel on my grinder, so it's quite a deep grind, giving the edge a very fine geometry. I have it finished up to 1500 grit here, but the blade will get a 600 grit hand-rubbed satin finish soon.

WP_20150731_17_22_25_Pro.jpg

I have given the insides of the liners a jeweled finish. I think this subtle detail is worth the effort. I didn't get any pics of the process of jeweling that I use, but you can check out my blog where I have show my methods before.

WP_20150801_13_36_52_Pro.jpg

Time for a test fit. Everything is looking good so far.
 

Attachments

  • 1.jpg
    1.jpg
    77.6 KB · Views: 55
WP_20150801_14_28_38_Pro.jpg

Here is Here is a photo of the blade after it has been hand-rubbed to a nice 600 grit satin finish. The next step that happened was to etch my logo into the blade.

WP_20150801_14_49_20_Pro.jpg

With the blade finished, I went ahead and polished the inside surface of the back spacer to a mirror finish and set the detent ball in the lock bar. That completed the "guts" of the knife, leaving it ready for permanent assembly with peened pins. In order to help lock the pins in place, the holes through the scales get tapered slightly. I don't have a tapered reamer, so I just used a countersink and just "kissed" the holes lightly, just enough to flair the lip of the holes. This flair on each side of the pins ensures that the pins will not move out in either directions. They are effectively locked into place.

WP_20150801_14_53_06_Pro.jpg

Here's a really blurry picture of the pivot system. If you cross your eyes and stand on your head, you may notice that the standard threaded barrel pivot is replaced by a piece of 1/8" 416 stainless dowel rod. The pin passes through the bushing which is just a tiny bit longer than the width of the blade plus the two washers. In theory, the bushing should keep the pivot from over tightening during the peening process, allowing for the blade to swing freely on the pivot.

WP_20150801_14_58_02_Pro.jpg

The innards of the knife get assembled and screwed together one last time and the mechanics of the knife tested. Once the scales are peened on, there will be no opportunity to make further adjustments, so everything needs to be working flawlessly before proceeding. To make sure that there is no gaps between the liners and the scales, each mating surface gets a final lap on my surface plate with 220 grit paper. Notice that the blade has been wrapped with tape to help protect the finish.

WP_20150801_15_03_44_Pro.jpg

We are about to the point of no return at this stage. The knife has been assembled with permanent pins in place and I'm bolstering up my courage to start smacking it with a hammer. It seems a little crazy to beat on something that took so many hours to create where a single slip could spell disaster. Needless to say, this is a very nerve-wracking thing to do. It's definitely not for the fainthearted.

WP_20150801_15_17_05_Pro.jpg

Success! Man, that was scary. My hat is off to all those slip joint makers out there who do this on a regular basis. Those folks must have nerves of steel. Anyway, I got the three pins all peened in place and expanded to fill the tapered holes. The great thing is, the bushing did indeed keep the blade from binding. I have a knife in my drawer of shame from a year or so ago that was overpeened, drilled out and overpeened again, and repeated twice more. Not a pretty sight after all that abuse, but a strong reminder of how NOT to do things. I'm so glad that this system worked for me on this knife. The folding action is a little bit snug, but it still swings smoothly. I can live with that. Next time, I'll add a couple thousandths to the bushing length to solve that.

WP_20150801_15_37_22_Pro.jpg

The test of a good job in peening is how the pins look after they are ground off. If done right, they blend right into the other material and simply disappear. The above photo shows the knife after a spin on the slack belt at 120 grit. Can you find the pins? Me neither. Sweet!

WP_20150801_15_39_16_Pro.jpg

Here is a progress pic of the knife at about the 320 grit stage. All sharp edges are rolled over and the surface of the scales begin to blend into a nice, even curve. You may be wondering what that divot is in the bottom of the handle. No, that's not a "whoops", it's a small groove that will direct the user's thumb to the blade's thumb stud to aid in opening the knife.

WP_20150801_16_34_19_Pro.jpg

Here is a final pic of where the knife was at before leaving the shop. The above work represents over two weeks of work so far. The handle has been finished up to a 1500 grit finish which will be hand rubbed back to 600 grit to match the finish on the blade. Before that happens though, I plan to do some carving and texturing on the scales. I think this knife is working out really well and should be something a little different than my usual work. It feels really good in the hand too. It should make someone a really fashionable piece for their pocket or their collection.

Realizing that I still a relatively new maker, I would love to hear some feedback from the more experienced makers. If you have any helpful hints to improve, I would love to hear them. Helpful critiques are also encouraged. I'm trying to improve my skills, so don't be afraid of offending me. I have fairly thick skin.

More to come soon. Thanks for following along.
 
You're brave Brandant! Peening definitely added some tension in the process, making me nervous just to think about it. I'm not experienced enough to critique your process one way or the other, but I too have been planning a "screw-less" folder, so I've been thinking a lot about various ways to get there. Did you file work your spacer any? I've only made one liner lock, but for my internal closed stop, I just used a bump on the backspacer. Since I had a full backspacer in there anyway, seemed easier than adding a stop pin. May be easier with a pin, what do you think?

SAM_0035.jpg
 
Thanks for commenting, Anthony. I was wondering if anyone was even reading this thread. To answer your question, no, I didn't do any file work on this particular knife. I almost always do, but for this knife design I wanted to keep things simple, sleek, and elegant, so no file work.

Your method for the closed stop looks like it would work alright. The only thing I might worry about would be if after several sharpenings, as the edge moves back, if the point of contact might not move out to where it contacts the edge or maybe allow the blade to swing in deeper into the handle and start rubbing on the spacer and even messing up your detent. You might consider making your plunge lines slightly forward of that point so that sharpening will not cause any interference. I don't know if my explanation is enough, so here's an illustration of what I'm talking about.

attachment.php.jpg

Of course, you may have already considered this, so if you have, please forgive me. Anyway, the reason I use a pin is so that I can control where that point of contact is a little better; that, and ease of construction. Most of the time simple = better. I hope this helps and I look forward to seeing your completed knife, so don't forget to share it with the class.
 
I finished it a long time ago, it was the 4th knife I made overall, 1st and only folder so far. And, yes my plunge lines were well in front of that area. In fact, all that stays under the scales throughout the rotation, I don't like it when notches and edges hang out in front. Not hi-jacking, but here's a low res pic of it finished. Looking forward to the final pics of yours.
First folder 1.jpg
 
Thanks, Justin. Hope to have more progress to post over this next weekend.

Hey, Anthony, that turned out really nice! Sounds like you worked things out just fine. I kind of figured you would have. I'm a little shocked that this was your first folder and only your fourth knife. Great job! You have a keen attention for detail, but I already knew that.
 
[FONT=Georgia,"Times New Roman",serif]I had a family reunion last weekend which kept me out of the shop for the most part. But, even with the family frivolities, I did manage to make a little progress on the Pride knife. Here's a look at the progress that was made.

WP_20150807_16_02_44_Pro.jpg

[FONT=Georgia,"Times New Roman",serif]The majority of my weekend shop time was spent in manufacturing a thumb stud for the knife. I know that may will buy pre-made thumb studs, but I really like to make my own to my own design and standards. I do not have a metal lathe, so all of my turning work is done on my mini wood lathe using files and sandpaper to do the shaping. Here you can see a piece of 3/16" round 416 stainless steel rod mounted in a Jacobs chuck on the lathe head. I gave the rod a spin and flatten off the end with a flat file.[/FONT]
[/FONT]
WP_20150807_16_07_11_Pro.jpg

[FONT=Georgia,"Times New Roman",serif]Because I am taking progress photos with my phone, this is about as close as I can get to the action before everything goes out of focus in a hurry. You might be able to make out that I have painted the end of the rod with black marker and scratched the desired length of the thumb stud for reference. Now that I have a flat spot on the end of the rod, I insert another Jacobs chuck into the tailstock of the lathe and clamp down on a #56 drill bit. I expose enough of the drill bit to drill the hole as deep as possible without drilling beyond the overall length of the thumb stud.

WP_20150807_16_11_12_Pro.jpg

[/FONT][FONT=Georgia,"Times New Roman",serif]After the hole is drilled, it gets threaded by hand with a 0-80 tap.[/FONT]
[FONT=Georgia,"Times New Roman",serif]
WP_20150807_16_14_37_Pro.jpg

[FONT=Georgia,"Times New Roman",serif]Here I've used a hack saw to cut into the rod at the top of the thumb stud so that I can see the material that I have to work with. In the photo I'm checking the length once again with the end of my calipers.

WP_20150807_16_27_12_Pro.jpg

[FONT=Georgia,"Times New Roman",serif]Since there really isn't much to see at this resolution, I'll just explain what I have done in words. Using a set of needle files, I have given some shape to the thumb stud until I'm pleased with the outcome. I use mostly 1/8" round and three-corner files to do this work. Once the shape has been cut into the rod, I give it a good sanding to knock off the sharp edges and polish up the piece.

WP_20150807_16_30_06_Pro.jpg[/FONT][/FONT]
[/FONT]

[FONT=Georgia,"Times New Roman",serif][/FONT][FONT=Georgia,"Times New Roman",serif]If you squint really hard you might be able to see the screw threads sticking out of the end of the thumb stud. This is a sacrificial 0-80 screw that has been threaded into the tapped hole and had its head cut off. You'll see why in the next photo. At this point, I part off the piece from the rest of the rod with a hack saw.

WP_20150807_16_33_10_Pro.jpg
[/FONT]
[FONT=Georgia,"Times New Roman",serif]Now you can see the value of the sacrificial screw. The threads get mounted into the Jacobs chuck so that I can spin it and finish up the head of the thumb stud. Since I finished the blade up to 600 grit, the thumb stud will get the same treatment.

WP_20150807_16_36_49_Pro.jpg
[/FONT]
[FONT=Georgia,"Times New Roman",serif]Here's a photo of the finished thumb stud. I sometimes get a little elaborate with my thumb studs, but I elected to keep this one simple and sleek, keeping with the overall theme of the knife.

WP_20150807_16_46_22_Pro.jpg
[/FONT]
[FONT=Georgia,"Times New Roman",serif]And here she is, mounted in the blade. I use a small 0-80 button head screw to make the attachment. The hard part is grinding down the length of the screw so that it's just the right length. But, with a little perseverance, I got it done.

WP_20150807_17_01_42_Pro.jpg
[/FONT]
[FONT=Georgia,"Times New Roman",serif]The knife is now at the point that it's time to begin work on the embellishments. I have drawn on the scales a series of overlapping curves that I will use for the basis of my carving and texturing. I sure hope this works out. This is all new territory for me. It would be a crying shame to mess things up at this point in the game. Oh well, to the brave go the spoils I suppose.
[/FONT]
 
WP_20150807_17_20_16_Pro.jpg

[FONT=Georgia,"Times New Roman",serif]Using a diamond cutoff wheel mounted in my rotary tool, I cut in the curves. I was shaking like a dog passing razor blades as I tried to keep the curves smooth. The cuts are a little jagged in places, but I'll clean those up in the next step. After mopping off the sweat from my brow, I took a moment for my blood pressure to come back down to normal range.

WP_20150807_17_22_59_Pro.jpg
[/FONT]
[FONT=Georgia,"Times New Roman",serif]With the basis of the lines cut in with the Dremel, I use a round needle file to start cleaning up the bottom and sides of the cuts. This worked surprisingly well to even things out.[/FONT]

WP_20150807_17_48_36_Pro.jpg

[FONT=Georgia,"Times New Roman",serif]Here is a final photo of the weekend's work. The lines are not as smooth as they need to be yet, but they are much better than they were before using the file. I still have quite a bit of work left to do to get them completely cleaned up, but I can see that my methods are going to work. My intention is to flute the spaces between the curves and to stipple texture the negative spaces between. I think this will give the plain stainless scales some real style.

If anyone has any suggestions or helpful criticism, I'm all ears. I love to know what you think.
[/FONT]
 
Alright, ladies and gentlemen. Let's finish things up on this knife.

WP_20150813_18_19_27_Pro.jpg
This is where we left of from last time. The contour lines have been cut in by first using a diamond wheel in a rotary tool and finished off by hand filing.

WP_20150813_18_19_54_Pro.jpg
After sitting on things and studying the knife for the last week, I made the determination that I was varying too far off my original intent of keeping this knife clean and simple. After come to this conclusion, I made the determination to remove the intersecting lines and keep only a single curve through the center of the knife. I have indicated the areas that will be removed in the above photo with a black marker.

WP_20150813_18_20_27_Pro.jpg
Using a 1/2" sanding drum in my Dremel, I cut into the steel at the previously determined line. At first, I am only trying to establish the depth of the cut at the curved line. This process effectively "lifts" the curve off of the surface of the scale.

WP_20150813_18_24_17_Pro.jpg
Here is what the handle looks like after making that initial pass. I was actually quite surprised at how fast the steel was removed using this technique.

WP_20150813_18_24_52_Pro.jpg

Next, using my diamond cut off wheel, I reestablish the curved line and smooth things back out.

WP_20150813_18_29_20_Pro.jpg
This photo shows the progress after the lines have been smoothed out.

WP_20150813_18_34_44_Pro.jpg
After spending some time with the 1/2" drum, I lower the entire surface of the section and even things out a little.

WP_20150813_18_46_35_Pro.jpg
I repeat the same process on the front area of the scale until things are all evened out.

WP_20150813_18_55_33_Pro.jpg
Now that the curve is raised and established, I can add some texture to the lowered areas. I debated a bit on how to accomplish this. I chose to make tiny cuts with the diamond wheel over stippling with a flame tip bit. Stippling with a flame tip gives small, round dots, and the diamond wheel gives tiny little lines. The reason for using the diamond wheel was to be able to orient the little cut lines with the curve to not only add texture, but to also continue the flowing look of the curve through the texture. I think it really adds a lot to this piece.

WP_20150813_19_58_02_Pro.jpg
The above photo shows the front area after it receives some texturing. I also repeat the whole process for the right scale to complete the carving and texturing work. At this point, the knife is practically done. The only thing left to do now is to clean it up a bit and give it some hand-rubbed attention.
 
DSC_0046.JPG
And here she is in all her glory! Everything is finished up to 600 grit and hand rubbed until things flow together. You might also notice that I smoothed out the indentation for the thumb stud ramp. This little divot helps guide one's thumb to make opening the knife really comfortable. The blade also got its edge put on. Because of the thin edge geometry, sharpening went really fast. I had fun making fine ribbons of cardstock paper as I checked the edge for any flaws. Man, I tell you, it's sharp and seems to hold a great edge. I've also been working on my photography skills. The pics are some of my best yet. I still have long ways to go though.

DSC_0047.JPG
Here's a shot of the spine. Not much to see here since I chose to keep things simple and not add any file work. I'm glad I made that choice. The knife is fairly thin, but is still really comfortable in the hand.

DSC_0048.JPG
This is a look at the bottom of the knife. Again, not much to see except to show a nice, early lockup.

DSC_0049.jpg
This final pic shows the back side of the knife in the closed position. You can just see the thumb stud screw head, which is the only visible hardware on this knife. I've peen thumb studs into blades before for a seamless fit. If I had to do it over again, I think I would have taken the time to do it with this one as well. I'll make a mental note for the future if I decide to make another knife in this manner.
I have to say, I truly enjoyed this build, even more so that most. It was a fun experiment into the unknown and I chalk this one up in the "win" category. It's no Wolfgang Loerchner, but I think it turned out really nice. I would say it has some simple elegance to it. I will be posting it to my available knives page on my blog if anyone is intereted.

I'd love to know everyone's thoughts and opinions on the build or the final product. It's my goal to constantly improve, so I value all constructive criticism. Thanks for following along on this build.
 
Thanks, Justin. It was a fun build, not without its challenges, but I'm pleased with the end product. Thanks for taking the time to post.
 
Back
Top