What do I need for my first frame lock build?

I'm thinking I want to go frame lock with g10 on the off side scale.
Can you guys give me the run down on reamers and counterbores, taps? I have little experience with them I have taped holes in mild steel and such but not titanium.
Having to ream the holes I just don't know what I need. I want to use the 3/16 chain ring bolts from usaknifemakers.com what size reamer do I need?
Also for my standoffs what size screws should I get 2-56?
Sorry for all the questions


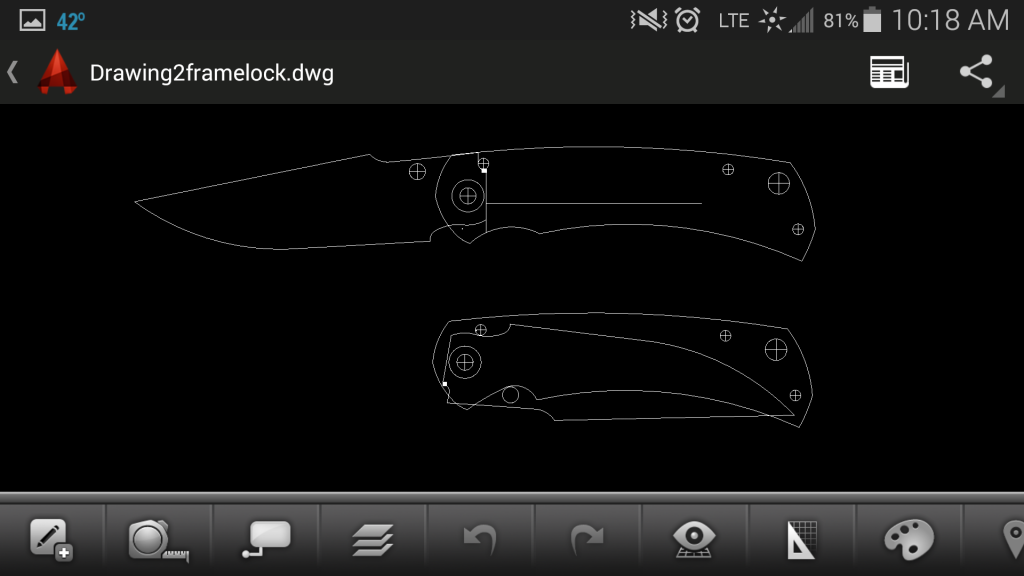
I'm back to work after a few weeks off since we had the baby. I decided to try my hand at Autocad since I have it on my work computer.
Thoughts? Concerns?
My only concern is did I leave enough room on the tang behind the pivot?
 
Last edited:
When you rotate the blade closed in cad, does the stop pin interfere? Looks like it has a little radius that's higher than the pin in the pic. Maybe not. I wonder if you should have more lock bar contact with the tang, you're only catching about half of it. Just thinking out loud, I love this stuff! Love watching the design process. Looking good to me!
 
Self the picture is not the best I had to take a screen shot of it after I plotted it to print and it added those white squares for some reason but yes it does clear the stop pin by a frogs hair. I see what you mean about the lock bar I raised it a bit to where it is basically in line with the center of the pivot but I have no clue how much of the tang it should contact. Maybe someone with some experience will chime in, I will do some research on that.
 
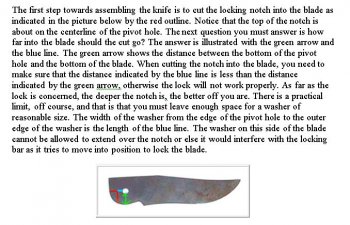
Justin, when I made one, I went by what's in the pic below. I wish I could remember who wrote this up, but I have it saved on my computer with no credits. I followed this to the letter and mine locked up perfectly. My experience is limited to just one, but just trying to help.
Capture.JPG
 
Last edited:
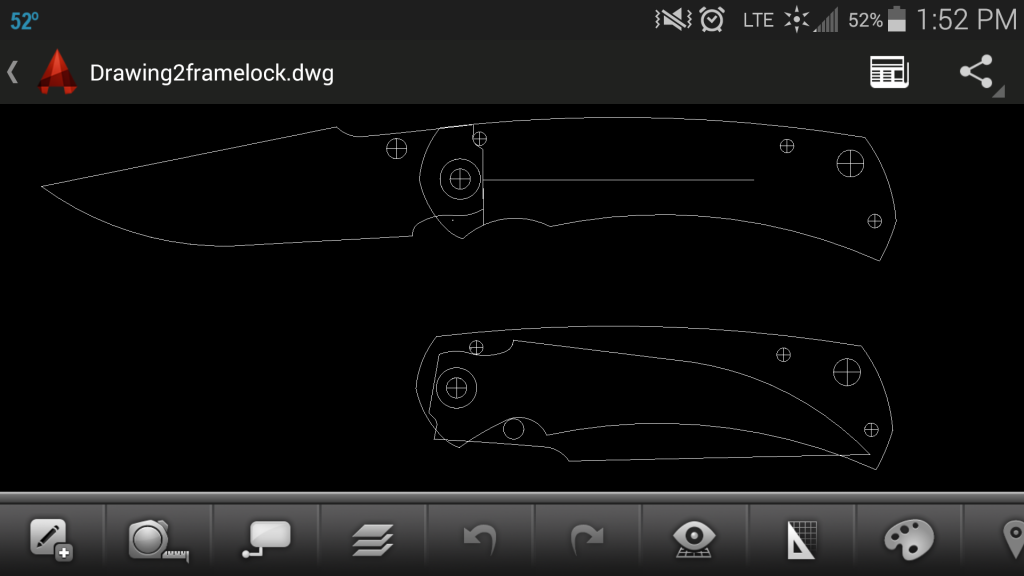
I believe that is from Ray Rogers tutorial, I have read it too and has been a help. I'm not sure what else to tweak. I don't know if I should maybe drop the material below the pivot to get more contact with the tang.
Just to be clear the circle with the X in it is the 3/16 pivot and the larger circle around it is the washer.


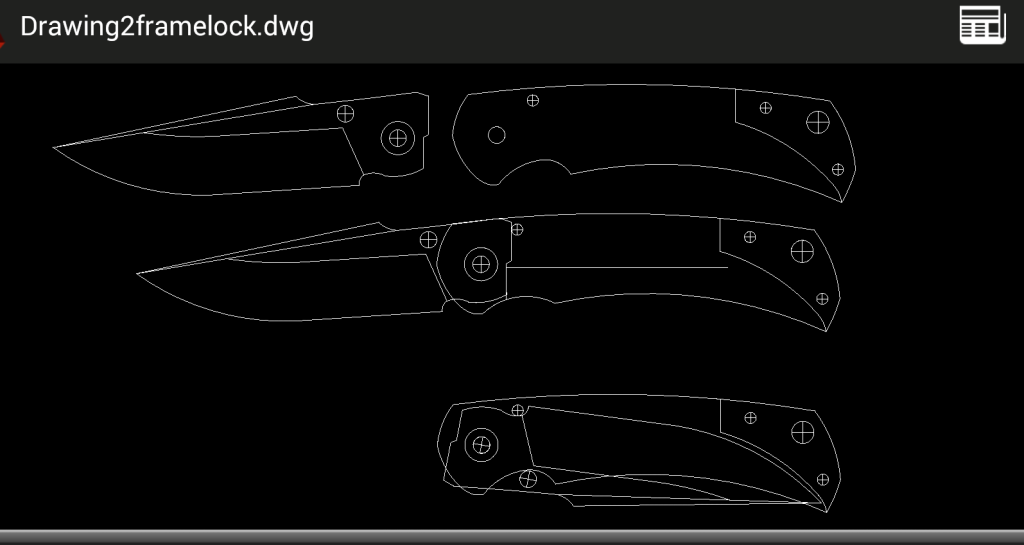
I think this is the final design and if I need to tweak it once the working template is made I will.
No I have to get my materials list together. I'm going to try and build it around the harware like Mr. Ed talked about in one of his post. I don't want to have to modify the hardware anymore then I have to so I will be posting some math to make sure I'm on the right track.
I will also be asking about reamers and tap sizes once I figure on the hardware.
 
Much better on tang/lock contact, IMO. But, now you have that little bit of tang showing again up front in the closed position. I'm not trying to be negative, I'm loving the design, just seems like that little bit should be under the scales. Am I wrong?
 
No you are right Anthony I think it is ideal to have it behind the scales but I have tweaked and moved pins to the point I was done. Seemed like I move on thing a tiny bit it throws something else off so I said screw it...lol
 
Looking at your drawing, you're soooo close. IMO, if you just pull the leading bottom edge of the frame down and to left to cover the tang, you would only have to nudge the thumbstud towards the tip just a tad to clear. It's so close, it wouldn't take much. I know where you are though, I've got 3 or 4 folders drawn in cad now and getting everything to pivot, stop, clear, etc. takes me forever.
 
# 53 bit for 1/16 detent
#43 bit for 2-56 screw.to pass through on unthreaded hole
#49 bit for threaded hole
#14 bit for 3/16 pivot
3/16 reamer for pivot
#19 bit to countersink screw heads into frame
5/32 thick precision ground blade steel
15 thousand phosphor bronze wsshers x .375
3/16 x 3/16 standoffs unthreaded
1/8 416 stainless rod for stop pin
3/16 piloted counterbore for pivot. size depends on pivot head size
you can make a linerlock or frame lock with that tooling. your biggest challenge will be cutting the lock bar and rough cutting the basic shape using the ti. a good jeweler sawand number 1 blades i believe will work on .70 thick ti. for a linerlock. will also.work on .125 ti but you will go through some blades. finish the profiling on your grinder using a good cool running belt. hope.some.of this has helped.
Wow thanks J. Hoover that is the type of info I'm looking for!!!! I'm going to try and get my hardware list together this weekend so all this info will come in very handy.
 
I think I have my list of what I need is there anything I missed?

AEB-L .136
6-4 titanium .138
3/16 pivot .375 length from ticonnector
5/16 (.312) counterbore for pivot screw
3/16 reamer
#14 bit for 3/16 pivot hole
1/8 pivot × .375 length from ticonnector for my stop pin
#31 bit for stop pin hole (not sure if that is the right size)
#2 (.156) counterbore for the stop pin above.
.125 reamer for stop pin
1/16 detent ball
1/16 spade bit carbide for detent ball on Blade
#53 bit for 1/16 detent ball on lock bar
2-56 screws .375 length threads to bolt handle together
#49 bit to drill hole for 2-56 threaded hole
2-56 tap
.165Lx3/16 titanium pas through standoffs from ticonnector
Thumb stud
.188 I.D. x .375 O.D x .016 Phosphorus bronze washers
 
Looks like your on the right track. Just a couple observations though

I would use a regular carbide bit for the detent and not a spade bit but the spade will work in a pinch.

Your choice of steel is fine but you didn't mention if it was precision ground or not. You can make the knife either way but having the blade precision ground takes one variable out of play. If the steel comes with the mill scale on it then that will need to be removed at some point. The odd thickness indicates that the scale is on the blade. After it is removed you will be closer to .125 thickness.

I will get the regular bit I thought I read where a spade bit is used for this but I have read so much on folders I'm cross eyed
The steel is from alpha knife supply and is not precious ground but Chuck said it has no mill scale, am I still ok or will I need to do something with it or take it to get ground?
Thanks Hoover
JP
 
I would either order it precision ground in the size you want or have it surface ground. I'm working on my first frame lock also and I'm glad I have a surface grinder, so far I've used on the blade, back spacer, bolsters and to get the pivot and stop pin to the correct length. I'm sure it can be done without a SG, but I'm glad I don't have to.

Jim
 
With no mill scale it should be fine. Getting it ground will mean your standoffs will need to be sized as well. I've made knives using 1095 that wasn't surface ground. They turned out just fine, it just takes a little more patience sometimes. You could go with precision ground steel and base all your spacing measurements off of it and know you have it right. If Chuck says it's fine for folders as is then I wouldn't worry about it. Stainless is foil wrapped for heat treat unless your using a saltpot or similiar oven and will come out of the heat treat clean with no scale. At .136 for the steel with .032 spacing for washers your .165 standoffs will work. Personally I would want them .168 but no one but you will ever know the difference.
 
Back
Top