You are using an out of date browser. It may not display this or other websites correctly.
You should upgrade or use an alternative browser.
You should upgrade or use an alternative browser.
4 inch Hunter in Elk and Maple
- Thread starter John Wilson
- Start date
John Wilson
Well-Known Member
I really appreciate the compliments, fellas!
It’s surprising what a few little tweaks do for a design. This is the same hunter i’ve been doing forever, but I recently added that swedge to the drop point. It looks like a totally different knife to me. Customers have reacted positively as well.
I was most worried about how to dye the maple without getting it all over the antler. It turned out to be a relatively simple solution. I put several drops of tint into a few mL of acetone then used a model paintbrush and gently painted the maple. The maple really sucks it up. I kept laying it on gently until I got the depth of color I was after. Then it was my old go-to of Tru-Oil and it worked out aces. Sometimes you get lucky and I’ve learned to take Yes for an answer over the years.
KentuckyFisherman
Well-Known Member
Gorgeous knife, John. Couple of questions if you have time:
1) Are the liners made from three separate pieces or were they bonded as bought? G10 or something else?
2) You may not have time to explain, but I'm a newbie and wondering when a maker uses two materials for the scales, how do you get a really, good tight fit where the two materials meet? There's got to be some fairly simple method that I just haven't read about. Maybe there's even an old thread or a YouTube video someone could point me to.
John Wilson
Well-Known Member
Couple of questions if you have time:
1) Are the liners made from three separate pieces or were they bonded as bought? G10 or something else?
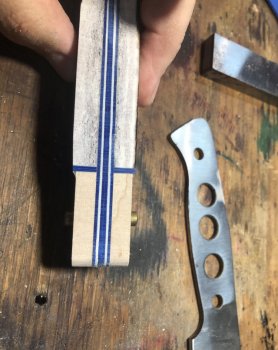
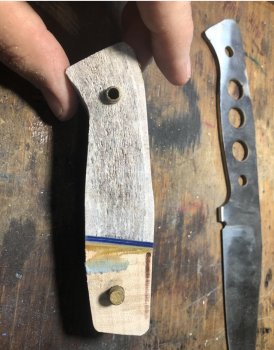
On each side between the handle scale and tang is three layers of liner. Blue / white / blue. These are the fiber liners. I use a hole punch to make holes in the center to hold even more epoxy.
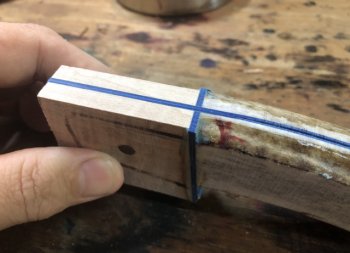
Between the two handle materials I used two slivers of blue fiber liner. I usually use one sliver but the customer wanted a thicker blue line so I used two.
2) You may not have time to explain, but I'm a newbie and wondering when a maker uses two materials for the scales, how do you get a really, good tight fit where the two materials meet? There's got to be some fairly simple method that I just haven't read about. Maybe there's even an old thread or a YouTube video someone could point me to.
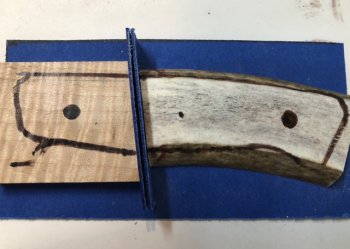
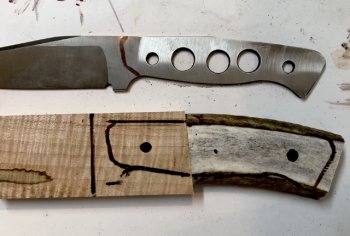
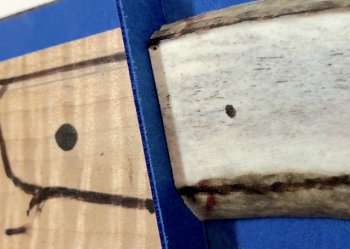
It’s easy as can be. I cut the approximate angle on my bandsaw and then use my grinder to get right right up to my cut line. Once you get a gapless joint between the two materials they will bond easily with no fuss. I like to put a liner in the joint for aesthetics and because I want to believe a liner with epoxy on both sides allows the two materials to shrink/expand at different rates without stressing the joint. That may be wishful thinking, I don’t know.
The other thing I do is to use a liner as a backer when I bond the two materials.
Attachments

John Wilson
Well-Known Member
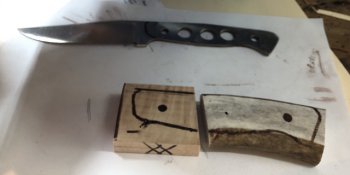
Here are better pictures to show the process
Attachments
-
 10DDE253-39C6-4366-BD22-BD916353E6E1.jpeg300.2 KB · Views: 4
 -
 CB1E5498-AB61-4E67-A75A-BCF597E36548.jpeg295.4 KB · Views: 4
 -
 962ACAAF-BDE9-4B82-A1ED-672674F1ED72.jpeg154.8 KB · Views: 4
 -
 46174471-2CF0-47D4-A326-4D4F37C0DE55.jpeg284.4 KB · Views: 4
 -
 8EE6D328-6CA2-4087-8C15-6B962662B10A.jpeg311.7 KB · Views: 4
 -
 E71BBC21-68BD-4EA9-BE40-5C56B3F9E642.jpeg527.3 KB · Views: 5
 -
 9F7BB9A6-94AB-472F-9C21-9DE14D033EF0.jpeg565.2 KB · Views: 5