Kevin R. Cashen
Super Moderator
In its most basic definition steel is a mixture of two elements - iron and carbon. In its simplest terms any heat treating operation is merely a matter of rearranging how the carbon is situated within the iron. Carbon can either be in solution (dissolved) with its atoms heavily intermingled with the iron atoms, or it can be out of solution and segregated into clusters of concentrated carbon, leaving the iron surrounding it to behave more like iron.
Iron is actually a rather soft metal. Iron and bronze coexisted for many centuries in the ancient world but bronze was actually stronger and more useful as a weapon until the advent of methods to make iron act like steel. Iron can hold carbon inside it quite well because carbon atoms are very small and can move in the spaces between the much larger iron atoms when they are heated. But at room temperature having these little guys in these spaces distorts the orderly stacking of the iron and kind of acts like wheel chocks keeping things from moving, this is why steel is much stronger than iron.
Heat treating is the tool with which we manipulate the amount of this wheel chocking effect by adding, or removing, carbon from key positions. This works well because, despite how well carbon can mix with iron at higher temperatures, at lower temperatures carbon tends to get squeezed out into more stable groupings of chemically bonded compounds instead of just being mixed in with the iron. So it is rather easy to wrap your mind around it if you look at it as virtually all of heat treating merely being a matter of moving carbon atoms between a simple mixture of iron and carbon (solution) and more stable localized concentrations (compounds).
Let’s use a visual to grasp it all the better.
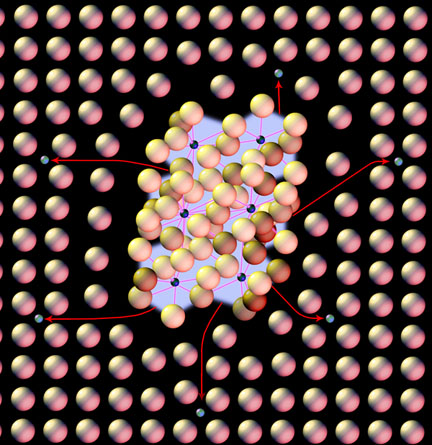
In this image you have a very tiny bonded compound of iron and carbon (iron carbide*) within a vast field of neatly arranged iron atoms. If you apply enough heat to break the bonds of the compound the freed carbon atoms will move into the field of iron and rest in the spaces between that iron. You have now dramatically changed the condition and property of the steel.
Congratulations! You have performed your very first heat treatment!
Simple But Powerful
Once you see heat treating in this way much of the mystery and complexity goes away, but that does not mean that the simple use of heat to move atoms around needs to be simple in a limiting way. When you add rates of heating and cooling along with all the different temperatures to choose from, you realize that your heat treating tool box is enormous and filled with countless tools to achieve almost anything you want within the steel. I remember once seeing a watchmaker’s tool box, it had dozens of drawers full of little gadgets that I could not figure out. But if I had spent a week in a watchmaker shop, one by one, each of them would have been revealed as invaluable to the art of making beautiful timepieces. Heat treating is like any other unfamiliar tool box loaded with specialized little tools, some of its contents is a mystery at first but, once you learn the processes they apply to, they quickly become really handy things to have around. If you allow them to intimidate you until you leave the box setting in the corner unopened, your full potential in that craft will never be realized. But if you learn the reasons behind the development of those tools, in no time at all you will wonder why you ever suffered with skinned knuckles and stripped bolts when there was a wrench made exactly for that purpose. This is exactly what developing knowledge of heat treating can do.
What has occurred in this first step is that you have put carbon into solution within the steel. But you need to remember that this is not the condition that the steel will prefer to be in at room temperature. How you cool it will determine what will happen next. If you cool slowly enough to allow the steel to choose its own course, it will naturally want to get that carbon out from between the iron and put it back into the compound. But if you cool quickly enough to keep the carbon in the iron the wheel chock effect will apply all the more, and the steel will act less like iron and more like strong steel. In this way the rate of cooling has a profound effect on determining if steel is harder or softer.
The greater the temperatures you heat to, the more carbon will be freed from its bonds to be mixed with the iron solution. The longer you keep it at this temperature the more the carbon will diffuse and evenly saturate the iron. This is the basis for “soaking” the steel in heat treatment, because it is obvious that the greater amount of carbon in the solution the more effect it can have on strengthening the steel at room temperature.
Combining Tools To Do More Things
So slowly we are adding more tools to our collection, we now have temperature, soak time, and rate of cooling. Believe it or not, when using a simple steel that is just iron and carbon, with these three tools you can achieve just about anything you want. But there are many more very specialized and powerful tools in heat treating that can take you, and your steel, to just about any level you can imagine.
With just the tools we have so far, let’s examine properties we may want to change in steel. One of the first things we will want to do to, in order to make a knife, is shape the steel. This will involve filing, grinding or cutting it any number of ways. If this is going to happen the steel needs to be softer than the tool doing the cutting. We could spend a fortune on diamond or carbide tools to ensure that our tools are harder than the steel or we could just make the steel soft. Fortunately, since this is the starting point for most industries, most steel will come from the mill already as soft as it can be, but let’s say we heated it or changed that condition somehow.
A steel that is not completely soft will have carbon trapped in solution or will have the compounds of carbon (carbides) in very ornery groups which will make shaping it miserable. To fix this we need to heat it to a temperature where the iron atoms will open their spaces to allow the carbon to move between them and the chemical bonds of the carbide will let go. When we do this the ornery carbide will get smaller as it loses the carbon that is spread evenly throughout the iron. Now, since we want the least amount of the wheel chocking effect at room temperature that we can get, our rate of cooling is now a very important tool. If we cool too quickly the carbon will stay too much in the iron and it will resist our efforts to shape it, but if we cool slowly enough for the carbon to gather together in small, manageable, bonded carbide groups, it will not be able to cause us trouble and there will be little left to reinforce the iron. The steel will act more like iron and less like steel.
If you got the general idea of that last paragraph- congratulations! You now have added the heat treatment known as annealing to your tool box!
Now let’s keep it simple and examine the opposite operation that we will want to perform on any blade- hardening. Just as our files, saws and drills needed to be harder than our steel to cut it, everything we wish to cut with our knife will need to be softer than it. This is one of the most basic rules to keep in mind. A butter knife is very good for butter but not much else, so if we want our knife to be as versatile as possible as a cutting tool we want it to be harder than most things will commonly encounter. To accomplish this we will want as many carbon wheel chocks in the iron as possible to make it act less like iron and more like steel. So this time we will apply heat until the carbide bonds break and the carbon atoms spread out through the iron as much as possible. For this our tools will be temperature and soak time. Temperature will break the bonds, and time will allow the carbon to fully diffuse into the iron. Now when we use our third tool we need to use it in the opposite way that we used it in annealing. We want our rate of cooling to be such that the carbon has no time to come out of solution and bond up, so we will want to cool very quickly. This is why we quench steel. By plunging the steel into a liquid, we trap the carbon in full solution and force it to be that way at room temperature. This greatly distorts the stacking of the iron and makes any movement very difficult, resulting in very strong, hardened steel.
Now if you got the general idea of that last paragraph – congratulations again! You have now added the heat treatment known as hardening to your tool box.
These are two of the most basic, yet most critical, operations to understand in working steel- how to make it soft and how to make it hard. Once you get these you are the closest thing to the alchemist of legend. You are able, at will, to take a metal and change its properties so drastically that it hardly resembles the same material at all. You can cut a piece off your material, change it with these tools and literally use it to cut its own parent bar like it was butter. This is what makes steel the most useful material to mankind, and the blade maker one of the most important figures in human history.
But the tool box is huge and filled with countless other tools, the sky is the limit and you can never stop adding new tools to your skill set if you wish to keep learning- normalizing, homogenizing, tempering, spheroidizing, marquenching, and stress relieving are just a few of the countless other heat treatments that can be done with the simple tools of temperature, soak time and rate of cooling.
Recommended reading on this topic: “Metallurgy Fundamentals” by Daniel Brandt
*for those interested in learning more but the metallurgical lingo just sort of gets in the way, I have kept it as simple as possible. But the terms used to describe these concepts make the discussion much more accurate, quicker and will allow you to read a wealth of other information on these topics. Just as literacy in any language is the key to education so it is with this. The really good news is that learning metallurgical terms is actually much, much, easier than learning even the basics of English. The intimidating, technical sounding words become very unimpressive and harmless as soon as you have a close look at them. I am happy to help with this if I can, for I believe the more people who find the concepts about the inside of steel elementary, the farther we can advance our craft.
Since the iron portion of steel is not purely iron it is more accurately referred to in most writings as “ferrite”
The chemically bonded forms of carbon within the steel are simply the “carbides” that you often hear people talking about. In the case of carbon chemically bonded with iron it is iron carbide which is more commonly referred to as “cementite.”
The solution, mentioned in this writing, that you form when heating the steel is known as “austenite” and thus the process of heating the steel and holding to get full solution is often called “austenitizing.”
The separation of iron and iron carbide formed by slow cooling is called “pearlite.”
The hardened phase of steel that is the result of trapping the carbon in solution is called “martensite”
There are images and more information for each of these, and others, on this page at my website:
http://www.cashenblades.com/metallurgy.html
For information on processing of some of the most common simple steels used by knifemakers I also have these pages at my website:
http://www.cashenblades.com/heattreatment.html you will find a description of the various heat treating processes, but at the bottom of the page you will see a columnar list of common steels, clicking on those steels will give a page with all the compiled information on the various operations and temperatures along with charts and other information. I hope this is helpful to anybody who can use it.
If this post, and the resulting thread, has information that you feel is useful enough to be linked to in the sticky index at the top of the page you may indicate that by voting in the pole. If you feel the information, or resulting thread, is not helpful, productive, or positive enough for all visitors to benefit from, do feel free to indicate that with a “no” vote in the pole. Both opinions will be regarded with equal value in ensuring only the best information is highlighted in this forum.
Iron is actually a rather soft metal. Iron and bronze coexisted for many centuries in the ancient world but bronze was actually stronger and more useful as a weapon until the advent of methods to make iron act like steel. Iron can hold carbon inside it quite well because carbon atoms are very small and can move in the spaces between the much larger iron atoms when they are heated. But at room temperature having these little guys in these spaces distorts the orderly stacking of the iron and kind of acts like wheel chocks keeping things from moving, this is why steel is much stronger than iron.
Heat treating is the tool with which we manipulate the amount of this wheel chocking effect by adding, or removing, carbon from key positions. This works well because, despite how well carbon can mix with iron at higher temperatures, at lower temperatures carbon tends to get squeezed out into more stable groupings of chemically bonded compounds instead of just being mixed in with the iron. So it is rather easy to wrap your mind around it if you look at it as virtually all of heat treating merely being a matter of moving carbon atoms between a simple mixture of iron and carbon (solution) and more stable localized concentrations (compounds).
Let’s use a visual to grasp it all the better.
In this image you have a very tiny bonded compound of iron and carbon (iron carbide*) within a vast field of neatly arranged iron atoms. If you apply enough heat to break the bonds of the compound the freed carbon atoms will move into the field of iron and rest in the spaces between that iron. You have now dramatically changed the condition and property of the steel.
Congratulations! You have performed your very first heat treatment!
Simple But Powerful
Once you see heat treating in this way much of the mystery and complexity goes away, but that does not mean that the simple use of heat to move atoms around needs to be simple in a limiting way. When you add rates of heating and cooling along with all the different temperatures to choose from, you realize that your heat treating tool box is enormous and filled with countless tools to achieve almost anything you want within the steel. I remember once seeing a watchmaker’s tool box, it had dozens of drawers full of little gadgets that I could not figure out. But if I had spent a week in a watchmaker shop, one by one, each of them would have been revealed as invaluable to the art of making beautiful timepieces. Heat treating is like any other unfamiliar tool box loaded with specialized little tools, some of its contents is a mystery at first but, once you learn the processes they apply to, they quickly become really handy things to have around. If you allow them to intimidate you until you leave the box setting in the corner unopened, your full potential in that craft will never be realized. But if you learn the reasons behind the development of those tools, in no time at all you will wonder why you ever suffered with skinned knuckles and stripped bolts when there was a wrench made exactly for that purpose. This is exactly what developing knowledge of heat treating can do.
What has occurred in this first step is that you have put carbon into solution within the steel. But you need to remember that this is not the condition that the steel will prefer to be in at room temperature. How you cool it will determine what will happen next. If you cool slowly enough to allow the steel to choose its own course, it will naturally want to get that carbon out from between the iron and put it back into the compound. But if you cool quickly enough to keep the carbon in the iron the wheel chock effect will apply all the more, and the steel will act less like iron and more like strong steel. In this way the rate of cooling has a profound effect on determining if steel is harder or softer.
The greater the temperatures you heat to, the more carbon will be freed from its bonds to be mixed with the iron solution. The longer you keep it at this temperature the more the carbon will diffuse and evenly saturate the iron. This is the basis for “soaking” the steel in heat treatment, because it is obvious that the greater amount of carbon in the solution the more effect it can have on strengthening the steel at room temperature.
Combining Tools To Do More Things
So slowly we are adding more tools to our collection, we now have temperature, soak time, and rate of cooling. Believe it or not, when using a simple steel that is just iron and carbon, with these three tools you can achieve just about anything you want. But there are many more very specialized and powerful tools in heat treating that can take you, and your steel, to just about any level you can imagine.
With just the tools we have so far, let’s examine properties we may want to change in steel. One of the first things we will want to do to, in order to make a knife, is shape the steel. This will involve filing, grinding or cutting it any number of ways. If this is going to happen the steel needs to be softer than the tool doing the cutting. We could spend a fortune on diamond or carbide tools to ensure that our tools are harder than the steel or we could just make the steel soft. Fortunately, since this is the starting point for most industries, most steel will come from the mill already as soft as it can be, but let’s say we heated it or changed that condition somehow.
A steel that is not completely soft will have carbon trapped in solution or will have the compounds of carbon (carbides) in very ornery groups which will make shaping it miserable. To fix this we need to heat it to a temperature where the iron atoms will open their spaces to allow the carbon to move between them and the chemical bonds of the carbide will let go. When we do this the ornery carbide will get smaller as it loses the carbon that is spread evenly throughout the iron. Now, since we want the least amount of the wheel chocking effect at room temperature that we can get, our rate of cooling is now a very important tool. If we cool too quickly the carbon will stay too much in the iron and it will resist our efforts to shape it, but if we cool slowly enough for the carbon to gather together in small, manageable, bonded carbide groups, it will not be able to cause us trouble and there will be little left to reinforce the iron. The steel will act more like iron and less like steel.
If you got the general idea of that last paragraph- congratulations! You now have added the heat treatment known as annealing to your tool box!
Now let’s keep it simple and examine the opposite operation that we will want to perform on any blade- hardening. Just as our files, saws and drills needed to be harder than our steel to cut it, everything we wish to cut with our knife will need to be softer than it. This is one of the most basic rules to keep in mind. A butter knife is very good for butter but not much else, so if we want our knife to be as versatile as possible as a cutting tool we want it to be harder than most things will commonly encounter. To accomplish this we will want as many carbon wheel chocks in the iron as possible to make it act less like iron and more like steel. So this time we will apply heat until the carbide bonds break and the carbon atoms spread out through the iron as much as possible. For this our tools will be temperature and soak time. Temperature will break the bonds, and time will allow the carbon to fully diffuse into the iron. Now when we use our third tool we need to use it in the opposite way that we used it in annealing. We want our rate of cooling to be such that the carbon has no time to come out of solution and bond up, so we will want to cool very quickly. This is why we quench steel. By plunging the steel into a liquid, we trap the carbon in full solution and force it to be that way at room temperature. This greatly distorts the stacking of the iron and makes any movement very difficult, resulting in very strong, hardened steel.
Now if you got the general idea of that last paragraph – congratulations again! You have now added the heat treatment known as hardening to your tool box.
These are two of the most basic, yet most critical, operations to understand in working steel- how to make it soft and how to make it hard. Once you get these you are the closest thing to the alchemist of legend. You are able, at will, to take a metal and change its properties so drastically that it hardly resembles the same material at all. You can cut a piece off your material, change it with these tools and literally use it to cut its own parent bar like it was butter. This is what makes steel the most useful material to mankind, and the blade maker one of the most important figures in human history.
But the tool box is huge and filled with countless other tools, the sky is the limit and you can never stop adding new tools to your skill set if you wish to keep learning- normalizing, homogenizing, tempering, spheroidizing, marquenching, and stress relieving are just a few of the countless other heat treatments that can be done with the simple tools of temperature, soak time and rate of cooling.
Recommended reading on this topic: “Metallurgy Fundamentals” by Daniel Brandt
*for those interested in learning more but the metallurgical lingo just sort of gets in the way, I have kept it as simple as possible. But the terms used to describe these concepts make the discussion much more accurate, quicker and will allow you to read a wealth of other information on these topics. Just as literacy in any language is the key to education so it is with this. The really good news is that learning metallurgical terms is actually much, much, easier than learning even the basics of English. The intimidating, technical sounding words become very unimpressive and harmless as soon as you have a close look at them. I am happy to help with this if I can, for I believe the more people who find the concepts about the inside of steel elementary, the farther we can advance our craft.
Since the iron portion of steel is not purely iron it is more accurately referred to in most writings as “ferrite”
The chemically bonded forms of carbon within the steel are simply the “carbides” that you often hear people talking about. In the case of carbon chemically bonded with iron it is iron carbide which is more commonly referred to as “cementite.”
The solution, mentioned in this writing, that you form when heating the steel is known as “austenite” and thus the process of heating the steel and holding to get full solution is often called “austenitizing.”
The separation of iron and iron carbide formed by slow cooling is called “pearlite.”
The hardened phase of steel that is the result of trapping the carbon in solution is called “martensite”
There are images and more information for each of these, and others, on this page at my website:
http://www.cashenblades.com/metallurgy.html
For information on processing of some of the most common simple steels used by knifemakers I also have these pages at my website:
http://www.cashenblades.com/heattreatment.html you will find a description of the various heat treating processes, but at the bottom of the page you will see a columnar list of common steels, clicking on those steels will give a page with all the compiled information on the various operations and temperatures along with charts and other information. I hope this is helpful to anybody who can use it.
If this post, and the resulting thread, has information that you feel is useful enough to be linked to in the sticky index at the top of the page you may indicate that by voting in the pole. If you feel the information, or resulting thread, is not helpful, productive, or positive enough for all visitors to benefit from, do feel free to indicate that with a “no” vote in the pole. Both opinions will be regarded with equal value in ensuring only the best information is highlighted in this forum.
Last edited:
")