Blade geometry and edge toughness

AJH_Knives

Well-Known Member
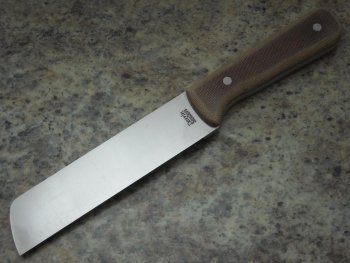
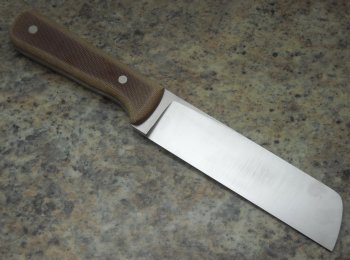
So I wanted to make a chopper type knife. I decided to use 80CRV2 3/16” thick. I flat ground the bevels, and sent off to Peters heat treat for the HT. I asked for 58-59 rc. When I put the edge on it. I put the blade in a fixture and set the angle to 20* per side. I sharpen against the platen. I go up to 800 grit then I strop. It is shaving sharp.
My questions are
1, is this the wrong way to put an edge on the blade?
2, will this edge fail when I start shopping stuff with it?
3, is 58-59 rc too hard for a chopping type knife?

here is the knife

12321270_989312471146454_3064507938619346121_n.jpg
 
I suppose its all in what works for each individual knifemaker. Personally when I saw the pic and where the primary bevel ends (about 3/4 the blade's width), that raised a red flag for me. If the primary intent is chopping, ending the primary bevel there creates a "wedge" point, which will generally require increased effort to use, and/or will lift the actual cutting edge off the material when the material reaches that "wedge" point.

When I'm asked to create a "chopper", it's generally in a 10"+ sized blade. Unless there is some compelling reason to do otherwise, I will do a full flat grind to make the blade lighter and "faster", but will generally leave approx a 3/32" flat on the edge prior to heat treat. Hardness wish, I tend to stay in the 57-58Rc range on a chopper....that can vary based on how the final grind is accomplished. When I final grind, everything gets cleaned up, and that edge that was left flat get convex ground. To be clear, I ONLY convex the last 1/4" (give or take) of the edge. I convex the edge through grits until when finishing up on a 400 or 600, the entire edge is sharp. The amount of convex applied will dictate how hard or soft the edge needs to be in order to be durable. The idea of all of this is to do everything I can to lessen the "cutting resistance" of a blade. That "cutting resistance" is something that very few makers think about, nor do they realize how much of an impact it can have on the cutting ability of a blade. If you eliminate those "wedge" points on a blade, the less effort it requires to do a given amount of work. Most of the makers who do/have participated in cutting competitions understand the importance of what I'm talking about..... but for those who don't create knives/compete in cutting competitions, I can tell you that when you understand the impact of what I'm talking about, and learn how to incorporate it into your blades, you'll be amazed at the difference it makes in a blades ability to cut..... cleaner, smoother, and with less effort.
 
Thanks for the info Ed! I have one with a full flat grind, however, the edge prior to heat treat was about .040". If we are just talking about the cutting edge. what would you consider the thinnest before you sharpen it?
I guess I should be using the slack belt to sharpen these.
 
With the methodology that I use, I leave the edges as I mentioned before (approx. 3/32" of a flat edge prior to heat treat). On most blades I produce, I've discovered over the years that no matter how shallow or heavy the convex put on the edge, it's helpful to take it to the point to being relatively a sharpened edge during finish grinding. You have to be cautious hand finishing, but once everything is done, a VERY light pass on each side of the edge with a worn out 400 or 600 slack belt is all that needed for a "working edge", and if you want that "scary sharp" edge, a single light pass on a buff with pink no-scratch after the belt(s). The idea being to have the very minimum edge bevel, and to have it convex rather then at a given angle (any angle on a sharpened edge creates cutting resistance, where as a convex edge reduces cutting resistance greatly.)

Probably one of the best experiments I ever did was when I was trying to understand the impact of bevels/geometry on how a blade cuts materials..... put on a high powered set of optivisors, then cut various materials, watching the cutting edge. You'll be blown away at what you discover with how different bevels/angles cut different materials versus using radius and/or convex to cut the same materials. Generally any blade with angles in the geometry will create those "wedges" that I mentioned, where as blades that have smooth radius/convex gemoetry will just "flow" through the material being cut, rather then running into those "wedge" points that cause excessive cutting resistance.

I suspect some would say it really doesn't matter, and that's OK, but in my experience it's the attention to detail that separates one maker's blades from another's. From a customer/client point of view, they may not be able to point directly to why they like one blade over another, but when you have clients saying that a given blade "Cuts great even when it's a bit dull." Or, "This blade just cuts like a laser", it's that experimentation and adjustment on the "little" things that brings about those types of comments, and bolsters your reputation as a knifemaker. :) The other side of that is that IF you go that route, you will establish a standard for your blades....which means that the established standard must be met or exceeded with each successive knife you produce. (There's that "give-n-take" thing that I'm always talking about) :)
 
Last edited:
So to put a physical view to the edge geometry a razor blade in a box cutter has a short convex to the thin secondary bevel that does alot of the slicing work?
The longer I am in this hobby/addiction the more technically versed I need to become. Lol
This is a similar curiosity to the edge geometry talks every one has been using with me when I pose a question about what makes a good blade.
Am trying to clear up the blur of verbal to visual for me. Sorry to kinda thread jack.
 
Not to worry Walt.... there's nothing that me or anyone else can say, or draw, that will make is completely understood/logical. I always try to pose the answers I offer in a manner that will lead individuals to provoke thought, and hopefully induce experimentation....that's really the key. I can type until my fingers fall off, but the "light" only truly comes on when a person physically does it on a knife, and witnesses the difference (hopefully improvement(s) it will make.

The best way to see it for yourself if to do what I mentioned with the optivisor.... way back when I did it....I got so wrapped up in how much I was learning that I spent a couple of week just cutting up stuff in the shop.... didn't get much of anything else done! :)
 
Just by coincidence, I recently finished this custom order for a customer who wanted what he called a "chisel knife". He specified the materials and design. At first he wanted a saber grind but I steered him toward a full height grind for the same reasons Ed described. This one was left at .025" the edge before final sharpening. 80CRv2 is a pretty tough steel and should do fine with that same geometry when paired with the hardness you described.
 

Attachments

  • 3V Chisel Knife #1  (2).jpg
    3V Chisel Knife #1 (2).jpg
    148.8 KB · Views: 28
  • 3V Chisel Knife #2  (2).jpg
    3V Chisel Knife #2 (2).jpg
    151.5 KB · Views: 29
Hello Darrin: This is Darrenk... that is one tough looking blade.... I cant wait to try it, use it, and most like abuse it...!
 
Thanks for explaining an being a teacher not a cheat sheet Ed. Will be podering and staring alot at cutting edges throughout the house. Lol
 
Thanks Ed,
This felt counter to what I thought I knew. I had always thought that the last bevel needed to be "razor flat" rather then an convex bevel with as smooth a transition as possible. Now that I am thinking about it I can picture the drag that is created to get past a flat "primary?" edge to the rest of the wedge.

I of course will experiment, well because I am like that short lived cat that everybody talks about, but in the end I am betting that this will take my work to the next level.
 
Last edited:
Back
Top