Cant get a satin finish...

Black cat

Well-Known Member
First before I rant ill apologize. I have a few issues :p and spend my life in a constant state of borderline suicidal.
Anyway today so depressed!
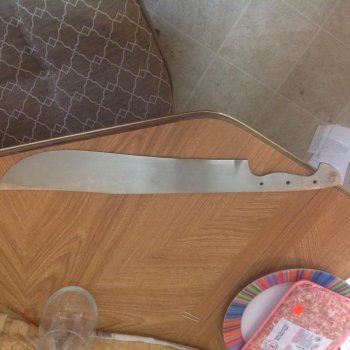
The big knife came out of heat treat well.
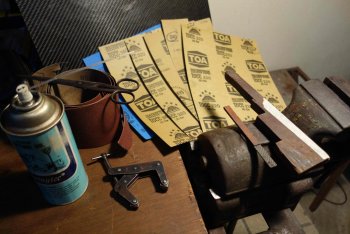
Today I spent 10 hours and about 100 dollars worth of wet dry paper trying to get a decent looking satin finish.
No paper left and the blade is in worse shape than when I started.
I can get a perfect mirror shine in about half an hour no problem but I dont want a mirror finish on this blade. I actually took it to a mirror finish then tried to step back a few grits to get the satin look.
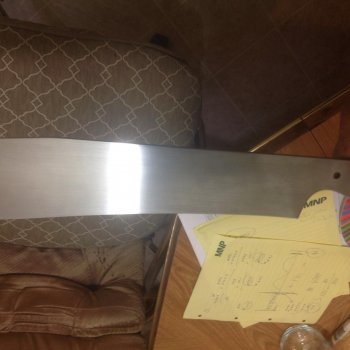
I just cant get it to look uniform. It looks all streaky and unfinished.
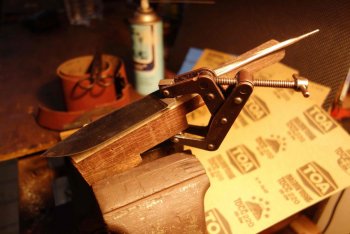
The closest I got was at the end of the days when I wrapped the paper around a wooden dowel rather than a piece of metal I normally use.
Also somehow I warped it while hand sanding... How is that even possible... I dont even...

Grit progression:
150
240
320
400
600
800
1000
 
Rather than a dowel or metal, try a hockey puck cut in half - pie like more or less with 1" strips of paper. Only sand one direction. You may want to modify the working surface of the puck a bit. I would not start this at 150 - too much risk of rounding nice clean edges - maybe start at 400 - 600.

Rob!
 
Satin finishes are not so easy if You want them real even.Maybe there are fellows who think its easy but then I take a look at their blades and then I know wy they are thinking it is easy.....of course in the eye of the beholder and the hand of the executer.....
There are many tricks and do"s and dont"s which have to be aware of.
depending on Blade shape, tool, sitting position, right move of the arms and hands, how and on what the blade is clamped, quality of sanding paper, adding cutting oil or not, steel alloy, hardness.....and so on
After 20 years of practical experience, the satin finish is the easiest work on the blade.....like everything it is all about practice

If You want a precise advice for Your case, please post a picture or two of the blade You are not satisfied with.
no need to be depressed...at least in this case.

Cheers
Jeremiah
 
Have you tried the Scot-Brite sanding pads? I use Scot-Brite belts on my grinder to do a satin finish and they come out well. I'm just trying to remember where I got the pads from. They came as a free sample with an order of belts.

Doug
 
Without pics I'm having a hard time picturing what's going on. The best advice I found when I started was a video by Nick Wheeler on hand sanding. Before that, I was sanding lengthwise and 90 degrees to that. Nick's advice was to sand at 45 degrees to the blade and then 90 to that, basically 45 degrees in both directions. Save the inline sanding until the last step. That really helped me a lot. Search youtube for Nick Wheeler Hand Sanding. Aaron Gough has a video about hand sanding too. I sand with a precision ground steel bar until almost at the end, then slip a piece of 1/8" rubber between it and the paper to finish up. It shouldn't be as hard as you experiencing.
 
As requested heres the pictures. I hope they are clear enough. Overall 22" long the spine is 3/8 thick the edge is 1/8 1084 steel distally tapered. I also included a screenshot of the 3m scotchbrite pads that were mentioned. Are these the right ones and how many should I order ? Is there a way to do this without the pads ?
Sorry the reply took so long. Been a rough week.

image.jpgimage.jpgView attachment 55424View attachment 55425View attachment 55426View attachment 55427
 
"Black cat"....knowing how thick the spine is including the pic of the spine is useless....its about satin finish of the flanks and generally, right?

the other attachments are invalid...try again.

You dont need special this and that pads or some other super-cool stuff, just normal sanding paper and important: wet sanding paper...not! dry ...You have to work with cutting oil to get clean first approach of the grit on the surface)
if it is not in the skills no "special" stuff can help...
I need to see better pics otherwise I dont know how Your problem comes together......
 
This was I need to get a good finish.

Grit 220 / 240 / 280 / 320 / 360 / 400 ....I work in smaller steps in grit size....I get a cleaner even finish in less time.
...it took me a few years to really see whats going on on the surface and in the light,....today after I am to grit 400, I am 80% really at grit 400...and on a real 400 it is no effort to get a grit 600.....

a simple stepped wood piece, about 220 mm in length and 15 mm in thickness, blade should be wider

a good paralel clamp

a piece of wood(140 x 10 x 3 mm) one with hard leather glued on, leather thickness about 2-3 mm...I prefer a piece of 2 mm carbon it wears not so fast down as wood, for bigger blades of course a bigger one

cutting oil

and for removing more material if it is needed
a fresh, sharp 150 grit grinding belt...
when new belts come in the house, I always sacrifice one, it is worth it 10 times!.....I invest 10 € in a belt and have nearly a year long the strongest, most removing hand sanding stuff. with cutting oil an even good pressure it is on big blades for me the fastest way to prepare a real fine finish....

and a paper scissors to cut clean stripes as wide as the small finishing wood.

this are the tools only

so far so good
hope that helps
 

Attachments

  • SF1,k..jpg
    SF1,k..jpg
    153 KB · Views: 48
  • SF2,k..jpg
    SF2,k..jpg
    146.9 KB · Views: 54
Last edited:
image.jpgimage.jpgSorry the spine was a random side thought lol I was looking at it at the time I posted and thinking to myself is this too thin already.
These were some of the pics that were invalid. Idk why... I see links on my end and they open into the pictures. Its odd.
Thanks for the help though! Im getting some idea whats going on. In the light it looks streaky. To me it looks like some of the sanding scratches are deeper and some are finer. Im wondering if perhaps I didnt get the marks from the coarser grits out as much as I had hoped. Im going to try sanding by changing directions as was mentioned and see if that helps.
 

Attachments

  • image.jpg
    image.jpg
    143.6 KB · Views: 42
  • image.jpg
    image.jpg
    134.1 KB · Views: 43
If you were doing all your grits in the same direction that's definitely the problem. There's no way to see your progress from one grit to the next without changing directions.
 
If you were doing all your grits in the same direction that's definitely the problem. There's no way to see your progress from one grit to the next without changing directions.
Anthony, in my opinion definitely not.different directions is the pattern to pre-polish or polish, like crosswise.
it is the too big steps in grit size....like I said, it is not easy to see whats going on, to see the coarser scratches.so the smaller steps in grit size giving the chance to get more out than You actually see....a 280 grit becomes easier clean a 320 grit if there is no 150 grit underneath....
 
Scott, how thick is that Hermes abrasive? I tried scotchbrite on my sander, and i didn't have enough clearance for it. I'm wondering if maybe this is a little thinner?

thanks,
Aaron

Aaron, those belts are perfect to give steel and other metal parts a fast! matte finish, motorcycle engine parts, construction pieces, You name it.
But there are to uneven to be important for handmade knives.Handmade knives should be done with finer standard. there are 3 grits of scotchbrite belts coarse and medium and fine....the coarse ones makes You a finish which is a mix of grit60, 40, 80 ,100....useless, the medium and fine the same deal, uneven crap...and they are getting hot, very hot!!....because You have to press like an ox if You want to see progress on 60 hrc.
the scotch brite belts from 3M are much better than from Hermes....so it depends how You see it and what kind of result You expect.....in my opinion it is not enough for professional knife making.....maybe the hobbyists have some use for them.....in Germany nobody uses them for high end cutlery....
 
View attachment 55442View attachment 55441Sorry the spine was a random side thought lol I was looking at it at the time I posted and thinking to myself is this too thin already.
These were some of the pics that were invalid. Idk why... I see links on my end and they open into the pictures. Its odd.
Thanks for the help though! Im getting some idea whats going on. In the light it looks streaky. To me it looks like some of the sanding scratches are deeper and some are finer. Im wondering if perhaps I didnt get the marks from the coarser grits out as much as I had hoped. Im going to try sanding by changing directions as was mentioned and see if that helps.

the pics are to unclear to see something.....there it looks like real cool satin...lol.
What is that for a steel You used on the blade?
it is very important not!! to practice satin finishes with D2, CPM, elmax, ATs....take something that is easy to remove and work with like O7, or 52100, 5160...or whatever but not that full alloy packed stuff....

and satin finishes on such big blades like Yours are not easy to get even....so if You want to have a nice finish think twice if it important for You to make it satin.
satin finishes have more friction they make a blade cut less agressive and the coarse opened surface rusts faster and/or holds a lot of dirt and remaining stuff from cutting, like wood smear and the like.

by the way that is a nice blade design!....
 
View attachment 55442View attachment 55441Sorry the spine was a random side thought lol I was looking at it at the time I posted and thinking to myself is this too thin already.
These were some of the pics that were invalid. Idk why... I see links on my end and they open into the pictures. Its odd.
Thanks for the help though! Im getting some idea whats going on. In the light it looks streaky. To me it looks like some of the sanding scratches are deeper and some are finer. Im wondering if perhaps I didnt get the marks from the coarser grits out as much as I had hoped. Im going to try sanding by changing directions as was mentioned and see if that helps.
 
the pics are to unclear to see something.....there it looks like real cool satin...lol.
What is that for a steel You used on the blade?
it is very important not!! to practice satin finishes with D2, CPM, elmax, ATs....take something that is easy to remove and work with like O7, or 52100, 5160...or whatever but not that full alloy packed stuff....

and satin finishes on such big blades like Yours are not easy to get even....so if You want to have a nice finish think twice if it important for You to make it satin.
satin finishes have more friction they make a blade cut less agressive and the coarse opened surface rusts faster and/or holds a lot of dirt and remaining stuff from cutting, like wood smear and the like.

by the way that is a nice blade design!....


Thanks! :D its 1084. So you think a mirror finish on a large chopper would look ok ?
 
I've been practicing my hand sanding as well recently. I think the biggest problem I encountered was getting lazy toward the finish. You spend all this time going up trough a few grits, checking, sanding some more, trying to get that last scratch out....by the time I got to what should be the end, getting the finish was hard because any little out of line move, stroke, pass, bump or whatever would screw it up. Sometimes to the point of a deeper scratch than surrounding area because I changed pressure or something. Then I had to get that scratch out again. Take a break when you're close to done, come back and do it evenly and methodical.
 
I've been practicing my hand sanding as well recently. I think the biggest problem I encountered was getting lazy toward the finish. You spend all this time going up trough a few grits, checking, sanding some more, trying to get that last scratch out....by the time I got to what should be the end, getting the finish was hard because any little out of line move, stroke, pass, bump or whatever would screw it up. Sometimes to the point of a deeper scratch than surrounding area because I changed pressure or something. Then I had to get that scratch out again. Take a break when you're close to done, come back and do it evenly and methodical.

Yup, I definitely agree with this. I think taking a break or even just stepping away from the knife for a while helps you see clearer when you come back to it. Good advice, N.N.
 
Call me crazy- but I've had pieces of steel that seemed like no amount of sanding would eliminate mysterious scratches that seemingly appeared around 600 grit, running in a direction that I had not sanded in at all.

I just had another issue that was driving me insane, but I figured it out. This may be what you're seeing-

I could get a good looking scratch pattern, and then I'd get crazy scratches from nowhere. I actually thought my paper towels were scratching the finish when I'd wipe the surface to change grits. (I sand with WD40).

I was half-right. I started shooting the blade with windex to lift any residual swarf or grit from the surface- and LIGHTLY wiping in the same direction I had just been sanding.

I discovered that my paper towel was picking up grit I couldn't see and then I was raking it across my finish and scratching my blade.

I have never had this problem before until I started using this brand of paper towel (el cheapo).

Using this windex / wiping direction step between grits restored my sanity. I also think it's the solution to my mysterious scratch problem I've had at times that I mentioned above.


Sent from my iPhone using Tapatalk
 
Back
Top