Heat treat oven

emtore

Active Member
A member here,-rolynd, posted a tread on how to calculate the heating elements for a heat treat oven some time ago.
Very handy info, and so far so good.
But,-(there's always a but), does anyone here know where to buy kathal A1 wire in useful diameters?
Anything between 11 and 14 AWG (2.3 to 1.6 millimeters) would suit.
And no,-I'm not lazy. I've been googling and spendt hours on ebay, but all they sell is thin wire for making elements for e-cigarettes.
Same with amazon,-only very thin wire. Those glycol vapour inhaling people are making it difficult to search for webshops selling
kanthal A1. All that comes up is for those addicted folks.
-Grateful for any info.
 
I signed up less than hour ago, and already I've got a reply with very useful info.
This forum seems to be alive and well,-thanks a lot.
 
rolynds tutorial is very good, but at the end he says that the reader can now calculate the length of the heating element when it is coiled.
Problem is there is no formula, table or method given in the tutorial that would make this possible.
rolynd hasn't been here since february so I haven't been able to get in touch with him.
However,-I found a pottery kiln site here that might solve this problem.
You can use a formula or a table in case you like tables best.
So, if anybody here is building or plan to build a heat treating oven, rolynds tutorial ( can be found here ) should be more or less complete with the addition of the above mentioned formula/table.
 
Sorry for pushing on with this topic, but if anyone wants to build a heat treat oven this info might be useful.
In the tutorial there is a formula for calculating surface area of the restistance wire which is neccessary to calculate the surface load.
The formula for wire surface area goes like this: Area = 2 x PI x wire radius x wire length.
Strange . . . there is no info wether radius and length is in millimeters or meters, because if wire radius is in meters then wire length also must be in meters and vice versa. Putting radius and length into the formula in meters gives you a wild result. Same with putting them into the formula in millimeters. So,-I let the radius be in millimeters and the length in meters, and I got a result 10 times to small compared with the author's result.
Same number, but smaller by a factor of 10
I trucked on and multiplied my result by 10.
Since this formula is neccessary to calculate surface load I put my numbers into the surface load formula,-and voila,-I got a reasonable result.
Before my results for surface load were through the roof.
So, use the formula for wire area,-insert numbers for wire radius in millimeters and wire length in meters and multiply the result by 10.
Then you can go on with calculating surface load.
 
Last edited:
formula works for any unit of measurement... you just have to use the same units across the board. The surface area will be in square units (m or mm or in or...).
 
formula works for any unit of measurement... you just have to use the same units across the board. The surface area will be in square units (m or mm or in or...).

True, same units across the board, inches, millimeters, lightyears,-doesn't matter, but when I do that the results get insanely wild.
I used the same numbers as in rolynd's examples and I got the same results as he did by multiplying wire area by a factor of 10.
His result was 288 square millimeters, mine was 28,8.
There's a kiln site with loads of formulas for calculating this stuff,-I'll go and check there and see what I find.
Would be nice if rolynd could pop in here. If there are errors in the tutorial it would be OK to have them corrected.
I'm sure he could give some additional tips and tricks too.

mm and m are not the same units. Everything must be in mm or m. Since his result is in square mm, convert everything into mm, and your calculation will be correct, and will match his unless there is an error in the book/site.
 
mm and m are not the same units. Everything must be in mm or m. Since his result is in square mm, convert everything into mm, and your calculation will be correct, and will match his unless there is an error in the book/site.

rolynd's result are in square centimeters,-so let's try to convert everything into centimeters:
2 x PI x 0.05 (wire radius) x 918 (wire length) = 288 cm squared.
Yessss,-same result as rolynd

Let's convert it into millimeters:
6.28 x 0.5 x 9180 = 2880 mm square = 288 cm squared.
Ah,-good, rolynd's formula was correct all along.
 
Last edited:
rolynd's result are in square centimeters,-so let's try to convert everything into centimeters:
2 x PI x 0.05 (wire radius) x 918 (wire length) = 288 cm squared.
Yessss,-same result as rolynd

Let's convert it into millimeters:
6.28 x 0.5 x 9180 = 2880 mm square = 288 cm squared.
Ah,-good, rolynd's formula was correct all along.
Correct, I assumed mm^2 based on your earlier post. I know not this Roland and in no way intend to offend.
 
No offense taken on my part.
On the contrary, you helped put me on the right path in reminding me that the units of measurment had to be the same.
That mm squared thing in my earlier post was just me not thinking straight.
This oven project requires lots of calculations over and over again, changing parameters until it all falls in place.
Change something and anything else changes too. The coil becomes either too long or too short,- the coil won't put out enough heat or it will burn up, your oven is too small and the coil won't fit inside the oven, it's too big and the coil won't be able to heat the chamber.
But, it keeps me occupied, and it's fun.
The only thing remaining now is to find a way to figure out how long the coils will be when stretched out.
I know how to calculate how much shorter a certain length of wire will become when wound tight, but when stretched out the right amount is another matter, I'll have to get one meter of kanthal wire with the desired diameter, wind it tight and then stretch it and measure the length of the coil.
That will give me the ratio to use when making the heating coils.
 
I have found the optimum stretch ratio to be around 3 or a little over: the installed length is around 3 times the length of the tightly-wound coil. My reasoning is pretty unscientific and there may be better advice out there.

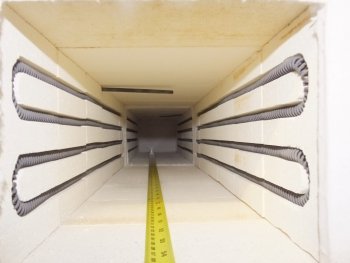
I fit the elements into routed grooves in the IFBs. the elements get held in place longitudinally by bent-wire staples made from either Kanthal or Nichrome wire of smaller diameter than the elements. If the wire diameter for the staples was the same as the element diameter and the inside of the bend was tight to the element, the element would need to be stretched to something over twice the coil-bound length to avoid the adjacent coils touching the staple and shorting out a coil. This probably would not cause any significant effect on the operation, but if the coil moves and touches the staple repeatedly, there is a possibility of sparking, leading to erosion of the element at that point. The thin spot then gets hotter and can become a failure point.

I use smaller diameter wire for the staples, which helps with the clearance. The wire still needs to be stiff enough to push into the IFBs, so it can't be too thin, and I bend them using long-nosed pliers which means the bend radius is longer than ideal. I increase the stretch to 3:1 to allow for this. I am middle-aged with eyesight that is somewhat less than it once was. I fit the elements in the ovens with both walls in place and with the roof off, giving a pretty lousy viewing angle. I need to be able to see the staple straddle the element and push it in, then push it fully home. I have enough trouble with a 3:1 stretch ratio. When I've tried at 2.5:1, it has been more than a tad frustrating due to the lack of wriggle room.
 
cm ²
I have found the optimum stretch ratio to be around 3 or a little over: the installed length is around 3 times the length of the tightly-wound coil. My reasoning is pretty unscientific and there may be better advice out there.

I fit the elements into routed grooves in the IFBs. the elements get held in place longitudinally by bent-wire staples made from either Kanthal or Nichrome wire of smaller diameter than the elements. If the wire diameter for the staples was the same as the element diameter and the inside of the bend was tight to the element, the element would need to be stretched to something over twice the coil-bound length to avoid the adjacent coils touching the staple and shorting out a coil. This probably would not cause any significant effect on the operation, but if the coil moves and touches the staple repeatedly, there is a possibility of sparking, leading to erosion of the element at that point. The thin spot then gets hotter and can become a failure point.

I use smaller diameter wire for the staples, which helps with the clearance. The wire still needs to be stiff enough to push into the IFBs, so it can't be too thin, and I bend them using long-nosed pliers which means the bend radius is longer than ideal. I increase the stretch to 3:1 to allow for this. I am middle-aged with eyesight that is somewhat less than it once was. I fit the elements in the ovens with both walls in place and with the roof off, giving a pretty lousy viewing angle. I need to be able to see the staple straddle the element and push it in, then push it fully home. I have enough trouble with a 3:1 stretch ratio. When I've tried at 2.5:1, it has been more than a tad frustrating due to the lack of wriggle room.

I'm middelaged too, and can't focus properly on anything closer than several yards away.
I've got lots of glasses, one pair for the computer, one for the cell phone etc. Very annoying.

Three times stretch seems like a good choice. It doesn't have to be scientific, it only has to work.
Do the staples have a tendency to come loose after some time?

You should have a peek here, this guy goes through everything from brickwork and math to schematics. The most complete tutorial I've seen so far.
 
The staples seem to stay put.

Of the 7 or 8 HT ovens I've built so far, the oldest one I've seen lately is about 7 years old and is used regularly by a maker of fairly high-end Carbon steel and PW kitchen knives. It had an element failure early on (16 ga Kanthal A1. I now use 14 ga A1), fixed by shortening the element slightly: the failure was very near the end, but seems to have stood up ok otherwise. He's not sprung for an Evenheat or Paragon, so it is presumably getting the job done.

On the wire diameter, the 14 ga seems about right. I buy wound elements because my supplier is set up to make them to order and they only cost the same as buying the wire to make them myself. YMMV.

I bought the original 16 ga elements wound to .380" OD to fit in a 10mm routed groove. I got the 14 ga wound to fit the same groove width. I don't think anything much thicker would wind so tightly and the groove width and depth would need to increase, cutting down the wall thickness behind the grooves. It's another thing to consider.

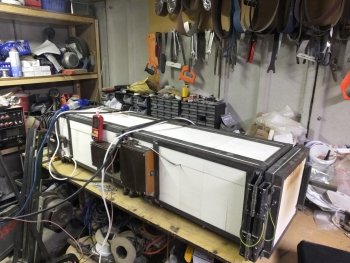
In theory, my new 14 ga elements will fit as direct replacements for the originals. The stretch ratio will be reduced (though still well over 2:1) and I don't want to be the one that fits them for the reasons mentioned above. My original chambers were 18"L x 7"W x 6"H and I added another brick to the length (22.5") for the ones with 14 ga elements to increase the groove length and get the stretch ratio up. The 18" ovens had performed well enough that I was confident the extra length would not be a problem. These also worked fine. For the latest 2 ovens, I went another brick for 27" long. The elements are all rated for 3 kW, 2 elements, each rated for 1500W at 115V and connected in series, as UK domestic mains sockets are rated 13A at 230V.

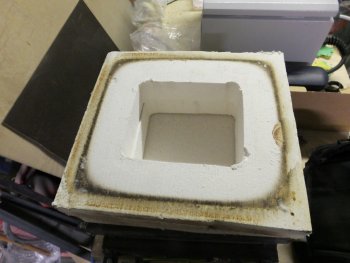
The 27" ovens reach 1300 degC/2372 degF with ease (they max out the type N thermocouples I use) and I'm pretty sure I could add another brick to go to 31.5" and still exceed 2150 degF. The connections to the elements were a PITA to do because they come out of the sides and need to be boxed in. The back of each oven is removable to allow them to be bolted together for swords up to 56" long (the extra 2" being a result of using 1" ceramic fiber blanket for the door- and back-gaskets. This compresses down to about 1/2" in use). In case this is not enough, the doors can also easily be extended by adding in one or two, maybe even 3, 2" thick Ceramic Fiber board spacers each, and one, maybe 2, more 2" spacers could go in the middle. 6' seems entirely possible.DSCF7288.JPGDSCF7323.JPGDSCF7324.JPG
 
Holy sheit Batman now that is HT oven!! Timgunn you put some thought and time into that one! Awesome work! If it is worth doing, it is worth doing it right!!
 
That is one fine oven. You could almost HT my truck! Lol. This must be extremely difficult to do correct? Emtore, feel free to shoot any math questions my way, I can more than likely help.
 
Timgunn,-I'm speechless, that is purely heat treat oven porn.
This is a great inspiration for me to get going with my own oven project.
I've put it up for years because I was uncertain about where to obtain the bricks.
Ordering them from the US is costly, customs charge you a good amount of money when importing goods from across the pond.
It's ironic, there is a factory here in Norway that produces every kind of fire brick, mortar and everything else.
They have retailers all over the country, the nearest one three hours drive from here, but would the retailer bother to order a pallet of bricks just to sell me 20? They would then get stuck with that pallet for decades. 25R insulating refractory bricks isn't something every other customer asks for.
So, I called the sales manager at the factory and asked what the minimum quantity was.
The answer was no minimum quantity,-for a small extra fee they would let the retailers order one single brick if need be.
That's it then,-I'm up and running again.
 
Emtore, feel free to shoot any math questions my way, I can more than likely help.
Thanks for that.
I've been gathering formulas and methods from a couple of places, and if you have time to go through it I will calculate a heating element.
You can go over it if you feel like it.

Note: This post will be edited as I find calculation errors.

All measurments are in cm and all results are in cm, cm ² and watts unless stated otherwise.

First I decide upon the size of the oven chamber.
length=44cm
height=12.5 cm
width=13cm

Calculate chamber area = 2569 cm ²

A sidenote:
This method uses two parameters called surface loading and power density.
Both are measured in Watts per cm ².


Power density applies to the chamber,-surface loading applies to the wire in the heating element(s).
So, what people usually refer to as surface loading at this stage of the calculation, I will be refering to as power density.


We'll need to know how powerful to make our oven, but first let's decide upon a suitable power density value.
The preferred value will be somehere between 0.8 and 1.0. Lower than this, and the oven will take a long time to reach desired temp.
To high, and the temp. will overshoot, and the PDI will struggle to keep temp. stable.
So, let's continue calculating the power of the element with a desired power density of 0.8.
P(watts) = surface area x power density = 2569 cm ² X 0.8 = 2055 watts.

Let's round this up to 2500 watts.
P=2500W

Calculate how much resistance the element(s) has to have.
R=V²/ P
R=230²/ 2500 = 21.16 ohms.

How long does the wire have to be to get a resistance of 21.16 ohms?
1.6 mm wire = 0.695 ohms per meter.
Length of wire (meters) = required wire resistance (ohms) / resistance per meter (ohms) = 21.16 / 0.695 = 30.44 meters.

Surface Loading:
To calculate surface loading we need to first calculate surface area of the wire.
What is the surface area of our wire?
Our wire has a diameter of 1.6 mm which equals 0.16 cm.
Length of wire = 30.44 meters which equals 3044 cm.
Then we calculate the circumference of the wire.
Circumference = π x diameter = 3.14 x 0.16 = 0.5026 centimeters.
Surface area of wire wire length x wire circumference = 3044 x 0.544 = 1530 cm ².
Surface loading = Power / wire surface area = 2500 / 1530 = 1.6 watts per cm ². (Surface loading is twice the desired value. Change wire length and/or diameter and recalculate.)

How long will our 30.44 meter wire become when coiled up tightly?
d = wire diam. (mm)
D = inside coil diam. (mm)
L = length of wire (meters)
x = length of close wound coil (mm)
Inside coil diam. must be at least 5-7 times wire diam. Let's go for 8 times = 12.8 mm. rounded up to 13 mm.
x = L x d x 1000 / π x (D+d)
x = 30.44 x 1.6 x 1000 / 3.14 x (13 + 1.6) = 1063 mm = 1.063 meters, rounded down to 1.0 meters.

The distance between the single windings should be 2-3 times the wire diameter.
For a wire with a diam. of 1.6 mm. this means the distance between windings should be between 3.2 and 4.8 mm.
Stretch the coil at least 2 times the length of the coil when it is tightly wound and see how the distance between windings end up.
Stretch more if distance between windings is below 3.2 mm.
How much you stretch the coil will always be a compromize between distance between windings and length.
If the oven needs a longer element, then stretch some more.
If the element becomes too long and the distance betwen windings is still below 3.2 mm. then cut off some of the wire, provided you don't cut off too much.
 
Last edited:
Back
Top