Looking for advice on edge retention

billyO

Well-Known Member
Hello all. I'm not sure if this is the proper forum, so please move if needed.
My sister asked me to make a knife for a chef friend of hers in appreciation for him donating food for a fundraiser for a dog rescue she volunteers at. When I talked with him, he said he wanted a butchers knife to break down turkeys, and he gave me some specific dimensions he was looking for. He did say he's never seen a knife like what he's asking for. Anyway, I've finished it 38.jpg
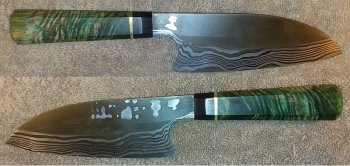
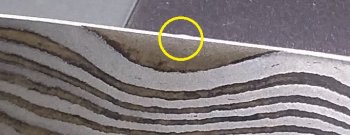
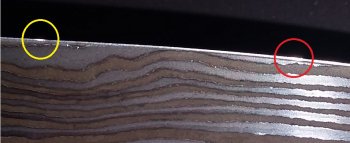
and before sending it off to him I thought I'd do some testing because I'm afraid the I made the edge a bit thin. So I got a whole chicken and today I destroyed it (the chicken;)), cutting through the bones, wedging the blade between joints to pop them open and torquing the edge against the cutting board while doing this. The edge seemed to hold up pretty well, was still shaving hairs off my arm after cleaning, but there are 2 spots where the edge deflected a little as shown in the pics. The yellow circle is the same spot on opposite sides of the blade.
20200716_151313.jpg20200716_150914.jpg
It's my understanding that this is what butchers use a steel for, but are deflections like this the acceptable norm when chopping through bones? Should I send this off for him to use? My plan if I do is to ask him to let me know if he wants a heavier blade edge and I will make him another one. This is a gift, so he's not paying me for it, but I don't want to send off something that isn't suited for it's purpose.
Thanks.
 
I don’t have much experience chopping through bones so can’t help there. You could always grind the edge back a bit to thicken it up if it turns out that’s what’s needed for this application rather than make a new one.
 
You'll have a better idea than any of us will given that you had it in your hand and can assess whether or not the "damage" is proportionate to what you did with it. My only comment is that edge does look really thin and that is some pretty minor...glinting? It doesn't look folded like a roll.
 
This is the first time I've butchered up a chicken so I'm not sure if what I did was normal or not. The knives I make are almost exclusively veggie slicers, so to me, chopping through bones is a bit abusive.
that is some pretty minor...glinting? It doesn't look folded like a roll.
I don't think they're rolled, they look to me like what you would see when you do the brass rod test (or is that what you mean by rolled?). I just got out my calipers and each one is ~0,020" long (not sure if that's useful info, but there it is ;) ).
 
Last edited:
A Japanese pattern knife (extremely hard, extremely thin edge) should never come into contact with bones or you should expect chips on the edge. They cut like a laser on soft foods, because that is what they are designed to do. Under the circumstances your knife did very well. If the recipient is into Japanese knives, repair the edge and send it to him. It’s perfect.

If the recipient is going to use this knife for every kitchen task, then I’d do what Chris Railey suggested. I’d take about .030” (guesstimate) off the entire edge and resharpen with a convex edge. Either way, thickening up the edge will make it more durable. Having an edge thickness of .005 - .010 before sharpening will give you great performance and edge retention. Chopping chicken bones is still going to ding the edge up. That’s what cleavers and beater knives are for.
 
Good morning, all. I hope everyone is staying healthy and safe. Thanks for the replies.
Chopping chicken bones is still going to ding the edge up
That's what I was thinking/hoping I'd hear....:)
Mike (the chef) said he'd like a knife specifically to break down turkeys. He gave me some parameters (5 1/2" blade length, 5 cm high at the heel, 5mm thick at the spine, square shaped WA handle 12 cm long) and also said he's never seen a knife like he's asking for, so I couldn't use any existing models/brands to compare with. When I tried to follow up for for more info, specifically about the thickness behind the edge, I got no response, so I went with my gut.
I'm thinking/hoping(?) that because he's a chef and should know what he's doing in the kitchen, he won't be chopping through the bones as with a cleaver like I did in my testing.
I cleaned up the edge last night and am planning on sending it to him with the understanding that I'll make him another one if this doesn't work for him. Because this is a gift and not something he's paying for I feel a little more comfortable sending it off with potential questions.
 
Were it me, I would likely build an entirely new knife, and design it per the user's intentions.

Now, here is where that old "give-n-take" of knifemaking happens.
IF you want to "modify" this particular knife, then Short of making an entire new knife, I concur with what Chris and John have said. Take the edge down to thicken it, then put a slightly heavy convex on it. Here's the rub..... that would require tearing off the handle (IMO), and refinishing/etching the blade.... if it were done correctly. I also noticed in the pic of the edge, with the red and yellow circles....the yellow circle has some delamination..... so that would be another reason to overhaul the edge/grind/geometry.
 
I also noticed in the pic of the edge, with the red and yellow circles....the yellow circle has some delamination..
I etched the blade for 3 20-30 minute cycles and you can feel the topography between the steels. Is this where it's coming from?
 
The specs you got are looking for an all around knife that can handle bone chopping as well as cleanly slicing. To get that there's gonna have to be some give-and-take. There can't really be the usual japanese hard steel/thin edge for fine slicing while still being able to chop a bone and have good edge retention. So what was suggested above is the right way.

Japanese knives divide things into different purpose knives (much like we do). Honesuki/Garasuki - boning, Santuko - multipurpose (much like what you have made), Gyuto - kinda multipurpose but meant for meat, and then various other slicers. So, technically if he's gonna do a lot of bone work, then a boning type would be preferable and then switch to the slicing type. I know that's outside what you're trying to do

I only know this stuff (a little) because I started making a few awhile back and wanted to kinda understand what I was getting into.
 
I etched the blade for 3 20-30 minute cycles and you can feel the topography between the steels. Is this where it's coming from?
I suspected you had done a lengthy etch from the pic. It's possible the etch caused it, but it does look like a delam just below the edge bevel in the pic.

To me, that's an unusually long etch. There are so many factors that can impact etching, what's "normal" for me, may differ for others. The one thing I am certain of..... you cannot rely on time. For example, in my shop, when it's cold weather, and the etchant isn't "warm" it can take 30 or more mins for what I call a "normal" etch, and 45+mins for a "very deep" etch. Compare that to like it is now..... 85+F in the shop, and a "normal" etch might be 15 mins, and a "deep etch" 20-30 mins. I only use those times as a descriptor, they are not absolute by an means.

I know that it's very common for knifeakers to put a blade in to etch, and go do something else, thinking they are being economical with their time..... IMO that's the wrong attitude to have....... Any time I etch a blade, I do nothing else to distract me, and am pulling it out, looking it over, every couple of minutes. Etching is just as important as any other step in the process, and should demand your full attention.
I can also say...... over etching creates far more issues than it solves, and there is a very fine line between "just enough" and "too much". ;)
 
I love Japanese blade aesthetics. But there is a lot to understand because they truly have a knife for every task. Which is a good thing.

That is sooo right. It's a dang black hole of time and information. Beyond the different knife types, each also has different point types, right and left handed, grind types for different meat release - hollow, chisel, single bevel, etc. Even different knives for different types of fish. You can spend days watching youtube on the making, uses, etc. It is super interesting though....
 
To illustrate what an acid etch CAN do to a blade I suggest an experiment. Next blade you are gong to etch sharpen it first until you have a good burr along the edge. Leave the burr and etch your knife as normal. The acid will eat that burr off in short order. Be careful though it leaves a nasty sharp edge when you do it that way. I have ruined more than one knife by forgetting it was in the acid.
 
Thanks for all the responses, folks. They are helpful.
I can also say...... over etching creates far more issues than it solves, and there is a very fine line between "just enough" and "too much". ;)
So true, and fortunately I learned this the hard way on one of my first few pattern welded blades. (I can't remember the extra long etch was on purpose or the result of being distracted by other things.)

I think I know the answer to this, but is there a general rule for how deep the topography should get?
I'm thinking the answer will be, it depends.....but thought I'd ask those who have been doing this longer than I have.
There are so many factors that can impact etching,
I feel I should add here in case any newer makers are looking at this for reference, don't forget that in addition to time, the strength of the acid is a big factor as well
 
you twist the joint open when you cut it, it should only cut tendons and a little cartilage, soft ribs maybe. but he want honetsuke or grasuki, as mentioned above, that looks like a western grind deba... a western grind deba is a fine choice too... but the bevel is ground more obtuse so the bevel can ride on the bones and cut off the meat, just above the bone, with a tiny edge bevel, that wont snag bone.
 
Back
Top