Mechanical Engineer designed his chef knife.

Mark Barone

Well-Known Member
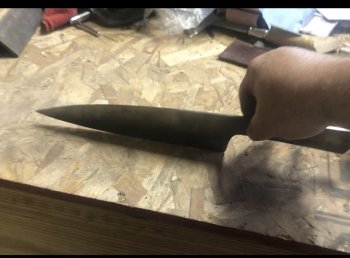
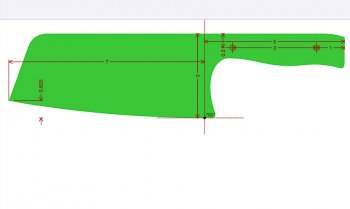
Just curious what you think. I wanted to make my brother a cleaver/vegetable chopping knife. He loves to cook. I don’t know if you know any engineers but many will do a great deal of research and trials just to design a toothpick. He is no exception. Any obvious issue you see with this design. I thought the handle may be a tad long. It will be 1/8 inch stock. Also can I get i do 2 pins or would I need 3. This is my first chef knife. He wants it mostly for choppin vegetables and also some slicing. He didn’t want just a straight blade on the bottom.
 

Attachments

  • 1D3B85E8-E5A6-474D-9CE9-A4BFA9EC5616.jpeg
    1D3B85E8-E5A6-474D-9CE9-A4BFA9EC5616.jpeg
    128.1 KB · Views: 39
That is a really good start, and yes, two pins will work just fine.

The only potential issues that I see are that the belly doesn’t flatten until it’s almost to the heel of the knife and the upsweep to the point is very steep. To use the front of the knife his heel will be way up in the air. If he’s tall that’s no problem. A shorter person will not be comfortable.

As to the belly flattening out right at the heel- That is going to cause a lot of “accordion” cuts where you have a string of cubes that are still attached at the back where the edge didn’t quite make it to the board. That becomes quite frustrating.

Some belly in a blade is very desirable for rocking, but a whole lot of vegetable prep is done with push cuts and chopping. You want a good bit of flat somewhere in the blade for chopping. If you look at a French Chef design, which is also the curve adopted by the Japanese for their gyuto (gyuto is their version of a chef knife for cutting meats) you will see a long, gently curved belly that flattens out for the last 1/3 of the blade. It is a dynamite design and does almost everything on a cutting board very well.

The length of the handle is great and the overall design is gorgeous. He will love it.
 
Last edited:
He didn’t want just a straight blade on the bottom.
gently curved belly that flattens out for the last 1/3 of the blade.
What I was taught was that, for general use chef's knives, you don't want any truly flat spots on the edge. How it was explained to me is that when looking down the edge (like when you're checking for straightness) you should see a continuous curve from the heel to tip. However, when holding the knife with the tip on the cutting board, and rocking it back to the heel like when mincing garlic, the curve should be shallow enough that you feel a definite 'stop' when the heel hits the cutting board, and not continue rocking. I hope this makes sense.
 
I know very little about knives and even less about chef-fery knives, but I agree with John and Billy. This here is almost exactly like Billy described and you can see it looks like the heel is flat in comparison and it's quite "rocky" right to the end. This is my #1 and I was surprised how very little curve it took to let it rock.
7FD2E087-22AA-4707-8870-9A7935F57FCE.jpeg
 
What I was taught was that, for general use chef's knives, you don't want any truly flat spots on the edge. How it was explained to me is that when looking down the edge (like when you're checking for straightness) you should see a continuous curve from the heel to tip. However, when holding the knife with the tip on the cutting board, and rocking it back to the heel like when mincing garlic, the curve should be shallow enough that you feel a definite 'stop' when the heel hits the cutting board, and not continue rocking. I hope this makes sense.

Yes great explanation. I will show this to my brother.
 
That is a really good start, and yes, two pins will work just fine.

The only potential issues that I see are that the belly doesn’t flatten until it’s almost to the heel of the knife and the upsweep to the point is very steep. To use the front of the knife his heel will be way up in the air. If he’s tall that’s no problem. A shorter person will not be comfortable.

As to the belly flattening out right at the heel- That is going to cause a lot of “accordion” cuts where you have a string of cubes that are still attached at the back where the edge didn’t quite make it to the board. That becomes quite frustrating.

Some belly in a blade is very desirable for rocking, but a whole lot of vegetable prep is done with push cuts and chopping. You want a good bit of flat somewhere in the blade for chopping. If you look at a French Chef design, which is also the curve adopted by the Japanese for their gyuto (gyuto is their version of a chef knife for cutting meats) you will see a long, gently curved belly that flattens out for the last 1/3 of the blade. It is a dynamite design and does almost everything on a cutting board very well.

The length of the handle is great and the overall design is gorgeous. He will love it.
Thanks John , I will cut and paste this to my brother. He may have some very specific reason why he wanted such a curve. I was A butcher for many years. And I am short, so I know what you are talking about.
 
Any obvious issue you see with this design

YUP!! All those lines and numbers!! :) Honestly, I've had a number of people over the years send similar things when ordering a knife, and I've even had a couple send actual Blueprints (the blueprints I simple returned and told the clients I don't build knives in that manner) All were complete train wrecks to me, because although it all looks good on paper, in my experience it almost never comes out as intended. It's very likely just the way I build knives in that I don't draw out anything, expect folders. I've found that trying to build to exact specs of a client/customer often produces a knife that looks OK, but handles and performs awful. In that particular design/drawing, there are a few things that scream out to me. I've also found that it's usually exasperating to try to talk a client out of things/features that I know they are not going to like, so If I build a knife they have draw to specs, it is understood that there are not refunds/returns, and more times then not, I get that call anyway, after they've tried to use the knife a time or two and found they don't like something about it. Sometimes they will order another knife, but this time they will just tell me what they want to use it for....and let me build it, which to date, has always worked out well.
I suppose it's easier for me then some, just because of all the years dealing with/building knives.

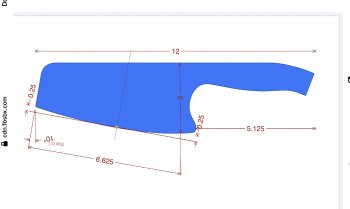
yes those lines and numbers were a bit overwhelming. I basically told him, when I print it on legal size paper, I will make sure the length and width are correct. Then I will cut it out and use it as a pattern. He understands but will always take it to the next level.
 
He may have a task in mind, based on the way he uses a knife. If he is that specific then I’d do what you said: print the drawing and use it as template.
 
He may have a task in mind, based on the way he uses a knife. If he is that specific then I’d do what you said: print the drawing and use it as template.

He liked the input from all And we appreciate it. He made a few tweaks. It looks like it has a a bit of flatter area also. Anyway. This is the template I will go with. This will just make it in my kiln. Now just have to figure out how I program my angle grinder to input the numbers. Not sure I have a .625 setting. BB3D66EF-FC4C-4318-9F11-92BA73456C52.jpeg
 
I use to sell electrical supplies. Mostly to electricians, every once in a while we would get an electrical engineer in the shop. I had one come in with a friend and ask me what size wire he needed to run an electric dryer. I told him 10 Gauge wire, he promptly responded "Well I'm an electrical engineer and my computer program told me I can run it with 14 Gauge wire"! After trying to discourage this he insisted on 90 feet of #14 wire, as I was going to cut it I heard him tell his friend "See they always try and sell you something you don't need" Two days goes by he shows up again with his friend asking for the same 90 foot cut of wire in 10 gauge I said nothing cut his wire got his money and said "It didn't work did it?" he was very defensive and said "Yes it did!" then his friend said "Yup but it took 4 hours for the cloths to dry!" we all burst out laughing!! Guy ended up being a good customer and never questioned our suggestions again!
 
That knife is similar to a nikiri style type of chopper. However, his has much more curve towards the tip. Maybe show him the nikiri style. I would tend to trust that a "tried, true, and tested" shape over something that was engineered but never actually put to use. Might make the difference between a well used blade and a "drawer queen".
 
He liked the input from all And we appreciate it. He made a few tweaks. It looks like it has a a bit of flatter area also. Anyway. This is the template I will go with. This will just make it in my kiln. Now just have to figure out how I program my angle grinder to input the numbers. Not sure I have a .625 setting. View attachment 74124
Good adjustments...this one will be a user.
 
I would tend to trust that a "tried, true, and tested" shape over something that was engineered but never actually put to use. Might make the difference between a well used blade and a "drawer queen".

This is probably the truest statement ever made when it comes to kitchen knives. Kitchen knives are the most tested, widely used and improved upon and standardized tool in the history of mankind. There's a reason that nearly all knives for a given purpose tend to incorporate the same design elements, because, unlike many types of knives, a kitchen knife lives and dies based on performance.

When it comes to kitchen knives, if a fairly timeless design seems odd to you then it is most likely because you are using it wrong. of course there are variations based on use. A good example is in this thread, above: namely the debate over a never-ending curve versus having the curve flatten towards the heel. A German style chef knife has no flat, whereas a French chef goes pretty strait at the last 1/3 of the curve. The German style is used for rocking only. It is blasphemy to chop straight up and down at the heel. The French chef is a a lot more forgiving and minces so much better that almost nobody uses a German profile anymore unless that's what they learned on in culinary school. Horses for courses. But the difference between the two designs in intentional and technique based. There's a method behind the madness. A chinese chef knife, which looks like a cleaver (but is a knife) is nearly all flat with some tiny bit of rise at the tip because Chinese cooking is all about the chop.
 
Last edited:
cleaver / chopper---> flatter belly, unless you just like the shape and will use it as a normal chef's knife, minus the tip for detail work... ask him to take a look at Bunka, it is kinda a blend between a nakiri and a gyuto, which ends up being very suitable for general purpose work and light veggie cleaving... and the appearance is a bit more elegant... that one looks like an engineer designed it... in the metal it will end up looking dull... the curves are a bit "how do we connect this bit to that bit"... we try to invoke a sense of motion with our lines, so that the knife looks dynamic even when lying on a chopping board... that will invite you to pick it up... 3" tall is for a person really deft with his hands... it will feel cumbersome if he is not a proficient cook...
this website is good inspiration... i drew up a quick thing, had to dust off libreCAD, but i would suggest to him to look at the various bunka, nakiri, gyuto... and then close them and draw something new... or a chinese cleaver... but then know it is for the very deft of hand, that tall heel and low tip, is a long way from the place your hand naturally points when holding a knife...
 

Attachments

  • bunka.jpg
    bunka.jpg
    6.3 KB · Views: 8
He liked the input from all And we appreciate it. He made a few tweaks. It looks like it has a a bit of flatter area also. Anyway. This is the template I will go with. This will just make it in my kiln. Now just have to figure out how I program my angle grinder to input the numbers. Not sure I have a .625 setting. View attachment 74124
I really like the overall shape and layout. I agree it maybe has a bit too much curvature in the belly. But if he is fairly tall or his counter top fairly low it may be perfect. Could also angle the handle down a bit to alleviate the curvature a bit? I'm 6'2" and like to cook as well, I think I could work with this knife though I'd prefer it an inch or so longer.
 
The only thing I have to add to the excellent suggestions above is that you might want to take another look at the placement of the leftmost pin. Think about where your scales are going to end and the location. I expect you will want the distance from the leftmost end of the scale to match that of the right pin to the rightmost end. Also consider that the blade side of the scale may taper down while the end may not.
 
The only thing I have to add to the excellent suggestions above is that you might want to take another look at the placement of the leftmost pin. Think about where your scales are going to end and the location. I expect you will want the distance from the leftmost end of the scale to match that of the right pin to the rightmost end. Also consider that the blade side of the scale may taper down while the end may not.
Thanks I did adjust from the drawing . I hope it came out good. I am posting the complete project in another thread.
 
Back
Top