One for the dishwasher

Sticks

Well-Known Member
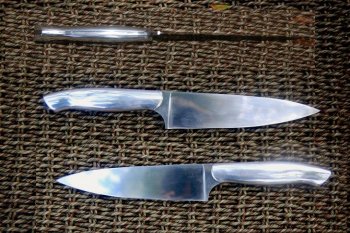
I figured a knife that could go into the dishwasher would be used more that one that couldn't. So here's my shot at a kitchen knife, of sorts.
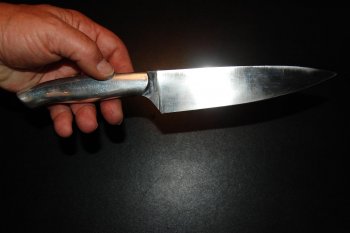
Blade- flat ground, full taper, 1/8" 154 CPM, scales- aluminum, peened with a black spacer to isolate the aluminum from the steel (prevent galvanic corrosion?) Still needs a little cleanup, but sharp, note band-aid.

Jay

Knife in hand.jpgKnife.jpg
 
I like it, However I wouldn't advise any good knife go in the dishwasher regardless of the durability of the scales because of the likelihood of damage to the edge. Most custom knife buyers probably know that anyways.

That being said a contemporary design, well made of low maintenance but high quality materials sounds like winner to me.

edit; One design note; where the plunge cut meets the full thickness of the blade at heal needs to be filed back at an angle a full 1/16 below the cutting edge. I know A lot of kitchen knives designs don't but it can really interfere with the chopping and mincing action of the blade by acting as a stop so the blade can not pass through the food. Even if it is good now with no light showing at the heel after a few sharpenings a gap will form and it is incredibly frustrating for the user. I don't say this to be over critical, but as a user who used to make a living in working kitchens and as a buyer. I personally wouldn't spend the money that knife deserves without that issue having been addressed. Otherwise I do like concept a lot.
 
Last edited:
Thanks for the critique! As it turns out, I've got some more work to do. My wife tried it and said the edge near the plunge line is too thick. So I'll grind a bit more to thin the entire blade as it is nearer the tip. I'll make your suggested change. But so I'm clear, the ricasso should be ground back at an angle so the the cutting edge of the blade is the only part making contact with a cutting board?
 
Sticks:
Great looking knife!
I too would be very leary of advertising any knife to be used in the dishwasher! This is a hostile environment for any knife much less one made and used with the presicision of the knife you posted.

I also agree that the heal of the blade should be a cutting surface all the way thru. Ive had some French made Chefs that were made in this manner, and thought they were great knives it broke my "flow" when I hit that part of the blade on the board.

All in all a great looking knife!!

God Bless
Mike
 
Sticks- Exactly right.

Diamond G - a lot of knives have that problem

Here's a pic of a Thiers Issard Sabatier that does it right to illustrate. It's forged with a bolster but the principle is the same, I have a vintage model.
sabatier_olivewood_chefs_10.jpg
 
Last edited:
Thanks! The picture is a great help! I thought the way I ground it was a user safety matter. But, I don't use kitchen knives much and the more I think about it what both of you say makes perfect sense. If I don't mess it up too badly, I'll post a picture or two of the knife revised as my wife and you recommend!
 
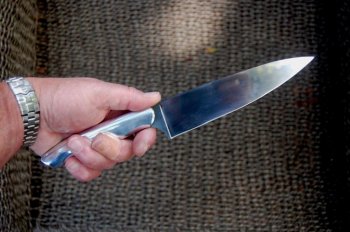
Well, I ground the blade quite a bit thinner. My wife's first test was cutting thin slices of a 4" red onion, using the blade near the ricasso and pardon the pun, it just wasn't "cutting it". Too thick. Its much thinner now and up to the task. I tried it. I've also changed the ricaso so that only the cutting edge will have contact with a cutting board. I'll clean up the ricasso blade transition somehow and remove the grinder scratches in the blade, buff her up and have made a better knife. Thank you for the advice!

Knife- Mod.jpg
 
Very nice, that looks to have great function. And I think, from style point of view the lines look much cleaner, a little work on the buffer to clean it up and you'll have a great knife one would be proud to own.
 
Jwhite, Thank you for your comments and advice! This is my first kitchen knife and flat grind. I do hollow ground hunters mostly, Loveless style drop points. So I have no "pride of design" when it comes to this type of knife and thanks to you guys I learned the easy way how to fix what would have been an annoyance resulting in disuse of the knife. One of the reasons I used aluminum scales was to reduce the weight of the knife. The balance point is where your index finger would be while holding the knife. I don't know if that is preferred for a kitchen knife.
 
Happy to help! As far as balance goes, that sounds good but it hard to say in an educated way without holding the knife and judging the whole weight of the knife. Light knives have become pretty popular recently but I still like heavier knives when it comes to a western chef, that's all personal preference. The best way to tell is to use it, since you stated earlier that you don't use kitchen knives much I'll walk through some common techniques for that style. The chef is the work horse of a kitchen and used for most tasks, but the design is specialized for chopping and mincing using the curve towards the tip of the knife as a fulcrum in constant contact with the board. It will help you a lot in your design and manufacture if you learn how to use them well. I typically hold a knife in my left hand so adjust to suit your preference. Starting with a peeled onion cut in half root to sprout and place the flat side on a board. Position the knife so that the onion is at the heal end of the knife and the curve at the tip is in contact with the board. Bring the knife down in a smooth motion to take a slice off off the onion keeping the front of the knife in contact with the board. Move the onion not the knife to continue. The knife will have a bit of an oscillating motion as the heal comes down and don't raise the knife completely off the board. Try to think of it as one of those big paper trimmers they had in school with a solid pivot bolt. Once you've got slices rotate the slices so that you can cut across the rings and continue until you have an even dice. For the mincing action take some of the chopped onion and place in a small pile on your board. Grasp your knife and hold edge down in the center of the pile. Take your other hand and put it on the spine above the curve that will act as a fulcrum. Bring the heal of the knife up and down while moving the heal across the food. The tip stays put with your other hand holding it down using gentle pressure. Be sure to keep the fingers of the hand on the spine up and away. When you're used to the motion it can be done very rapidly and with a good knife will process food to a very fine mince. The same motion is used commonly to process fresh herbs. I'll see if I can't find a video to illustrate later.

Once you have some practice you'll be able to tell right away if your balance is right, and the precision and efficiency of your bevels in use. Practice with whatever commercial chef you have in the house, when you're comfortable get the knife you made. Ask yourself if it is easier or harder to keep on the board. Is the cutting action more difficult to control? These will tell you what you need to know about balance, edge bevel, and blade thickness.
 
Thanks. I'll print this and take it with me to the cutting board, sacrifice an onion or two....
 
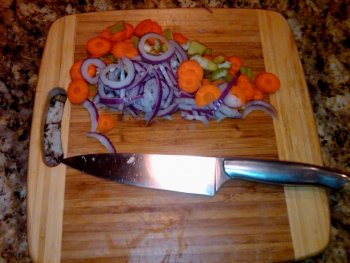
Well I was pressed into service. Wife's getting home late so I marinated some pork loin and used the new knife to slice some veggies for a decent tossed salad. It worked great kept constant contact with the cutting board from point to heal as I used the rocking motion described by Jwhite (wish I knew your first name.) The knife would cut as thin as I dared let my clumsy mitts get to the vegetable.
Knife carnage.jpg
 
Good deal! Here's the video I promised, its by Jamie Oliver. It illustrates the two methods I described plus a third called a tap chop. I didn't include it in my description as I rarely see it employed by home cooks, but its there and it is a useful skill when mastered. There is a language warning at the beginning but I wouldn't have a problem with my kids watching it, I cant imagine how sensitive you'd have to be to get bothered there are no bleeps so it made it past the BBC and US censors as it was an aired episode and posted to YouTube by the copyright holders. I believe it should comply with Knife Dogs site rules. If it bothers the MODs I'd be happy to remove it.

Names James BTW, James White.

[video]http://youtu.be/5z_d0soK1cI[/video]
 
James,

Great video! Jamie really puts on a show. The video could be the subject of a new thread because I think anyone interested in this "kitchen" sub-forum would like to watch it.

Thanks,

Jay
 
Sticks
Looks great, and seems to be designed to lend itself to the task designed for. The transition area looks much better. As JWhite showed, the Sabatier is a prime example of that metod of manufacture. They have been around a LONG time, that is a tried and true design.

Could you elaborate how you did the handle?

Great Job, I know your Wife will be justly proud!

God Bless
Mike
 
Mike,

Thank you! The handle is made of aluminum "scales". I bought a piece of 1/4" x1 1/2" x 18" flat bar stock. I had drilled (3) 1/8" holes in the blade's handle before heat treat. I rough cut the aluminum to the length of the finished handle (two pieces, one for each side.) I clamped (stacked) the blade on to the right side rough scale and used the drill press to drill through the holes in the blade and scale. I then placed 1/8" aluminum pins and scribed the blade's handle profile. Then I did the same for the left side scale. When I had the pin holes in the right place and the blade profile scribed I ground the scales down to the scribed handle profile. The scales were then peened at the three locations (front, middle and back of the handle) with 1/8" aluminum rods. I used a thin black liner coated with J B Weld between the scales and blade. I used the JB Weld as a sealant (I think its heat tolerance is higher than normal epoxy.) And the liner to isolate the aluminum from the stainless steel to prevent galvanic corrosion, although don't know that is really a concern.

One caveat aluminum was much more difficult to grind than I thought it would be. It tends to "fill" the belts as you grind and using anything less than a 36 grit belt while forming the handle is a waste of time. It may be one of those metals that hardens as you work it. But it does buff out well and has a nice feel to it.

Jay
 
It has been through the dishwasher, but the Aluminum loses that polished look and becomes "hazy", which improves the grip, but is not as "pretty." I prefer to hand wash it whenever I use it.
 
Back
Top