
I'm having some trouble using the rise and fall fixture that I built and am curious if anyone else has experienced similar issues. The fixture itself is very robust, but I'm getting variation in my readings. I think the culprit is one of two things. Either my spring is set WAY too tight or my pivot pin material is too soft. The pull is pretty substantial, so it could be the first one. Also, I don't have any 410/416SS pin stock (right now), so I'm using some scrap material from work. It is a proprietary alloy we use in which Nickel is the primary constituent. The question is whether the pin is too soft or the spring is too strong or perhaps a combination of the two. After a few pulls, the pin begins to bend, throwing off the readings. For reference, I'm installing the rear and center pin in the spring and then using an arbor press to deflect the spring enough to insert the blade onto the pivot pin. The blade uses a bushing, so I'm using the bushing on the pivot pin in the fixture. Is it likely that switching to a harder pin will solve my problem?
You are using an out of date browser. It may not display this or other websites correctly.
You should upgrade or use an alternative browser.
You should upgrade or use an alternative browser.
Rise and Fall Indicator Issues
- Thread starter JC in SC
- Start date
Bruce Barnett
Well-Known Member
Why not use a drill bit shank as your temporary pivot pin. Some rise and fall indicators are not very thick and the pins tend to wobble around a bit. Bruce Bump made one that is about 3/4" inch thick and by using longer hardened temporary pins your reading will be a lot more consistent.
Cheers Bruce
Cheers Bruce
Calvin Robinson
Moderator Christian Forum
I only try to get to within 10 to 12 thousanths on the indicator then do the rest by trying and fitting untill it's just right.
Johnny Roberts
Well-Known Member
I only have two pins on my RFI. One for the pivot and one for the center of the spring. I push up on the back of the spring to apply pressure at the tang.
As Bruce mentioned above, I use a drill bit shank as my pivots.
Don Robinson makes a really nice RFI and the one I built is ver similar. Certainly not saying his or mine is any better than yours but I know mine is also sturdy and would still have some issues handling the full pressure of a spring on the pivot pin.
I would like to see pics of your design if you have some. Check out Don's RFI in another post in this forum.
Johnny Roberts
Why not use a drill bit shank as your temporary pivot pin. Some rise and fall indicators are not very thick and the pins tend to wobble around a bit. Bruce Bump made one that is about 3/4" inch thick and by using longer hardened temporary pins your reading will be a lot more consistent.
Cheers Bruce
Hey Bruce,
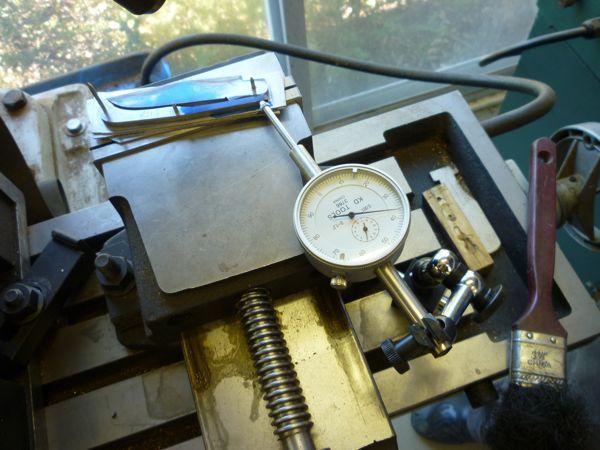
That is an excellent idea. My indicator is machined out of a 2" x 4" x 9" block of 6061 Aluminum. I only removed about 0.665" of material from the face, so I've still got will over an inch of thickness to play with. I only drilled the pivot hole 0.250" deep though, so perhaps I should go deeper there first. The pin isn't wobbling though, it is definitely deflecting from considerable tension in the spring.
I only try to get to within 10 to 12 thousanths on the indicator then do the rest by trying and fitting untill it's just right.
I'm already pretty close. Right now, it is flush when open, ~0.005 over in half-stop and ~0.010" over closed; however, those measurements seem to fluctuate by ~0.0025 because of the pin. I'll check again today at lunch using a drill bit. Hopefully I won't break it.
Thanks for the responses.
JC
I only have two pins on my RFI. One for the pivot and one for the center of the spring. I push up on the back of the spring to apply pressure at the tang.
As Bruce mentioned above, I use a drill bit shank as my pivots.
Don Robinson makes a really nice RFI and the one I built is ver similar. Certainly not saying his or mine is any better than yours but I know mine is also sturdy and would still have some issues handling the full pressure of a spring on the pivot pin.
I would like to see pics of your design if you have some. Check out Don's RFI in another post in this forum.
Johnny Roberts
Hey Johnny,
I noticed Don's RFI in his for sale post. At the time I wondered why he only had 2 pin holes. Now it makes a lot of sense. Only use the center and pivot pin rather than fight with the spring tension. I'll try to get some pics of my RFI today at lunch as well. Checking the fit will be much easier with the rear pin out.
Thanks very much for the tip.
JC
Another huge THANK YOU for the recommendation to only use the center and pivot pin as opposed to all three. This made trial fits a million times easier to do on the fly following light sanding. In less than thirty minutes I got both the half-stop and closed positions to within 0.005" of the open position. It is actually a little closer than that once you apply reasonable pressure to the rear of the spring. Anyway, here are some pics so you know I'm actually working on something:biggrin:
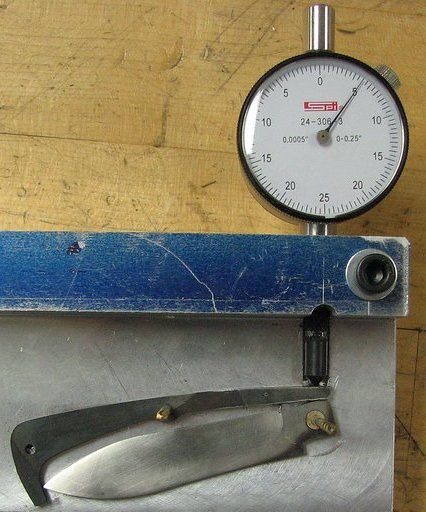
Open:
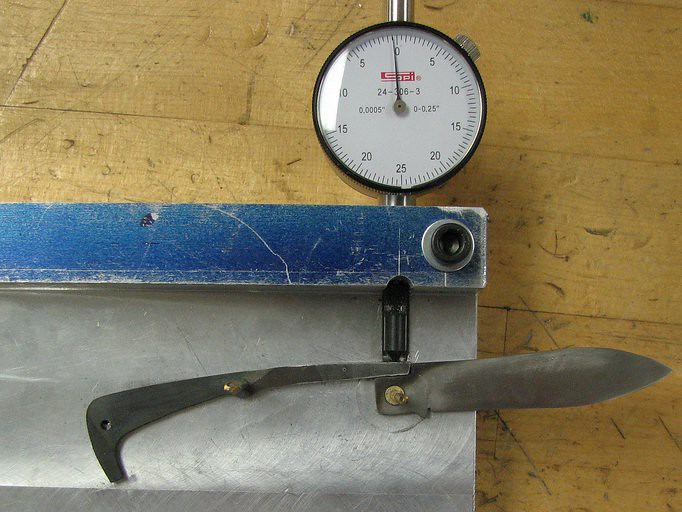
Half-stop:
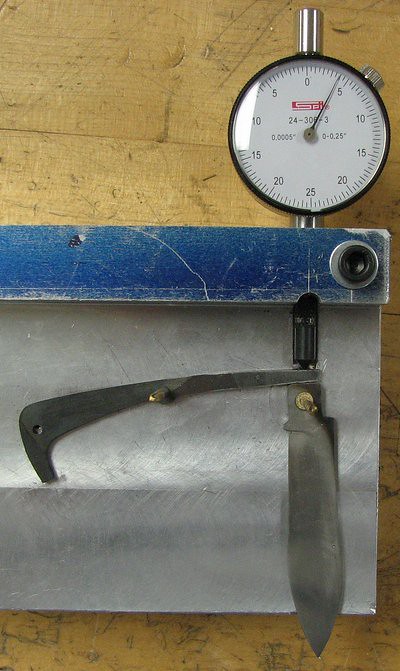
Closed:
Now I'm trying to decide if this is close enough for my first slip joint or if I should take it down to within 0.0005" in all three positions. I have noticed that I can vary the measurements to some degree depending on how much tension I apply to the rear of the spring. If I do that, the half-stop drops to within ~0.0025" and the closed to within ~0.0035"; however, the open position varies a little too. I already know that the blade will never be perfect on this one and that there are some minor gaps between the handle scales and the liners, so I might move forward without tweaking this aspect any further. Any thoughts here?
Here is another view of my RFI that gives a little more perspective:
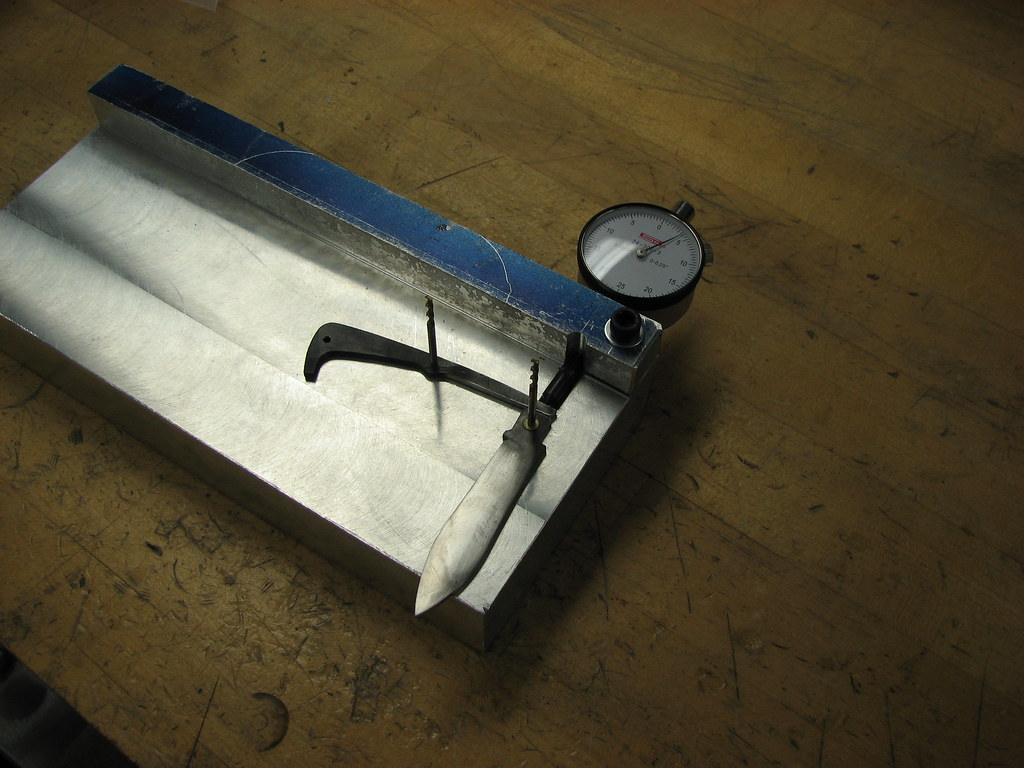
Overbuilt? Most definitely, but it is the size of material I had left over from another project, so I used it. Dial indicator is an el cheapo from MSC in 0.0005" graduations with 0.250" overall travel. As always, any and all comments welcomed.
Open:
Half-stop:
Closed:
Now I'm trying to decide if this is close enough for my first slip joint or if I should take it down to within 0.0005" in all three positions. I have noticed that I can vary the measurements to some degree depending on how much tension I apply to the rear of the spring. If I do that, the half-stop drops to within ~0.0025" and the closed to within ~0.0035"; however, the open position varies a little too. I already know that the blade will never be perfect on this one and that there are some minor gaps between the handle scales and the liners, so I might move forward without tweaking this aspect any further. Any thoughts here?
Here is another view of my RFI that gives a little more perspective:
Overbuilt? Most definitely, but it is the size of material I had left over from another project, so I used it. Dial indicator is an el cheapo from MSC in 0.0005" graduations with 0.250" overall travel. As always, any and all comments welcomed.
Last edited:
Sean Cochran
Well-Known Member
JC
I usually go to .005 on the indicator. This does make for a little more work and trial fit but it gives me enough to take off by hand to get the fit just right. To keep everything square when taking off the last few thousandths I clamp a square block to a granite slab and sand it that way. BTW I only use two pins as well.
Also I dont know if it really matters (or how anyone else does it) but I zero on the bottom of the tang and then work the open and half stop to that. I like to do it that way because I like the flow of the bottom of the tang into the kick to be a nice arc. Once I get that set it is not as easy to remove material from the bottom as it is the half and open. I hope that makes sense.
Calvin Robinson
Moderator Christian Forum
Take it off the RFI and assymble it with the pins you are going to use, eyeball it in all three positions, make notes then take it apart and gring off where its needed. Keep doing this till you get it right. I say this assumeing that you already have the spring tension where you want it and already have the blade buried in the handle when it's closed.
I set mine up in a vice. Without the center pin in before HT I set it up there is about 0.005 for adjustment in the closed and half stop if there is one. After HT I assemble the knife and stick the pins in the Vice so I can adjust it under tension.
A picture says a thousand words.
A picture says a thousand words.
Don Robinson
Well-Known Member
JC, your fixture is fine.
I have a suggestion, though. Unless you intend to build only that knife pattern, an adjustable slide for the center pin would allow you to use it on any slipjoint. You could add that to what you have easily.
I apply pressure to the back end of the spring with my thumb and get the indicator to repeat in all positions within .002" or less before profiling and heat treat.
Your spring/tang dimensions look OK, but if the spring is too strong after HT, you might want to consider moving the center pin a little farther from the pivot pin on the next one.
Keep the WIP coming. We enjoy seeing it!:s11798:
Last edited:
Thanks for all the responses. I should have mentioned already that the blade and spring have been heat treated and tempered, which is why it is taking me so long to get these tweaked in when sanding by hand. Next time, I'll get them closer before HT.
I think the spring tension is going to be a little too much right now. I'll do some additional sanding on the spring while I wait on my 416SS pin stock to arrive from Tracy.
Like I said above, I think I'll do more fitting prior to HT next time.
Hey Don,
I'm kind of stuck as far as pin placement at this point. Right now, it is feeling like a nail breaker, so I'm going to do some more work on the spring. I need to get the blade to tuck in a little more as well. This first one has definitely been a learning experience about what not to do when designing/building a slip joint.
I do plan to machine in an adjustable slide at some point. That is why I only drilled the pin holes 0.250" deep. I was so eager to get this one finished that I decided to forego the slide for the time being. I already looked at the next slip joint I have planned and the center pin hole on that one is spaced quite differently, so I might even just drill another hole for that one for the time being. I've got to finish this one first though.
Thanks again for all the comments and suggestions.
JC
Take it off the RFI and assymble it with the pins you are going to use, eyeball it in all three positions, make notes then take it apart and gring off where its needed. Keep doing this till you get it right. I say this assumeing that you already have the spring tension where you want it and already have the blade buried in the handle when it's closed.
I think the spring tension is going to be a little too much right now. I'll do some additional sanding on the spring while I wait on my 416SS pin stock to arrive from Tracy.
I set mine up in a vice. Without the center pin in before HT I set it up there is about 0.005 for adjustment in the closed and half stop if there is one. After HT I assemble the knife and stick the pins in the Vice so I can adjust it under tension.
A picture says a thousand words.
Like I said above, I think I'll do more fitting prior to HT next time.
JC, your fixture is fine.
I have a suggestion, though. Unless you intend to build only that knife pattern, an adjustable slide for the center pin would allow you to use it on any slipjoint. You could add that to what you have easily.
I apply pressure to the back end of the spring with my thumb and get the indicator to repeat in all positions within .002" or less before profiling and heat treat.
Your spring/tang dimensions look OK, but if the spring is too strong after HT, you might want to consider moving the center pin a little farther from the pivot pin.
Keep the WIP coming. We enjoy seeing it!:s11798:
Hey Don,
I'm kind of stuck as far as pin placement at this point. Right now, it is feeling like a nail breaker, so I'm going to do some more work on the spring. I need to get the blade to tuck in a little more as well. This first one has definitely been a learning experience about what not to do when designing/building a slip joint.
I do plan to machine in an adjustable slide at some point. That is why I only drilled the pin holes 0.250" deep. I was so eager to get this one finished that I decided to forego the slide for the time being. I already looked at the next slip joint I have planned and the center pin hole on that one is spaced quite differently, so I might even just drill another hole for that one for the time being. I've got to finish this one first though.
Thanks again for all the comments and suggestions.
JC
J S Machine
Well-Known Member
JC, your fixture is fine.
I have a suggestion, though. Unless you intend to build only that knife pattern, an adjustable slide for the center pin would allow you to use it on any slipjoint. You could add that to what you have easily.
I apply pressure to the back end of the spring with my thumb and get the indicator to repeat in all positions within .002" or less before profiling and heat treat.
Your spring/tang dimensions look OK, but if the spring is too strong after HT, you might want to consider moving the center pin a little farther from the pivot pin on the next one.
Keep the WIP coming. We enjoy seeing it!:s11798:
JC, sorry I didn't see this thread sooner. I've been busy and haven't been on. You definitely need to go a little deeper with your pivot hole, or all of them for that matter. It is probably fine like it is, but it never hurts to over-do things..I see you have that mentality and that's good. I would use drill bit shanks as suggested..they are hard and they are not going to give. My first suspect would be the pin material you are talking about you are using. The hole drilled in the aluminum also needs to be size on, if not reamed, unless you want movement of the pin in the hole. I've actually thought about using a hardened drill bushing here, because the aluminum eventually wears to the point where the pin isn't tight.
As Don said, I apply pressure with my thumb also. This will get you pretty close, and then if you feel the need you can go back and pin it up to check. Just remember, all this changes slightly after heat treat and final fit up. It's ok to get it close now, but don't bank on it staying exactly the same throughout the whole knife build. Trying to chase that fit down to the tenth is a waste of time for now. I'd get it +/- .002 or so and then when you start putting the knife together go from there with you headache work.
Good luck man.
As an update, I haven't drilled the holes any deeper yet, but I switched to using the drill bit shanks and only 2 pins as suggested. Interestingly, I could vary the reading depending on whether I used the rear or center pin. I decided to use the center pin and apply pressure to the back of the spring. I got the blade and spring, both of which had already been heat treated, to within about +0.005" at both half and closed relative to open (at zero). I temporarily pinned it together afterward and it looked great. I couldn't detect any difference between the spring and liner, once loaded by the spring, when dragging my fingernail across in any of the three positions.
I did some shaping to the scales and got it to the point where I decided it was ready to pin together, hopefully for the last time. My 416SS pin stock had arrived, so I cut some pieces, tapering the center pin to be inserted last. I got everything together to the point of oiling and driving in the center pin. I guess my taper was too steep cause something when wrong and my pile side scale separated from the liner. Since I'm not using bolsters on this one, I thought it would look silly to have the 3 main pins plus 2 scale pins. Perhaps that was a mistake. What adhesive are you slip joint guys using between the scale and the liner? I used some 30 minute slow cure epoxy I got from Pop's Knife Supply. I think I'm going to rough up the glue side of the liner via bead blasting before I try again this afternoon.
I did some shaping to the scales and got it to the point where I decided it was ready to pin together, hopefully for the last time. My 416SS pin stock had arrived, so I cut some pieces, tapering the center pin to be inserted last. I got everything together to the point of oiling and driving in the center pin. I guess my taper was too steep cause something when wrong and my pile side scale separated from the liner. Since I'm not using bolsters on this one, I thought it would look silly to have the 3 main pins plus 2 scale pins. Perhaps that was a mistake. What adhesive are you slip joint guys using between the scale and the liner? I used some 30 minute slow cure epoxy I got from Pop's Knife Supply. I think I'm going to rough up the glue side of the liner via bead blasting before I try again this afternoon.
Bruce Barnett
Well-Known Member
I just use Hot Stuff CA on mine but i also use 2 x .062 scale pins on the rh side and 2 on the lh, 1 of which is holding the escutcheon plate, shield etc
Sean Cochran
Well-Known Member
As an update, I haven't drilled the holes any deeper yet, but I switched to using the drill bit shanks and only 2 pins as suggested. Interestingly, I could vary the reading depending on whether I used the rear or center pin. I decided to use the center pin and apply pressure to the back of the spring. I got the blade and spring, both of which had already been heat treated, to within about +0.005" at both half and closed relative to open (at zero). I temporarily pinned it together afterward and it looked great. I couldn't detect any difference between the spring and liner, once loaded by the spring, when dragging my fingernail across in any of the three positions.
I did some shaping to the scales and got it to the point where I decided it was ready to pin together, hopefully for the last time. My 416SS pin stock had arrived, so I cut some pieces, tapering the center pin to be inserted last. I got everything together to the point of oiling and driving in the center pin. I guess my taper was too steep cause something when wrong and my pile side scale separated from the liner. Since I'm not using bolsters on this one, I thought it would look silly to have the 3 main pins plus 2 scale pins. Perhaps that was a mistake. What adhesive are you slip joint guys using between the scale and the liner? I used some 30 minute slow cure epoxy I got from Pop's Knife Supply. I think I'm going to rough up the glue side of the liner via bead blasting before I try again this afternoon.
JC
Are you hooked on slipjoints yet?
")
I am like Bruce, I use CA and scale pins. Even with no bolsters I use scale pins. It shouldnt be a problem though if you dont use them. However if you are having to drive the center pin (even with it tapered) then your spring is to tight. I had this problem for a long time, I still got a decent pull because I made up for the tightness by taking material off the spring in front of the center pin. This will work, but it is not needed. Todd Davison helped me alot with this. After working out the rise and fall, my next step is to lay out the liners. I lay the spring and blade on the liner in the open position the make a mark on the liner down the back of the spring. I then drop the spring ~.035 or a little less than "half a hole". This doesnt sound like much, when the knife is put together without the center pin in you can look through the hole and the spring and liner almost looked lined up. The first time I tried it I was able to push the center pin through on the edge of my bench. The pull was perfect. Hope this helps.
Sean
Last edited:
JC
Are you hooked on slipjoints yet?
I am like Bruce, I use CA and scale pins. Even with no bolsters I use scale pins. It shouldnt be a problem though if you dont use them. However if you are having to drive the center pin (even with it tapered) then your spring is to tight. I had this problem for a long time, I still got a decent pull because I made up for the tightness by taking material off the spring in front of the center pin. This will work, but it is not needed. Todd Davison helped me alot with this. After working out the rise and fall, my next step is to lay out the liners. I lay the spring and blade on the liner in the open position the make a mark on the liner down the back of the spring. I then drop the spring ~.035 or a little less than "half a hole". This doesnt sound like much, when the knife is put together without the center pin in you can look through the hole and the spring and liner almost looked lined up. The first time I tried it I was able to push the center pin through on the edge of my bench. The pull was perfect. Hope this helps.
Sean
ABSOLUTELY!!!
I'm in the process of selling off some of my favorite knives in order to fund some better tools for a home shop (that presently doesn't exist). During the process of building this knife I have learned more about what not to do, from both a design and assembly perspective, than any book could ever teach. I was always more of a hands-on learner
With all of the flaws and compromises in this piece, it is truly a challenge to make myself finish it when I've got so many improvements to apply to the next one. I'm convinced though that forcing myself to finish will make those lessons all the more memorable.The recommendations on getting the spring tension correct are certainly appreciated. Yet another compromise with this particular knife. Without the nail nick ground in yet, it is fairly difficult to get open. Despite all the mistakes, setbacks and compromises, this process has been quite enjoyable and I can't wait to do it all over again!