Most buttons on auto knives have a 5 degree or 7 degree ramp that under spring pressure pop up and hold a blade in the open or closed position.
Getting that button centered, especially on the open position is tough.
There are tapered end mills sold most everywhere that sells end mills in 5 and 7 degree tapers that will match your button.
Here is an example. This button has a flange. Some do, some don't. Looking at the top you will see the cup the little spring on the right fits in. Also on the cup end you can see the taper. This is the part that engages the blade. You need a taper in your blade to match this.

To put this in context a bit:
Using my pattern hardened drill template I will drill holes in the blade for the stop pin and the open and closed positions.
In my back side I have the coil spring channel milled and the stop pin and button holes are both blind holes. I will enlarge the button hole by plunging a .312" end mill to the proper depth. The tang on the blade is oversized to take this into account.

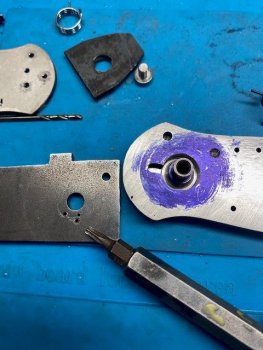
Using the mill, I have locked the blade into a vise and secured it with a fixture plate. I will move the X and Y table to allow a 1/8" drill rod to slide up and down in the hole. Now I have located the center of the hole in the blade.

I changed to the 7 degree end mill with out moving anything. I then plunge this to get the 7 degree matching ramp in the blade. If you plunge this like a drill bit, you will miss and over drill as the end mill sucks the quill down when "hand drilling" I used the fine control down wheel to plunge, check, plunge check until the button fit.

To check the fit, I sacrificed a button by cutting it half. This style button is different than the one pictured above. You can see how small the ramp is and you want to be right in the middle.

Here it shows the button fits nicely in the hole and half way up the ramp portion of the button. This is repeated for the second hole.

Here is what it looks like after the tang has been milled. The blade on the left is just mild steel I used in mocking up the knife. The blade on the right is damascus and I didn't want to try this on the "good" blade. I will have to profile the tang on the right to match the one on the left. This is pretty straight forward. Scribe a line using your pattern through the stop pin hole. The tang needs to clear the stop pin all around the swivel path. Grind it back and with trial and error make sure the blade swivels freely. You need to keep this fairly close as the inside of the button rides on your tang trapping it in place.

I got lucky. The closed position is right where I planned it....

and so did the open position. I anticipate I will have to hand file the stop position on the blade tang just a bit after it is completely assembled. The reason is the stop pin will certainly move a bit when I put this all together but this process is fairly easy to repeat. Right now there is absolutely no lock rock which was my main concern. Some guys hand file the ramp on their blade. I am not good enough to do that so I had to develop this method.

Getting that button centered, especially on the open position is tough.
There are tapered end mills sold most everywhere that sells end mills in 5 and 7 degree tapers that will match your button.
Here is an example. This button has a flange. Some do, some don't. Looking at the top you will see the cup the little spring on the right fits in. Also on the cup end you can see the taper. This is the part that engages the blade. You need a taper in your blade to match this.
To put this in context a bit:
Using my pattern hardened drill template I will drill holes in the blade for the stop pin and the open and closed positions.
In my back side I have the coil spring channel milled and the stop pin and button holes are both blind holes. I will enlarge the button hole by plunging a .312" end mill to the proper depth. The tang on the blade is oversized to take this into account.
Using the mill, I have locked the blade into a vise and secured it with a fixture plate. I will move the X and Y table to allow a 1/8" drill rod to slide up and down in the hole. Now I have located the center of the hole in the blade.
I changed to the 7 degree end mill with out moving anything. I then plunge this to get the 7 degree matching ramp in the blade. If you plunge this like a drill bit, you will miss and over drill as the end mill sucks the quill down when "hand drilling" I used the fine control down wheel to plunge, check, plunge check until the button fit.
To check the fit, I sacrificed a button by cutting it half. This style button is different than the one pictured above. You can see how small the ramp is and you want to be right in the middle.
Here it shows the button fits nicely in the hole and half way up the ramp portion of the button. This is repeated for the second hole.
Here is what it looks like after the tang has been milled. The blade on the left is just mild steel I used in mocking up the knife. The blade on the right is damascus and I didn't want to try this on the "good" blade. I will have to profile the tang on the right to match the one on the left. This is pretty straight forward. Scribe a line using your pattern through the stop pin hole. The tang needs to clear the stop pin all around the swivel path. Grind it back and with trial and error make sure the blade swivels freely. You need to keep this fairly close as the inside of the button rides on your tang trapping it in place.
I got lucky. The closed position is right where I planned it....
and so did the open position. I anticipate I will have to hand file the stop position on the blade tang just a bit after it is completely assembled. The reason is the stop pin will certainly move a bit when I put this all together but this process is fairly easy to repeat. Right now there is absolutely no lock rock which was my main concern. Some guys hand file the ramp on their blade. I am not good enough to do that so I had to develop this method.