Sheathmaking: tips and tricks and getting started

leatherman

Sheath Forum Moderator
Dave and I have decided to have an informational thread for those who have discovered a nifty trick, or have some tips for those starting in the trade or for those of us like me that never stop learning. My thirst for knowledge is never satiated. cool 1

Please dont hesitate to post your discoveries, tips, tricks, time savers, even basic techniques. Nothing is too simple, especially for those of us starting out. I learned most of mine through the generosity of those that started ahead of me. Those that inspired me to do more and better: Dave Cole (DC Knives), Sandy Morissey, and though came on to the internet later than me has inspired me as well, Paul Long (sheathmaker), and Gary Graley, folder sheath maker extraordinaire.

Lets hear those tips!!! :D
 
Bee's wax on a thread. You can buy thread waxed or not. The advantage to waxed thread is that is doesn't fray as much when you hand sewing with it. This isn't so much of a problem when you are using a machine. It also holds in place a little better as it tends to lock itself into the stitches. The disadvantage of waxed thread is it doesn't take dye as well as non-waxed. This is really insignificant though. I always buy unwaxed linen thread and then wax it with some bee's wax just before I sew a sheath.
 
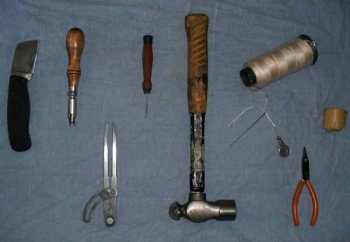
These are pretty much all the tools I use to stitch leather sheaths (not including tooling punches).

from left to right:

Leather cutter kiridashi

Groover/gouger - used to cut a groove for your stitching so it will be recessed and avoid abrasion on the thread.

Divider - for measuring stitch spacing and scribing parallel lines.

Small precision screwdriver - sharpened up to a fine point like a needle. I use this to make the stitch holes after they are marked with the divider.

Hammer. Use this to hammer the screwdriver through the leather.

Needle, thread and needle threader - self explanatory.

Small needle nose pliers - for pulling needle through the tighter holes.

Bees Wax - use this to wax your thread by pulling the thread along the wax.

GEDC0136.JPG

This is a very secure stitching method that I use, it is much easier and secure than using an awl or even a machine.

If stitching a belt loop, start on the inside, at the end of one line of stitch holes, actually where you start doesn't really matter because it will all look the same anyway. The diagram shows that I weave through the holes in one direction and when I get to the beginning hole, I loop around and reverse the direction so the stitches make a complete 'sewn' look. The pictures should explain it better than I can.

When doing a sheath I use the same method, if it is a folded sheath, I start at the tip, from the backside and run the thread up to the top, double loop at the top and then stitch all the way back down to the tip. I also backstitch a couple of times so that the thread ends out the back side, cut it short and I like to apply a drop of superglue just for peace of mind.

With this stitching method, there are basically two seperate stitches holding the pieces together, unlike an awl or machine stitch, where is one thread gets worn or cut, the whole piece could unravel. With the double serpentine stitch, if one stitch gets cut, the other stitch is still intact to hold the piece together.

attachment.php


attachment.php
 
Last edited by a moderator:
Here's a few,

For cleaning your leather of fingerprints,dirt and hopefully not blood you can use Oxalic acid better known as Wood Bleach.It is available in most hardware and home improvement stores.Mix as directed with water and put in a spray bottle, use as needed.

Keep a spray bottle of water handy when your tooling, if your leather starts drying out too much.A couple of sprays and you can continue.

My friend Josh, told me to pass this one on.To aid in blade retention in flat sheaths make your welt about 3/4 the thickness of the blade and then cut a couple of short (about 1"-2"long) wedges the same width as your welt and glue them to the welt on the open end to open the mouth of your sheath. Done this way you will have a nice snug fit.I learned this one from my mentor Sandy Morrissey.

Dave2thumbs
 
A few more.Dave:)

When using an edger or groover, dampen the leather for better results.

Q-tips make great applicators for both glue and dye in small area's.


Get some small punches, available at Harbor Freight and many others, use these for doing any small radius's instead of trying to carve the round.

Dave:)
 
If you get contact cement some where it isn't supposed to go wait till it dries and use a pencil eraser to erase it away..

This seems to be a common prob for me.I was wondering how to do this fix this....thanks.
 
Heres a tip if you have a "limp" or too soft leather problem. One of the finishing steps I take just before sealing the leather is to dampen (not drench) and then put the sheath in a food dehydrator to dry it. The leather comes out fairly hard which is something I like personally.
 
When doing multi-colored sheaths or filling in the background when carving, use Sable or Camel hair brushes and you will get a better job and less chance of flicking dye all over your project.

Also when doing small dye jobs using a brush, I pour a little bit of dye into a small plactic cap like a milk jug cap, less chance of tipping over a bigger bottle.

Dave2thumbs
 
Sheath Basics- getting started

A suggestion was made to me to lists some basic things needed to get started in leather sheaths.This alone has alot of variables based on skill, finances and who you talk to, much like knives. Hopefully some others will add their thoughts as well and as your experience level grows alot of these suggestions will change as they did with me.Dave:)

Leather-the standard to use is veg-tanned.The best bang for your buck part of the hide to use will be the shoulders. Sides are ok but have alot of waste at the edges. Bellies should never be used for sheaths, due to being too soft and stretchy.
Leather is sized by the ounce with 1 oz. = 1/64".
Typical sizes used for sheaths(this varies with some makers) is 5-6 oz for small folders and fixed blades, 7-8 oz for most everything, and 9-10 for larger knives.

Tools-can go crazy here , like with knifemaking tools.Quality widely varies with cost, but since this is for basics we'll go cheaper.
Most of this stuff can be purchased at Tandy or Hidecrafters,etc.
Needles
Thread-I would suggest waxed nylon
Stitching Awl-for punching your holes
Stitch Groover- for making a groove for the thread to lay in
Overstitch Wheel- for marking your hole spacing and setting your stitches
Edge Beveler-to round corners
Dividers-used for line spacing
Lacing Fid-used for opening holes up for lacing
Small needle nose pliers- to assist in sewing or lacing
X-acto or Razor knife
Poly Mallet
Metal ruler
Red pen- for marking lines and such will disappear under darker colors
Dyes- I suggest sticking with Fiebing's oil dyes, the ECO-FLOW stuff has had alot of complaints
Topcoats- Tan Kote, or Leather Sheen
This list could literally go on and on, but that will get you started.

Suppliers
http://www.tandyleatherfactory.com/

http://www.hidecrafter.com/hci/index.php?option=com_content&view=article&id=1&Itemid=22

http://springfieldleather.com/store/

http://www.zackwhite.com/

http://www.wickett-craig.com/

http://www.siegelofca.com/

There are quite a few more, and I will add some later but this should get you started.Hope this helps.Dave
 
Last edited by a moderator:
Dave,
Thats great info every first timer needs. Perhaps this is sticky material ?

I was thinking maybe modify Tips and Tricks sticky to read... "Getting Started & Tips and Tricks".

Does it get kinda annoying over time when there ends up being 27 Sticky threads at the top of the page, or is it just me ?

Great Job providing the info Brother Dave !

-Josh
 
"Tips and tricks and getting started" is the new title of the sticky at top of the page. :) Since this is Dave's thread its up to him if he wants to merge this one with that one. :D Good idea Josh.

I knew I made a good choice in picking Dave for co moderator. :)
 
Spit Shine - To get a mirror finish on your leather edges when burnishing simply lick the edge and rub with the smooth side of a piece of scrap leather. Sounds weird but I swear it works.
 
Last edited by a moderator:
Your results may vary if your chewing gum or eating candy. :p

Good side effect could be a very yummy smelling sheath! :D

I keep a sponge by the bench for such uses, and gum tragacanth for the finish.

I'm never sure whats been walking on my leather in that warehouse.
 
Knives --- don't shy away from 'head knives' or round knives. I used 'box-cutter' style kinves for years before I got a head knife, now I use the head knife 990% of the time. It's a push cut instead of a draw cut, but boy does it it make cutting th heavy stuff easier.
Speaking of easier -- get some green rouge and make a leather strop for your cutting blades.
I ground an old wood handled ice pick into a diamond tip to make my holes, and instead of a hammer I use a rawhide mallet. That pick and mallet have made tens of thousands of holes. I use the same pick to run through the holes from the back side after all holes have been made. I can make almost perfectly straight lines on the back of the sheath by doing this, and the sewing is easier too :)
Keep your punh or awl tip waxed with beeswax for smoother, easier penetration.
Great thread guys, keep it coming2thumbs

Mike
 
I have been using a kitchen fork to mark my holes for the stitching. I havent seen that mentioned. The wheels that are made to do it are expensive especially when buying everything to get started in the craft. It will get you by for a while.
 
Leather working is kinda like knifemaking. you start out with rudimentary equipment to get started then as your interest grows you buy up to improve your quality. I have a friend who is a saddlemaker that we have got to make sheaths and his work is fabulous. Larry Parsons- he also has brought me over to the dark side - buying top quality leather - custom stamps which make Tandy stuff look retarded. I will accompany him and (Meyers) another saddlemaker to Wichita Falls Oct.3rd and see all the newest stamps and custom work from boots to saddles that would blow your mind. Exotic leather all over the place and new and used equipment for sale. Just a knifemakers wish list all over the place.
 
Hi Mike,Larry does some fine work.I believe that my exotic hide dealer is going to that show(http://ostrichmarket.com/) and he is supposed to be displaying one of my holsters with his hides.Have a great time and wish I could be there.Dave:D
 
Back
Top