You are using an out of date browser. It may not display this or other websites correctly.
You should upgrade or use an alternative browser.
You should upgrade or use an alternative browser.
What's going on in your shop?
- Thread starter Justin Presson
- Start date
Finished up the Damascus Hunter
Nice all the way around.


Randy Lucius
Well-Known Member
Got three ready for heat treat. AEB-L. My first in stainless steel. Left and right are hunters. The middle one is an .080 steak knife. Planning on doing a plunge less grind. That will be another "first" too.

Bruce McLeish
Well-Known Member
You are just aworkin' y'alls fingers to the bone and lookin mighty fine while you're doin it ! Great job.
Heikki
KNIFE MAKER
I really like that steak knife profile in the middle. Looking forward to seeing it finished.Got three ready for heat treat. AEB-L. My first in stainless steel. Left and right are hunters. The middle one is an .080 steak knife. Planning on doing a plunge less grind. That will be another "first" too.
View attachment 67960
Daniel Macina
Well-Known Member
Picked up this ol girl today. Going to get it cleaned up and working.


Also have had this one lying around. Got it apart hoping to get it working as well.

Also have had this one lying around. Got it apart hoping to get it working as well.
Sean Jones
Well-Known Member
Nice find Daniel. I could use a bigger vise myself.
Bruce McLeish
Well-Known Member
Only one thing to say .... Where's the wire brush and WD40 ?!!!!
Just how in the world did you do that? Is that what Boss called "stipple"? Almost looks like CruForge V bonded to the 4140 with the Nickel?Was experimenting with some different lamination stuff. This is not San Mai. You can probably tell since it continues through the tang. Little hidden tang neck knife. Just gotta do the guard and handle now.
Edit: CruForge V at the edge. 4140 towards the spine with a piece of nickel in between.
View attachment 67775
Daniel Macina
Well-Known Member
Only one thing to say .... Where's the wire brush and WD40 ?!!!!
Got the wire brush but the wd-40 will gum everything up. (Ask me how I know
") )
)Daniel Macina
Well-Known Member
Pulling the bearings on my grinder motor. On of the last steps to having my grinder up and going! Exiting stuff!
Smallshop
KNIFE MAKER
Tracy...beautiful work!! That looks real clean!continuing my engraving practice.
all shaded, now on to practice some in lay.
View attachment 67959
Half shaded
View attachment 67958
major lines have been cut twice, some shading in place.
View attachment 67957
Von Gruff
KNIFE MAKER
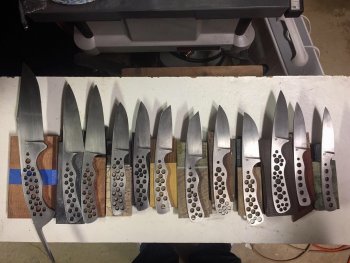
So you got the easy part done huhPre heat treat pic. These were heat treated last weekend. Working on final grinds now. Hopefully get to drilling and glue up this weekend.
I have been concentrating on engraving practice for the last several weeks. After practicing in-lay with .999% silver (it is nearly as malleable as pure gold and a bit cheaper to practice with) I am now trying some gold in lay. This is about 2 bucks worth so it's not breaking the bank. There will be about 4" total in-lay and that will be around $12 which is cheaper than most mosaic pins for handles so it's maybe not as expensive as you might think. It does take an unreal amount of time though.
Here I am using 22kt gold. I meant to get 24kt as it more malleable but ordered the 22kt by mistake. Live and learn. It's a bit harder but with some effort it works. Cutting two straight parallel lines is the hardest part - at least for me. The channel has to be dug out then little divots in the center of the channel and slight under cuts along the entire edge are added. This holds the gold in place with a mechanical lock as it is hammered it into place using a brass punch in my pneumatic engraving tool.

Here I have stoned it down to 1000 grit with an EDM stone. You have to use plenty of oil while stoning. Despite the oil, the stone still loads up and stops cutting so a quick pass on some 120 grit sand paper opens the stone back up. It's tedious. I didn't realize cleaning up the in-lay would take more time than doing the actual in-lay. This took a couple days to cut the 4" square channel and in-lay one side of it. I expect it will go much quicker with practice but it is a slow process. This pic is zoomed in. With out magnification, the border is fairly straight but could still use some more clean up. Since this is practice, I wanted a quick peak to see my process was working. Now to go fill in the other 3". See you in a few days.

Here I am using 22kt gold. I meant to get 24kt as it more malleable but ordered the 22kt by mistake. Live and learn. It's a bit harder but with some effort it works. Cutting two straight parallel lines is the hardest part - at least for me. The channel has to be dug out then little divots in the center of the channel and slight under cuts along the entire edge are added. This holds the gold in place with a mechanical lock as it is hammered it into place using a brass punch in my pneumatic engraving tool.
Here I have stoned it down to 1000 grit with an EDM stone. You have to use plenty of oil while stoning. Despite the oil, the stone still loads up and stops cutting so a quick pass on some 120 grit sand paper opens the stone back up. It's tedious. I didn't realize cleaning up the in-lay would take more time than doing the actual in-lay. This took a couple days to cut the 4" square channel and in-lay one side of it. I expect it will go much quicker with practice but it is a slow process. This pic is zoomed in. With out magnification, the border is fairly straight but could still use some more clean up. Since this is practice, I wanted a quick peak to see my process was working. Now to go fill in the other 3". See you in a few days.
Dennis Morland
KNIFE MAKER
Bossdog-Check our Alec Steele on YouTube. He put together a bunch of stuff on gold inlays and engraving. Right up your alley.
Randy Lucius
Well-Known Member
Good looking batch of knives! I really like the profile on #78. Be sure to post the finished knives. Thanks!!Pre heat treat pic. These were heat treated last weekend. Working on final grinds now. Hopefully get to drilling and glue up this weekend.
