What's going on in your shop?

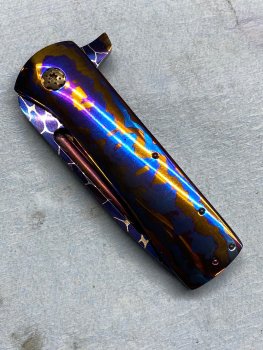
Yeah...,that wood cracking has caught me once or twice. I’m not a big fan of using wood scales. Only one customer I do wood scales for. This is Lignum Vitae. a wonderful “flowery” smell when working it.


For the spring I’ve switched to firearms building/gunsmithing. Done some trigger work, and right now I’m machining a couple lower receivers.


I know..., I know...NOT knifemaking! Just what I’m currently doing.I don’t get a whole lot of time to work on things, with pain always knocking on my door. Keeps me from working on more than one thing at a time, every few months.
 
I've already seen how easy the grind can get away from you. I was able to correct one mistake to get it back to this point and ready to heat treat. I had reference lines everywhere to be able to see where I was grinding all around. It's a complex grind for sure, and I'm not convinced I will finish it to my liking. I'm happy with the progress so far, though.
 
David...Love the lines on that knife! Well done.

Thank you kindly Ted. Would you believe that was an accidental design? Started as just a “one off” gift for a close friend. He’s a very skilled, avid hunter and told me exactly what he was looking for in a knife. After receiving & using it, he informed me it’s the best hunter he’s ever used.(after 30+ years of hunting). I tweeked the handle design a bit, but didn’t touch the blade. It’s become my most popular knife. It’s one of those blades that truly feels like an extension of one’s hand.
 
20200529_135527.jpgA friend of mine gave me the first piece of Demascus he made. Real low layer count and small. I decided to put a few twists in it so I squared it up, then twisted it a few times for the heck of it. Made a boneing knife with the blank. Did a quick Ferric bath just to see pattern. Wish it had more but its solid and forged nicely. Its kinda growing on me!
 
My forged pattern welded titanium and mosaic sanmai damascus blade.
Bearing set up.
Most work on a knife for me than any other to date.
TracyMickley-Folder-06022020-JSmith~1250x1500.jpg

IMG_1275.jpgIMG_1268.jpg
 

Attachments

  • IMG_1281.jpg
    IMG_1281.jpg
    735.7 KB · Views: 7
  • IMG_1279.jpg
    IMG_1279.jpg
    755.2 KB · Views: 8
  • IMG_1280.jpg
    IMG_1280.jpg
    793.7 KB · Views: 8
Last edited:
Here is something I've been working on my first attempt at carving. The handle is getting pretty close. At the March 2020 Travis Wuertz hammer inn I was able to attend a carving class by Larry Fuegen a world class maker , very nice man and great instructor. My idea wasn't to copy things exactly from one side to the other.
H49rJoDm.jpg
H0dR9Gfm.jpg
 
Last edited:
Here is something I've been working on my first attempt at caving. The handle is getting pretty close. At the March 2020 Travis Wuertz hammer inn I was able to attend a carving class by Larry Fuegen a world class maker , very nice man and great instructor. My idea wasn't to copy things exactly from one side to the other.

Nice. I like how the leaf motif is repeated on the guard and handle. What kind of wood is best suited for carving?
 
Nice. I like how the leaf motif is repeated on the guard and handle. What kind of wood is best suited for carving?
Thank you. Larry was demonstrating on antler, I am using brown mallee burl here it's pretty soft so I think that could be good or bad. I almost used ironwood this is my only experience ,but I think finishing is easier on soft wood and so are mistakes .
 
new flipper design time.
I start with CAD. Often I can import an older drawing and just move a few things around leaving the original inside geometry mostly untouched.
I print out a few copies and super glue them to some .125" stainless, the cheaper the better.
I'll spot the holes with an optical punch and then drill to size.
Most holes are #48 which is perfect for tapping in titanium. Some of these holes I will have to enlarge to #43 for through holes in my build materials but the #48 holes are perfect place holders.
The detent hole is #49
in this case, the stop pin is .093" and the pivot is 3/16.

The pattern on the left is an older one that shows what they look like when done.
IMG_1297.jpg

After the holes are drilled the patterns are ground back to the lines. Normally I use a contact wheel and work rest for the bulk of the stock removal and then I switch to small wheels and clean up the edges all smooth.
I will heat treat to around 59RC and go from there.

IMG_1298.jpg

I would not make a folder with out a hardened template in case (almost always) I have to make a replacement part.
 
Back
Top