What's going on in your shop?

So, I picked up some ATP-641 anti-scale to try during heat treating in the forge. I hand sanded my blade to 220 grit and coated it with the anti-scale. After hardening and tempering, it took my less than 5 minutes to hand sand back to 220 grit. I also hardness tested it, and it caused no change to the hardness I wanted. I'm liking the results, because I hate grinding my ricasso after hardening. I think I'm sold on it, and will use it from now on.
 
So, I picked up some ATP-641 anti-scale to try during heat treating in the forge. I hand sanded my blade to 220 grit and coated it with the anti-scale. After hardening and tempering, it took my less than 5 minutes to hand sand back to 220 grit. I also hardness tested it, and it caused no change to the hardness I wanted. I'm liking the results, because I hate grinding my ricasso after hardening. I think I'm sold on it, and will use it from now on.

Does anti-scale help with decarb as well then? I've been thinking I'd like to try some, just haven't figured out where to get it yet. Glad to hear you're happy with the results.
 
Does anti-scale help with decarb as well then? I've been thinking I'd like to try some, just haven't figured out where to get it yet. Glad to hear you're happy with the results.
Yes, it is supposed to help with decarb. One of the main reasons I wanted to try it out. I went straight to hand sanding after hardening on the ricasso. I still need to grind some on the bevels, but I primarily did it to maintain my flatness and parallel on my ricasso without having to regrind.
 
I felt pretty good about this until Craig posted. This is the first of a new design for me. Still tweaking it.
I also drooled a bit over Craig's post, but you are too critical of yourself John. It's looking great.
Based on the markings on the bolsters, I assume they are welded onto the liners?
 
Based on the markings on the bolsters, I assume they are welded onto the liners?

Yes. I spot weld them. After welding I heat them to red. The spots then disappear immediately as soon as I sand the bolsters. There’s no visible line between the bolsters and liners when it’s all done, either.
 
Yes. I spot weld them. After welding I heat them to red. The spots then disappear immediately as soon as I sand the bolsters. There’s no visible line between the bolsters and liners when it’s all done, either.
Why is that? Do they forge weld when you heat them to red?
 
Well, as we used to say in the Navy.... It's FM
Not necessarily...if we're talking about diffusion welding. Not having made a folder, I don't know what tolerances there are or how smooth the surfaces are, but it's possible to achieve some level of diffusion welding at room temps. It's my understanding this is why machinists blocks have oil coatings, to prevent welding.
 
Just finished a skinner. First time using 52100 and my first blade I have heat treated. Maple Burl scales with Micarta pins. Maroon g10 liners. Did a stone wash finish. Man had a hard time etching the blade. Is 52100 hard to etch?
194F8ED3-8625-40C9-BBE0-12475543E192.jpegC78DFA4D-852B-4D21-B653-5661A0C1B71E.jpeg
 
For years I have wanted to get into auto folders. I am finally getting started.

This will be a dual action using a bar lever. Dual action is one you can open manually, just like any other liner lock or open using the button (or lever bar in this case) an it will open like an auto. I hear this often called a double action and I could be wrong but that is more correctly used to describe an out the front that will be both open and close the knife by a slide bar.

the top drawing is for the lever bar. Peter Martin sent me a hand sketch of what he has used so I put it into CAD just to have a reference. I do not have anything figured out for the lever bar pivot pin lugs yet. I will probably make some lugs that screw into the liner. I will try TIG welding some lugs onto scrap and see how it works. Many guys solder the lugs in place also.

The bottom is a "sketch" (basically a solidworks term for not a finished, fully constrained drawing). I print these out, glue them onto pattern material and use the hardened pattern to make the actual pieces. The curved wire from the rear of the knife to the kick face on the blade is the leaf spring. That is held in place, when charged, by the button bar lug. When the knife is closed, the spring is charged and held open by the lug on the button bar. The blade can open and close manually with the spring held in place. The button can be activated, releasing the leaf spring, kicking the blade out. When you close the blade, the spring is charged again.

I am stepping up the detent ball to 3/32" from a 2mm ball because I think it will hold better. The detent ball does not hold the spring back so it all has to be clocked perfectly. I hope I don't screw this up ten times trying to get it figured out.

The two metal pieces just under the sketch are my pattern pieces I made and hardened yesterday.
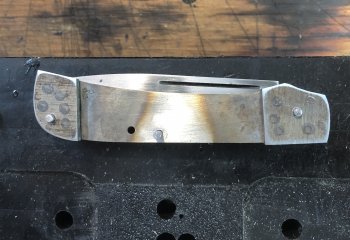
The very bottom pieces are the liners I profiled, drilled tapped and screwed together to check alignment. The wire is .067" piano wire and will be the kick spring.

At this point I am guessing: I will get the liner lock working, then locate the lever bar and mount that, then work on tuning it, then locate and drill the detent ball socket. There is more but that is enough for now.

IMG_1762.jpg
 
Back
Top