Adding a blower to a forge....

"the needle valve on the forge"
"That's why I think that a ball valve on the gas line is essential."
Doug Lester

Doug,
Keep in mind this is my first forge build, my first forge was bought of eBay, it's not the greatest forge in the world and probably not the worst. It was just time to upgrade to something that would work better with my (still) developing skills.

Now, I have some questions realted to the quotes above, last-first. The ball valve I think I have covered. On my old forge it is positioned just above the burner, I was told to set it open and leave it alone, to control the gas from the tank. Is this info right, or is there a better way to control the gas flow? My old forge didn't have a psi gauge, my new one will, the new one will also have a pyrometer, just so I know what kind of temps I can achieve, and how efficient it's running.

Also, what is a "needle valve"? No, I'm not afraid to show my ignorance, if it keeps me from getting blown up! The burner I have in mind here as discussed in this thread with Ed C., doesn't have anything in it, just the pipes with the gas going through them, well that's the way I understood it. if I'm wrong please let me know! I did reduce the pipe size from 1 1/2 down to 1", I was going to start at 2" then reduce down to 1" to increase the pressure of the gas, thought that might help a bit. But a 2" gate valve was like 33 bucks, at the time I still had a lot to buy and was trying to stay on a budget, a month later the budget is out the window, I want to make the best forge I can possibly build! If I understood Ed correctly, and it can be built without all the other pieces and parts, that is the way I want to go. If it can't be I'll be back at the drawing board! Thanks, Looking forward to the responses, Rex
 
Ok, I just took a look at Ed's picture of his burner and he does have a needle valve on it. It's the brass fitting on his burner, unless I'm mistaken about what I see. I think that it's pretty neccessary to regulate the temperure of the forge. It is the ball valve that he doesn't show in the picture. I don't know if he has it at another spot off picture but I like to have mine right up by the forge so that I can grab it real fast if necessary. I also don't agree with the advice to leave the ball valve on the gas line open unless there is an emergency. By having it closed I can open the valve on the tank and then light my torch and have the flame from it going into the forge as I open the ball valve on the burner to light the forge. Also, if I have the gas off at the at the tank and the ball valve then I know that it's off in two places. Now there is no one correct way to build these things. You could possibly do without the ball valve on the gas line but I don't like the idea for the reasons stated above. When I designed my burner I just included all the parts that Ellis includes on his.

Buy the way, I went from a 2" gate valve to a 1 1/2" gate valve on my burner assembly for exactly the same reason.

Doug Lester
 
Doug,
If you can't tell by now I'm easily confrused! I know the ball valve is the in-line shut off valve with the handle, I think mine is red. The gate valve is going to be attached to the blower (and I think it's used to adjust the amount of air flow), or the other way around, Blower then Gate Valve then 1 1/2" pipe to a bell reducer to a tee, w/bushing (for gas line)then to 1" pipe, a 90 degree elbow, then pipe, then a 45 degree elbow, then pipe to the forge.

Have you got a pic of the needle valve? I agree with the ball valve that is a necessity, for safety reasons, I have that planned, I haven't bought one yet, I thought about reusing the one on my old forge, but thought again. It's better to buy a new one, they don't cost much and I'm a little more comfortable having a new one. Also, I'm planning on keeping my old forge for the future, when I can hopefully (oneday) put on a Mini-hammer-in, that way I'll have an extra forge for folks wanting to do some hammerin'.

Back to the needle valve, I think I've seen one, but memory doesn't serve me well. How is it adjusted? I really do like the KISS method, as I don't want it to be over complicated if it can be avoided, I would rather stick to Ed's plan, I will be using this forge for forging, if I HT anything in it it'll be 1084, and that's only because I don't want to wait on my kiln, which is usually never! I might have HT'd one blade in my forge, my kiln is dead on, and since I haven't had a problem Ht'ing, I think it's best to not mess with it. BUT(!!!), if I do need the needle valve, I need to know what it is and where to get one, and how to operate it, so share away PLEASE!

Ed if your out there and have time to chime in, please do. If the needle valve is for adjusting temp and I only need to keep my temp around the recommended forging temp of the steel, is it necessary to add this part? I think that's the best way to ask this question. Please keep it simple, for my poor brain is maxed out as it is. (SHUT UP Murph! I know you had a Jar Head comment coming from that!! I'm kidding, you know I can take it. But don't forget I can dish out too!).
I know, I probably sound ignorant about this needle valve stuff, and honestly, I would have bought the Blown Gas Burner assembly that Ellis has for sale, IF he would have answered his freakin EMAIL!!! Yeah, I'm a little ticked about that, after I bought all the parts I knew then his price is very reasonable. I could not just order it without talking to him about it, I had some questions, and just wasn't comfortable without some communication. So keep the info coming guys and if anyone has any pics of the way this is set-up, please share.

I intended to get the new pics loaded last night, but I didn't get in from the shop until 11, I was pooped, I hit the hay, didn't even check email. I'll get them on tonight.

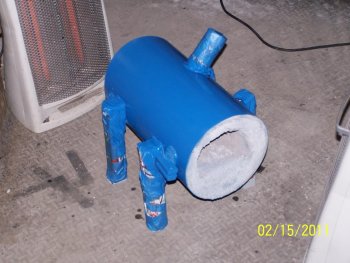
THANKS Doug, this information is helpful even if I don't end up having to have it, because this forge will probably be a prototype, there are some other features I would like to add to the next one, but I need to purchase a plasma cutter before I can do it. I have some good ideas for the legs that I couldn't do with a band saw, I tried, it wasn't happening! With the thickness of the steel I wanted to use, so I just went with square tubing for the legs on this one.
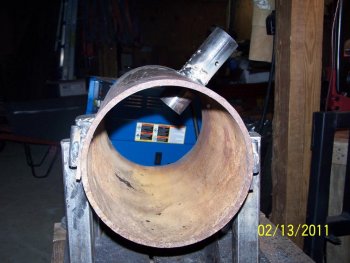
I've gotten a lot done since the last update, matter of a fact, it's almost done, I've got the refractory all mudded up and the first coat of paint on it. And since I'll be waiting on some more parts for a little while, it'll give it a lot of time to cure. Something I very happy about, the warnings I read about retained moisture in the refractory was scary, steam is some powerful stuff, I have total respect(call it fear if you want)for it. It should have at least a week to cure maybe more. I'm usually very paitent, especially when the outcome can make me one!

Here is another question I didn't think about until I decided to put this forge on a stand, I was planning on putting it on the work bench or building a cart for it. But I got an idea to make it where I can either put it on a stand or bench AND be able to mount it on a pedestal. The question is how high? I'm sure it has to do with my comfort level, but is there a recommended height based on how tall I am? Or maybe how short I am, something like the way you figure anvil height? I've considered making it almost chest high, but that really looks dangerous, that high would make the feet on it so wide I'd have difficulty putting it away when it wasn't in use, so I figured I'd go to the experts that have probably already addressed this question, so if you have any experience or ideas, I'm looking forward to hearing them, got to get back to work, Y'all have a wonderful day, Rex
 
IMG_0055.jpg

Ok, click on the picture above to enlarge it. Where the hose comes up on the right hand side of the forge, the first fitting is the ball cut off valve. It's a little hard to see because the handle is in the open position. Attachec to it on it's left looks like a brass block with a short rod coming out of the top with a small rod through the top of that rod forming wings. That is the needle valve. It is a fine adjustment for the gas flow by turning it. On mine clockwise opens it and counter closes it but I don't know if that's universal. They should probably run about the same as a ball valve. The ones that I have found in the local hardware stores are for water. Ellis sells fitting for gas. In Ed's picture of his forge burner it shows similar connection with a brass knob on top. I'm pretty sure that that is also a needle valve.

As far as as hight goes, that sort of individual. I have mine at low chest height. I have it there so that I'll have to bend slightly to look in instead of being able to stand and stare into it, which can be hard on the eyes. Also make sure that you have enough room between your forge and your anvil so that you don't back up into the dragon's breath as you work around the anvil. I can tell you, from experience, that if you get your back side too close to the forge it won't take long to figure it out.

I can identify what you're going through making your first blown gas forge. It seemed hard to me until I got the job done. Then I realized that there really wasn't all that much to it.

Take care and let me get back down into the workshop and see if I can ruin another blade:5:.

Doug Lester
 
3 Forge build pics!!!

Here are the pics of what I've done over last weekend and the Monday and Tuesday.
Forge build pics 3 012.jpg
Here I got the burner tube holder welded o the forge body, I also took th time to drill and tap 4 holes for bolts to hold the burner in place.

Forge build pics 3 013.jpg
This is a pic of the hinge idea I came up with, pretty simple, while still pretty slick!

Forge build pics 3 009.jpg
This is the burner assembly, well what I've got at this point, if you need any help with which parts are where, do ask. Really simple and since I've seen the needle valve, I know what it is, just didn't know what it was called. BTW, aint that a pretty swanky drawing behind it?

Forge build pics 3 016.jpg

And here it is with the refractory put in, getting close to the finish now, and I really need to be.
Forge build pics 3 021.jpg (91.0 KB)


I've been working every night after my regular job. I'll have to wait a week or more to put the Plistix in it, and that will be the last work needed inside the forge. And my lovely wife came through yet again, she simply asked a question about the pyrometer I took off my kiln when I added the new computer control , asking if it would work like I wanted to, and if I knew how to hook it up, so I checked it out and sure enough, it will work wonderfully! The only problem I think it might top out at 2000degrees, I really wanted one that would register welding temps, so when I start working the steel at the high temps, I would have a reference for what temps work best. We'll see soon enough, if nothing it will give me time to figure out which one I really want. That's all for tonight, I still have a blower to order! It was a hard decision, the (cheap blower) cost versus the one I really need. I think I have it figured out though, Y'all have a good night, Rex

BTW, the last 2 pics is just before the first oat of paint, and then another after the blue has been applied, I sorta adopted the local high schools colors, that and they are one of my favorite color combinations,...oh and the fact that one I painted my grinder the same colors that was the 2 colors we had the most of, kind just happened that way. I'll be adding some more pics when I get the rest of it painted, finish the pyrometer, and I've got an idea for a work piece holder I want to implement, should be pretty cool.Oh and one more pic once I get her FIRED UP! Thanks to all for everything,. it has been a trip!!!! Rex
 

Attachments

  • Forge build pics 3 011.jpg
    Forge build pics 3 011.jpg
    91.8 KB · Views: 18
  • Forge build pics 3 021.jpg
    Forge build pics 3 021.jpg
    91 KB · Views: 20
View attachment 20663

Ok, click on the picture above to enlarge it. Where the hose comes up on the right hand side of the forge, the first fitting is the ball cut off valve. It's a little hard to see because the handle is in the open position. Attachec to it on it's left looks like a brass block with a short rod coming out of the top with a small rod through the top of that rod forming wings. That is the needle valve. It is a fine adjustment for the gas flow by turning it. On mine clockwise opens it and counter closes it but I don't know if that's universal. They should probably run about the same as a ball valve. The ones that I have found in the local hardware stores are for water. Ellis sells fitting for gas. In Ed's picture of his forge burner it shows similar connection with a brass knob on top. I'm pretty sure that that is also a needle valve.

As far as as hight goes, that sort of individual. I have mine at low chest height. I have it there so that I'll have to bend slightly to look in instead of being able to stand and stare into it, which can be hard on the eyes. Also make sure that you have enough room between your forge and your anvil so that you don't back up into the dragon's breath as you work around the anvil. I can tell you, from experience, that if you get your back side too close to the forge it won't take long to figure it out.

I can identify what you're going through making your first blown gas forge. It seemed hard to me until I got the job done. Then I realized that there really wasn't all that much to it.

Take care and let me get back down into the workshop and see if I can ruin another blade:5:.

Doug Lester

Doug,
Thank you, a picture is worth 2000 words, I knew I knew what it was I just couldn't picture it in my head, this wouldn't be a problem to add if it is needed. I don't see it being an issue to add it even if I don't need it. What size is it threaded? And where would be the best place to add it? I'm thinking the gas line maybe, my ball valve will more than likely be installed close to the where the gas will be going into the burner, how about behind the ball valve? Or should it be in front? Does distance matter? Like, should it be xx inches from the ball valve? When I was researching this build, I was so intimidated by the burners that a lot of folks are using, there were so many pieces and parts inside the burner tube itself. Not to mentione the fear....I mean respect for propane! I'm so thankful Ed Caffrey showed me the way! As well as everyone else that has helped in this build, but it was Ed who first said, K.I.S.S. it! All the other parts aren't needed, for a blown gas forge, and the heat need to forge weld is easily attained, that was a huge sigh of relief! The internet is awesome, for gathering information, but<--(That should be a BIG BUT), that information should be checked and rechecked, questioned, and even researched further, there is great info on the web. It just shouldn't be taken at face value, unless you can discuss everything with the author. The biggest problem I see is there are so many people out there getting their jollies by purposely putting out false information for their own entertainment, while it may be funny for them, they have no idea how much damage they can do to folks, while thats not so much the case with this stuff, it is a problem. With my forge build, the biggest problem for me was that there is so much information, most of it was good, it was the wading through all of it and keeping the different type forges from getting mixed together. There are many great designs out there, that work well for so many folks, this is where the individual needs to do their homework. AND the benefit of having guys like you all to advise guys like me that didn't know a needle valve from a gate valve before I started, that benefit is priceless, I can never thank everyone enough. We do have the CREAM of The CROP right here, you guys are the best! Thanks everyone for helping, we're not done yet, I'm in the home stretch, the blower is on the way, and few little things to finish up, it should be ready to fire up by Tuesday or Wednesday of next week, yeah I'm getting EXCITED! Thanks again for everything, Rex
 
IMG_0056.jpg

As you see in the close-up of the gas connection to the forge. The gas line is connected to the ball valve by it's male connector. On the other side of the ball valve is the needle valve which connects to the ball valve by it's male connector. On the forge side of the assembly is a bushing that screws into the needle valve and a short brass nipple screws into it which is inserted tightly into the plasic plug in the T-fitting and reinforced with epoxy to make sure that it doesn't leak. The fittings are all standard sizes. If you wanted to thread the brass nipple into an iron plug you will have to ask at the hardware store what size drill and tap to use. The brass nipple on my other forge is the same size as the hole in the needle valve and didn't require a bushing to addapt it.

The assembly of valves comes right off the side of the burner so that it is the same distance back from the opening/s of the forge as the burner to keep everything clear of the dragon's breath. With the knob for the gate valve being right below the gas valves it creats a control manifold that I can easily get to without having to walk around the forge.

Doug Lester
 
View attachment 20696

As you see in the close-up of the gas connection to the forge. The gas line is connected to the ball valve by it's male connector. On the other side of the ball valve is the needle valve which connects to the ball valve by it's male connector. On the forge side of the assembly is a bushing that screws into the needle valve and a short brass nipple screws into it which is inserted tightly into the plasic plug in the T-fitting and reinforced with epoxy to make sure that it doesn't leak. The fittings are all standard sizes. If you wanted to thread the brass nipple into an iron plug you will have to ask at the hardware store what size drill and tap to use. The brass nipple on my other forge is the same size as the hole in the needle valve and didn't require a bushing to addapt it.

The assembly of valves comes right off the side of the burner so that it is the same distance back from the opening/s of the forge as the burner to keep everything clear of the dragon's breath. With the knob for the gate valve being right below the gas valves it creats a control manifold that I can easily get to without having to walk around the forge.

Doug Lester

Doug,
How about this, gas line to the needle valve, to a shorter gas line then the ball valve then another gas line, then to the forge? Since the ball valve is more important for safety, and it should be right up front close by the forge where the gas enters the forge, if I put it there, wouldn't the needle valve be fine at the tank? I've been having a little trouble finding the gas lines and the right regulator around here, looks like I may have to order it. All of the regulators I've found locally have not had the connection on the regulator for a psi gauge. I did without one on my old forge and I want to know how efficient the new one is running, I did find gas line in short sections, 5foot. I really wanted to have at least 10 feet, 20 feet would be better, any ideas where I might be able to find it in that legth? I saw some, long hoses somewhere but they were ridiculously priced, I think like 60+bucks, that seemed like a lot, and it was the first I'd seen, so I decided to wait to shop it around some.
To sum it up, will it work if I went from the tank to the needle valve, the hose, then the ball valve, then into the burner? I know I will have to look at it again, to make sure I have it all figured out, Thanks for taking the time to explain this and taking the extra pics, I do appreciate it, more than I can say, hopefully I can repay the help one day, Rex
 
My advice would be to get a ready made combination from Ellis or Zoeller. They come with the connector for the tank, a regulator, guage and gas line with male connectors on both ends. If you're having problems finding a needle valve for gas I know that Ellis and probably Zoeller sells those. Then all you will have to do is get a ball valve and a brass nipple to go into the air line and those should be available locally. Just check out the assembly. Ellis evedently just threw the one that I got from him together loosely, probably to make sure all the parts were included, and the regulator was hooked up backwards ( What can you say? a 50/50 chance and he blew it) I turned it around and it worked fine.

Doug Lester
 
Doug, Personally I wouldn't advise that for Ellis, and Zoeller told me he didn't do blown forges so I was on my own. I emailed Darren 3 or 4 times, NEVER got one response. I would have loved going that route, if I could have found it already built at a reasonable price I would have jumped all over it, Even tried Tim Zowada, no response. At some point I had to decide to do something, I waited long enough, and finally decided to do it myself. Glad I did, I learned so much building it. And did get better at welding, and understand so much more about it, I may tackle some thing I've always wanted, a hydraulic press! I'll wait a little while I've got some shop improvements to make rearranging, painting, all kinds of fun stuff!!! Still have a few more things to do to finish the forge, Rex
 
Quick question, and since I'm at work I won't have time to proof read this one.
I'm not sure about this, and wated to check to see if it mattered, I went and picked a needle vavlve at lunch, it is made of brass and and has what looks like compression fittings on the ends with a little bushing inside that falls out everytime I unscrew it. I got to thinking about it and if I remember correctly, ( I rarely do, that's why I ask) this type of fitting is used for water. Is that right? Or are they used for both? If it can be used with gas will I need to add a little extra "P" tape and/or maybe some silicon if there is a leak. Thanks guys gotts get back to work, Rex
 
That's typical of fitting made for water, the compression fitting is to connect to plastic tubing. It's kind of hard to say without looking at it but you might be able to remove the part with the compression fitting and screw in a brass nipple. Or you could return it and order one made for gas from Zoeller or Ellis. Unfortunantly, Ellis seems to have a backup of orders and is not accepting new ones for about a week. I have seen these, as well as the propane connections at both.

Doug Lester
 
Back
Top