Adding a blower to a forge....

Hey Guys,
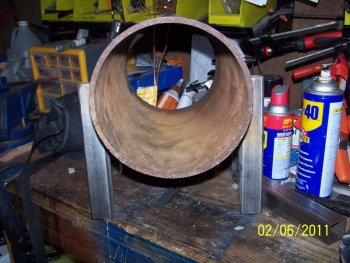
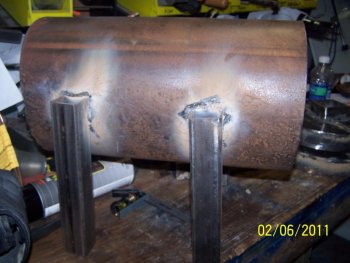
Just thought I'd try to give y'all a quick update, things have been kinda slow going the last couple of days , I mashed my hand under a 90 pound post anvil Saturday, so I've had to back off a little, I did get the frames for the doors welded together and started on the panels that will cover the doors, my hand is'nt broken or nothing serious, just sore as the devil! Might loose a finger nail or 2, it could have been a lot worse, probably should have been a lot worse! I don't have full range of motion as of yet, seems my knuckels are bit stiff, if it doesn't get better soon, I'll be off the Doc. I doubt that will happen, I dunked it in ice water immediatley after, and the swelling is minimal, it probably just needs some time to heal, I'll keep piddling along, a little at a time, I don't really like this saying, but it goes like this, "Slow and steady wins the race", I prefer fast and steady but sometime we have to understand our limitations. Mine aint' 90 freakin pounds, if I can get more accomlished tonight, I should have a few more pics to post in a day or so, I already have pics of the door frames. Thanks Guys, ,Rex
 
Sorry about the smashed hand Rex. Next time you try to man handle one of those post anvils use the technique I showed you. It works alot better that way and I know a big ole boy like you can do it.

By the way, I had a nice phone conversation about that anvil with the maker today. I'm still smiling!!! Even after that drive yesterday.

:biggrin:

Hey Murph,
Enjoyed the visit, next time we get some steel hot and do some bangin'!
I'm assuming all the info I was given was correct? Did you mention to Mr. Robin about selling some billets to a guy a while back? To see if that info was correct, I'm curious, not that it would matter all that much if it was or wasn't, I think it's an awesome anvil. And NOBODY but you could have pried from my fingers swollen or not! To top off everything else, on Monday I came down with some sort of bug, sick as a dog, I'm back to work today, still weakish feeling, but much better. I plan on getting back to work on my forge tonight, and some tomorrow, we've got Baseball coming up and the Pup is a player! Got take care of the family most of the day tomorrow, so I'm not sure how much time I'll be able to work on it. I hate projects that stall no matter what the reason. Seems like I'm working on them for years, I should be back on track this weekend...I'll keep my fingers crossed, still feeling crappy but way better. I'll be updating the build as I get more accomplished, Rex
 
Hey Dawgs,
I haven't been able to get a lot of work done this past week, but I think I made up for it this weekend, here are the pics to where I am right now, I'm beat, so I'm going to keep it to the point and pretty quick. I know, I know, your all going yeah, right! Well, here are the pics, enjoy, and don't make fun of my welds! Kidding, I can take it! I'll just blame them on the Pup! Shameless, I know:biggrin:

2nd Forge build pics 003.jpg
I forged these rings for the door frames. I know my blacksmithing skills leave a lot to be desired, but they will work very well for me!

2nd Forge build pics 005.jpg
Here I have half of the door welded on the frame, with the entry hole on the side.

2nd Forge build pics 006.jpg
Here I have both sides of the doors welded with the entry tube, nice weld, Yeah?

2nd Forge build pics 011.jpg

Here are the doors completed except for some finish work, and paint, yes I'm going to paint , not sure how long it will last, but I want it to look good for a while, at least while it can.

2nd Forge build pics 010.jpg
Here is the door on the forge body, it's not attached yet. My design will have a hinge pin assembly that will hold the door on, not sure if I have them good enough to hinge the door open, but a good way to lock them on, and easily removed for re-lining the forge when needed.

The last 2 are the inside and a side view, I will be working on my hinges tomorrow, and if I get time the burner tube to hold the burner while in place. I think that's where I'm going to run into some problems, I think I'll get my hole cut for the burner, and then get all of the refractory in before I start assembling the burner, I still have to order my blower. That's all for now, bed time!!! Please excuse all the typos, grammar and other errors, I'm so tired I can barley think, Nitey nite Y'all!!!
 

Attachments

  • 2nd Forge build pics 012.jpg
    2nd Forge build pics 012.jpg
    94.8 KB · Views: 20
  • 2nd Forge build pics 013.jpg
    2nd Forge build pics 013.jpg
    85.7 KB · Views: 22
Forge is lookin good Rex. So, you caught a bug, huh? Well, I did too. We had beautifull weather today after a long week of ugly. I still haven't made it to the shop to play with that anvil and now that I have this bug I don't know how long it will be before I get a chance. Hopefully I'll be better by this coming weekend so that I can make it to the AKA Show in Little Rock.
 
Forge is lookin good Rex. So, you caught a bug, huh? Well, I did too. We had beautifull weather today after a long week of ugly. I still haven't made it to the shop to play with that anvil and now that I have this bug I don't know how long it will be before I get a chance. Hopefully I'll be better by this coming weekend so that I can make it to the AKA Show in Little Rock.

Murph,
I had my bug last week, kinda strange really, I was never puking sick, just ran a low to mid grade fever, massive headache, zero appetite, felt like if I could puke I'd feel better the entire week. Cold sweats were the worst and they always came at night, I'm better at being hurt (lots of experience) than sick, I know I'm a, great BIG, baby! No one needs to be around me when I'm sick, I'm a grouchy old fart! Yeah I hear ya thinking Murph, you said, "So what's the difference any other time?" I guess I eat more, a smile some too!

Thanks for the comments on the forge, I got a lot done this week end, now if I can keep up the pace a little more, I really need to get it done before baseball practice gets started, my shop time will be cut
bigtime once the Pup's season gets started. I still have to buy my blower, I've decided to go with a forge blower instead of a cheapy, squirrel cage blower. I'll take Ed's word for it, and I do believe it will cost more in the long run. I really don't know how much forging I'll be doing right away, but I figure do it right the first time, and done with it...until it's time to re-line it. Thanks Bud, Rex
BTW, hurry up and get well, that anvil aint getting any younger!

 
No worries Rex. It may not be getting any younger, but it is ageing gracefully. My first two projects after I move back to Arkansas next month are to build a new stand for the Sea Robin and a new forge.
 
Last night I did a little more work on the forge, I got the hinges on one end, a lot harder to do than I expected, I ended up going with two tubes one on the end cap and one on the body and a "U" shaped pin to hold it on, it is there just keep the caps from falling off if it were to be bumped or the back end pushed off while passing steel through, I kinda wanted it to hinge, but that wasn't a necessity. The only reason to remove the ends is for re-lining or if something small falls in.
The wife wants me to weld some triangles on the top for ears and some nuts for eyes, she thinks it would be cute that way....err, NO!
"It would look like a cute little pig", her words, is there any other way to demasculinate a forge? I didn't think it was possible! More to come, our lovely weather is headed back into the deep freeze, this past week end we had highs in the high 60's, Wednesday night there is a chance of SNOW! I hate this global warming!!! Freezing me to death!!! If I can get anything done tonight, I'll get pics of the hinges, well there not hinges, I guess latches? I don't know, BTW my welding is getting better not good, but better. I've done more welding on this one project than all the welding I've done combined, I really like it, might have to find me some more excuses to weld more, but I'm going to have to get back on making knives here soon, got 2 orders that will need to get done, real soon! Rex
 
Lookin' good Rex! Can't wait to see you fire that sucker up!

Thanks Cal,
I think we're quite a bit a way from that right now, I've still got to get my blower ordered, and few more things cut and installed, I got the rest of the weldig done last night, all the door latches are done, and I made some "U" shaped pins to hold it on, I'm not happy with them, I may do something about it later, may not, they are functional, but ugly. I know that's not all that important, but I've got to make me happy too! It's something I'll address at a later date, right now getting her finished and ready for some steel is more important, once I have everything finished on it and get some knives made, I'll decide what to do about the latches, if anything, Thanks Bud, Rex
 
Got a quertion...

Ok Dawgs,
It's about time to install the Kaowool, my question is, How do you attach it to the inside of the pipe? I did one of the doors last night and it was stiff enough to just cut it to shape and the entry hole and it fit snugly around it, even tucked it in the edges around the sides, it aint coming out with out purposely pulling it out. But the inside of the forge body, I can shape it closely, then put it in, but how does it retain it's form? And stay stuck to the pipe itself? I hadn't thought this far in advance. Thanks for the help, I'm starting to get excited, it really is looking pretty good, Rex
 
When I built by large forge with the ceramic matting it was stiff enough to stay in by itself. Measure carefully and then maybe cut it just a little oversized and then just stick it into the forge.

Doug Lester
 
You need to call Wayne and get some on order pronto if you're gonna finish this project.


After that, go to the supply room and pick up:

1 box of Grid Squares
1 case of chem light batteries
And the key to the drop zone
 
Question about Thermalcouple

Hey Dawgs,
I've got my burner tube hole drilled out and now it's time to drill a hole for the Pyrometer, where is the best place to put it, I was thinking the top, since heat rises, but them I though that wouldn't be an accurate reading since, well, heat rises. So now I'm thinking I should try to put it close to where my material will be heated, what do y'all think? Looking forward to the responses, after this, I'll be ready to start getting her lined! Thanks for EVERYTHING! Rex
 
You need to call Wayne and get some on order pronto if you're gonna finish this project.


After that, go to the supply room and pick up:

1 box of Grid Squares
1 case of chem light batteries
And the key to the drop zone

Don't forget the sky hook !!!!!

Rudy
 
Update Pics to follow tonight...

Hey Dawgs,
This passed weekend I did get a lot more accomplished, I put the insulation on the doors, haven't cast them yet as I wanted to see how deep the refractory would be at the opening. I did go ahead and re-design the door hinges, I went with my original idea, I took some 1 inch solid square bar and cut a slot into it, drilled a hole in it and basically made a very simple hinge. The other ones I made were not working well at all. They were ugly and it was difficult to get them to close correctly, the new one is much better, although my welding isn't quite good enough, I did'nt get one of them straight or level or something so when it hinges open it's kinda crooked, not a major deal, more cosmetic that functional, it opens -it closes! Thats pretty much what I was looking for. I've got the pics for all of the work and changes I got done over the week-end, I should get them on here tonight. I decided to wait until I got the floor done before I drilled the hole for the pyrometer, I decided it would be best to put it close to the material being heated and not good if it ended up being blown on by the burner, so waiting until I have the floor poured was the best solution. Me and the Pup worked on the refractory last night, it was NOT FUN!!! This stuff looks like mortar, like it might stick to where you put it, wrong!! It doesn't stick to much of anything inside of a forge! It was a learning experience to say the least. I decided to give it a good coat, and then sorta boxed it in around a couple of small heaters to keep it warm, so it will have been simering from about 10pm last night until I get to it, about 6pm tonight. I know that isn't enough to cure it, but it should give it a head start toward curing. With the temps lower and the humidity here higher, I knew that if I didn't do something like that it will never dry, until I fire it up. Which, from what I've read, could be bad if it has moisture trapped inside.

I was thinking about going back and adding more refractory to it, right now I have decently covered all of the Inswool, not real thickly, probably thicker in some areas than others. Although I attempted to keep it the same all over, without guidance this is difficult at best. I mixed the refractory to the consistency of mortar like the directions said to, when I needed it to be stickier I added a couple more drops of water, mixed well, and used my hand to pack it in there. I didn't finish the floor last night, I wanted to see how well the walls were going to hold up and make sure that they were in good shape. I put an old, really OLD, I'm talking antique old, fire brick in the bottom, these were recovered by my father-n-law (who recently passed) from the VA in Montgomery when he replaced their old boiler with a new furnace, somewhere between 10 and 20 years ago. They were in there for maybe 50 years prior to that, most of them don't even have a crack in them! I'm planning on covering the brick completely, to give it more of a seamless look, I mainly wanted the brick for height as it comes up to the entry hole on the front cap perfectly. If there is something I'm forgetting, or something I need to change please say it now, I'll probably have this baby finished up this week sometimes, well all the building part, once my blower and pyrometer gets in, it'll be completely finished them. Also, plan on giving it a good coat of Plistix, it's just like ITC 100 just a lot cheaper. Any tips on adding that?
Thanks Dawgs, I appreciate all the help, it's been a wild ride, but I still have to get this baby fired up, needless to say that I'm a bit apprehensive! Ok Scared to death!
I've never made anything like this, and gas +fire (can) = catastrophie! I'll be posting everything I've done on that before the big event, so those of you who know can make sure I haven't built an explosive device! Thanks Rex
 
Yes, working with gas can be a little intemidating. Just establish some work rules. First of all check all connections with soapy water to make sure that they're tight. When I light my forges I make sure that the ball valve is in the off position and turn on the blower before opening the shut off valve on the tank. I then light my hand held propane torch and stick the flame into the forge as I slowly open the ball valve on the gas line. I find that the hand torch is the easiest and safest way to go if you don't have auto-ignition. If the forge doesn't light I immediately shut off the ball valve and turn off the torch and then check out the problem. One time I forgot to change to connection from the blower to the forge-I had left the hose connection to the other forge. Another time the problem was that I had had the needle valve on the forge turned way back to lower the temperature on the forge while heat treating the previous time that I used it. There was enough gas to burn in a hot forge but not enough to light a cold one. I just opened the needle valve up a little and tried again. The first time out you will have to get the needle valve adjusted for lighting. Just remember that at the first sign of a problem turn the gas off. That's why I think that a ball valve on the gas line is essential.

Doug Lester
 
Back
Top