Adding a blower to a forge....

Craig's correct about the pic I posted, the ONLY thing you cannot see is that the end of the pipe which goes into the forge has concentric pipes for the last 3"....the pipe itself is 1 1/2" ID, with a 3" piece of 1" inside of that, and then a 3" piece of 1/2" inside of that. About the only thing it does for the burner is cut down on the "roar", and creates a more stable flame pattern.

So the burner itself isn't filled with nipples, and fittings etc etc!?!? I was thinking the burner had all kinds of parts, or is that the venturi type burners that have tips and nipples? If I'm understanding this correctly, the pipe that goes to the forge is just a pipe with other pipes inside of them, with the gas attached back up the pipe a ways and the blower coming in from the rear. Do I have that right!??!? Because if I do I have yet again over complicated the simplest of things. The Burner set up that Ellis sells is just the pipes with shut off valves, and a connection for the gas? The pipe that enters the forge is just an open pipe? Guys, y'all are getting me excited, because I have yet to hear back from Darren Ellis, Tim Zowada or Larry Zoeller, either my business isn't important or their too busy for a couple hundered of my dollars, that isn't something that sets well with me. I work very hard for the few dollars I do have, and require the simplest of courtesy to spend those dollars with anyone. I understand that folks get busy and don't have time to check their email, what I don't understand is if they want to be in business why they don't have a phone number on their web site.
I'm going to draw up what I think is basic blown gas forge assembly probably copying what Ellis has on his site, I'll attach it to a post here and you all can tell me if I'm on the right track. I was thinking of using the black iron pipe from Lowes, I'm not sure of all the fittings they have for it, the connection for the gas is of considerable concern if they don't have one made for it, other than that, I do believe I can build this baby myself!
Ed the stepped down sizes of pipe you have on yours isn't a necessity, more of an improvement on the basic design? Also, what is the right ID sized pipe that should be used? And would starting it off at a larger ID and reducing it as it gets closer to the forge improve the pressure/performance? It works with water, except I don't think the distance is great enough with gas. Thanks so much EVERYONE,and I have to say a special Thank You to Ed, as you my friend have been advising me since I started this thread, and I truly hope others will learn from it. It will continue until I get this sucker built! I'm going to do some checking, the biggest thing I'm concerned with is the gas hook up, if I get that part figured out, I think I'll be in business! Thanks again, I can't thank y'all enough, you all don't know how much it means to me, to have this caliber of help in an area that I know nothing about. I'm not the traditional Southern boy that spent alot of time with Dad, learning all of the basic skills that Dad's teach, my dad was practically a war hero of the Korean War, he spent my entire life reliving the nightmare with undiagnosed PTSD, he didn't have the paitentce to teach much of anything, he worked, he slept, he drank (so he could sleep, without the dreams) sometimes he would eat an entire meal with me and Mom. But if there was every anything to fix, change the oil, wood working, anything like that, he hired someone to do it, he would never attempt to even wire a light switch. All that said, I'm basically self-taught with all the things that I can do, with the help of several folks along the way, everything I know I've had to go and learn it on my own, a lot of times from fine folks like you guys. That is why I say THANK YOU so often, I can never show everyone my true appreciation, but do know everything you guys do that helps me is so greatly appreciated. When I can hep you all with something I know, do know that I'll be there, Thank You So much!!! Rex
 
So the burner itself isn't filled with nipples, and fittings etc etc!?!?
Nope! Not at all...in fact my recommendation is that IF you run across something that has all kinds of parts on/in it, run the other way! Keep "K.I.S.S." in mind, its the only way to go with forges and burners!

Ed the stepped down sizes of pipe you have on yours isn't a necessity, more of an improvement on the basic design?
Correct. Because I live at a higher elevation, I had to "up" the velocity in order to achieve the level of heat I wanted in the forge. I did that by using a 2" x 12" pipe at the blower end, taking that into a 2' X 1 1/2" 90 degree elbow, and then a 1 1/2" X 12" piece of pipe that goes into the forge.
Generally 1 1/2" black iron pipe throughout is just fine for lower elevations.
 
Actually, on the distal end of the burner assembly you can get away with using galvanized pipe and fittings because there should be no combustion inside of the burner tube. It's really a fuel injection tube and should not be getting hot enough to support combustion inside. If it does, then you have a design problem. The most common cause that I have found for that is that burning gasses are escaping through the hole in the forge body that the burner pipe is inserted through. I just fill any space around the burner tube with furnace patch. The 90 degree elbow on the outside end of my burner tube stays cool enough to touch, even after a couple of hours of forging. Another thing that might allow combustion inside the burner tube is not have enough air pressure.

BTW, your feeling that a blown burner is much easier to construct than a venturi burner is quite correct. Also your experience with both Zoeller and Ellis is not uncommon. Not a good bussiness model but they do work hard to keep up with orders. Ellis has also had to take time out to deal with a family emergency reciently, as stated on his site.

Doug Lester
 
Last edited:
Actually, on the distal end of the burner assembly you can get away with using galvanized pipe and fittings because there should be no combustion inside of the burner tube. It's really a fuel injection tube and should not be getting hot enough to support combustion inside. If it does, then you have a design problem. The most common cause that I have found for that is that burning gasses are escaping through the hole in the forge body that the burner pipe is inserted through. I just fill any space around the burner tube with furnace patch. The 90 degree elbow on the outside end of my burner tube stays cool enough to touch, even after a couple of hours of forging. Another thing that might allow combustion inside the burner tube is not have enough air pressure.

BTW, your feeling that a blown burner is much easier to construct than a venturi burner is quite correct. Also your experience with both Zoeller and Ellis is not uncommon. Not a good bussiness model but they do work hard to keep up with orders. Ellis has also had to take time out to deal with a family emergency reciently, as stated on his site.

Doug Lester

Doug,
Please excuse me for that rant, I was getting a bit peaved because I was all ready to place my order and couldn't get in touch with anyone to place my order with! I've never done business with any of the ones I mentioned and it doesn't look like I'll will be. I can get everything I need from Blacksmith Depot, they do answer their email, and have a nice little blower for a 100 bucks that is made for forges. I did read on Ellis's site that he and his wife were in grad school, and that all orders were shipped on the weekend except for over night items, I didn't see anything about a family emergency, Thanks and Sorry if I came across disgruntled, Rex
 
Nope! Not at all...in fact my recommendation is that IF you run across something that has all kinds of parts on/in it, run the other way! Keep "K.I.S.S." in mind, its the only way to go with forges and burners!


Correct. Because I live at a higher elevation, I had to "up" the velocity in order to achieve the level of heat I wanted in the forge. I did that by using a 2" x 12" pipe at the blower end, taking that into a 2' X 1 1/2" 90 degree elbow, and then a 1 1/2" X 12" piece of pipe that goes into the forge.
Generally 1 1/2" black iron pipe throughout is just fine for lower elevations.


WOW, that is a relief for me, now if I can find the piece that has the gas hook up on I'll be set! I should be able to put that together in a couple of hours unless my son helps me, then it may take a couple of days! I understand the higher elevation, but here's a question, would reducing the pipe size at lower elevations increase the efficency at all? It should give the gas more pressure as it is entering the forge, it's just a thought. I would really like to build this forge once and let it be in service for a while before I have to go tinkering with it, I tend to overbuild everything because of that. And I absolutley LOVE the KISS method, the simpler the better, and not having all the pices and parts to go inside the burner makes me all the happier! I feel like I can build it now that I have this info, although a good set of plans wouldn't hurt, just to make sure I'm not doing anything dumb, as I'm very capable of doing. Anyone know of any plans on-line for a blown forge? I don't mind paying for them, provided their reasonable. It makes it easier all the way around to know the exact parts to get instead of hoping the ones I pick out will work. I'm sure if I stick to the black iron pipe, I'll be fine, I don't know about the part that attaches the gas line, if it's a custom piece or a stock piece, something a propane supplier might have in stock, maybe? I'm not sure if Lowe's has them, it's one of those things I've got to learn about, when I figure it out I'll let y'all know, Thanks, Rex
 
Both Ellis and Zoeller have web sites and that is the best way to do business with either of them. I wouldn't try to place a phone order with Ellis or Zoeller; as I said, a heck of a business model. No, you didn't come across frustrated.

Doug Lester
 
Last edited:
Weldingforgeblower.jpg


QUOTE]


Ed I'm focusing on your gas hook up right here, what kind of fitting is that? Also, is that a blower designed to be used with a forge? My ideas were a lot different than that, a so much more complicated, I like this much better. Do you have your burner entering the forge at an angle or is it basically a side burner? I'm loving the KISS method for all of this, it looks so much simpler, I think I'll be better off copying someone else's design that I would be coming up with my own! Like your's Ed, I like the idea of using all metal gas lines too, it's got to be so much safer. Back to the gas connection, where can you buy that, is it a gas store item or would a hardware store have it? Since we're out of BBQ season around here, there isn't much you buy for gas anything in the big box stores, not sure if they'd have a conection like that even if it was! Thanks Bro', Rex
 
I can't speak for Ed but to me it looks like(left to right) Needle valve- Nipple- reducing bushing. All are available at a Lowes or Home Depot, around here anyway. I've bought all my various forge parts at these stores for years .

Rudy
 
IMG_0055.jpgIMG_0053.jpg
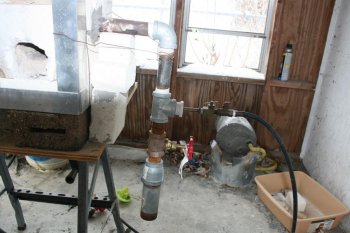
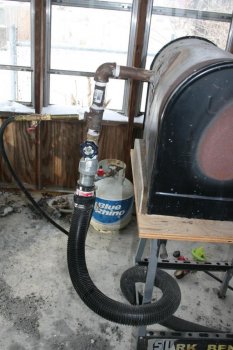
The first picture shows how I have the burner hooked up to my pass-through forge that I do most of my forging with. The gas line, which is a rubber hose designed to carry gas with brass connectors on each end. The far end goes to the propane tank which is against the wall behind the forge. That is where the regulator is conneded to the tank with a POL fitting. The other end of the hose is connected to a 90 degree ball valve as emergency cut off valve, which is connected to a pin valve to regulate the gas and that goes through a plastic plug via a brass nipple that is screwed tightly into a T-connector that the black pipe screws into. The hole in the plastic plug is just big enough for the brass nipple to "screw" into and is reinforced with epoxy. A steel plug would have to be drilled and tapped and I'd probably be reiforced with JB Weld if I did it. The second picuture shows how I connect the air line to the burner assembly with a flexable platic hose with rubber fittings. I do it this way because both forges have to share the same bower, which is off to the right of the pictures. The connectors just allow me to easily swithch between one forge and the other by just loosening the band clamp and moving the hose over. What you see is all that there is and it all came from a hardware store, except for the needle valves which I ordered from Ellis. The local stores only carried valves for water fittings and was set up to connect to platic tubing. You will also notice that both burner assemblies have brass gate valves that I use to regulate air flow.

Maybe this will give a large view of what the whole assembly looks like.

Doug Lester
 
Doug,
Thanks for the pics, that helps a lot, I understand it so much better now, I'll be going to Lowe's tomorrow morning and picking up the parts, Thanks! Rex
 
Check out this Website !!Forge building tutorial, for both Atmospheric and Blown!!!


I actually typed this this morning, went to town and got back about an hour ago, and found I hadn't sent this, so here it is, an update of my trip to town will follow soon.

Check out this website, this is David Robertson's Gas Forge Manual. Actually there are 2 complete tutorials here, one for Atmospheric Pipe forge and a bonus Square Box Forge w/Blower I found this early this morning trying to find the missing info I needed about how the burner was constructed, and several other loose ends I didn't quite understand. Oh yeah, here is the link: http://www.knifehelp.net/media/docs/gas-forge-construction-manual.pdf
I have to say, it isn't exactly what I was looking for, but it is so much more detail that I ever expected with so much more info that is a huge help in getting my mind wrapped around everything I need to understand and it has a parts list!! I have my own ideas I want to incorporate into it, but for the most part it is INCREDIBLE!

Actually, there are parts of his Atmospheric forge plans that I want in my blown forge. He uses a pipe for the forge body and a 30 degree angled burner like I had planned in mine as well, while he shows how to make a frame for fire brick for the front and back, I want to put a door on the front of mine with a square hole, and weld the back of it with a hinged "pass through" door on the back. That way I can pass longer stock through it if the need ever arises. I'm not sure how big I'm going to make the square hole in the front, probably about 2", depending on what scrap I've got in the shop. One idea I had, was to extend the square tube outside of the opening about an inch and extending it inside about an inch, depending how high it comes out, if it I can make it as high as the fire brick inside of it, it won't be necessary to extend it inside but having a "lip" on the outside could be helpful. Does anyone see any problems with this idea? Of course it won't have that feature on the back, it will probably be about 2" long on the back to accommodate the thickness of the insulation.

The way he makes his burners, isn't very difficult to understand, from what you all have said it's not really necessary, but it seems like it does work very good for him, he uses a 1 1/4" pipe, takes a 2" long 3/4" pipe, he then welds a washer on the end of it and then tack welds that into the 1 1/4" pipe keeping it centered inside that larger pipe. He gives tips to be able to do this fairly easily, is this step necessary? Or should I just leave it off? I think I want use my idea of reducing the pipe from about 2 1/2" down to about a 1" pipe, I'm not sure there will be enough room there to realize any real benefit, in (my) theory, it seems like it should increase the pressure. Which "should" (possibly) make it more efficient. Check it out, it is an excellent tutorial for both forges, and is explained in depth and I even understand most of it! Check it out, I'm headed to Lowe's! And probably several other stores, I don't think I'll find everything I'm looking for at Lowe's alone. Ed, please don't take this is a slight to all the information and advice you've given me, but I have to use the Super Wool, I've got it, it's paid for and to not use it is killing me! I hate waste, I know I can use it later on, but I've got so many items to buy, I can use it until it either proves to be too inefficient or wears out. I want to build this on a budget and I'm considering doing a "build along", if I can remember to take pics along the way, I might attempt to make it a WIP, the only problem I have with that is I think I could be spreading bad info, and I don't want to do that. The better idea is to take pics and notes along the build and after it's up and running correctly then post it....maybe. What do y'all think about that? I'll be back in a few hours, with a load of goodies to get his project started! I'm excited, BIG TIME!! There are several items I need to order, I have Satanite, but Ed says Kast-O-Lite or other "like " refractory is better, I'm planning on using that AND Musoula (sp) for coating the floor, as I'm planning on making Damascus in the not too distance future.
2 more questions, first is there a good hi-temp rated paint that I can use to dress it up some? It not only looks better, but inhibits rust after I get it all off, I don't want it coming back, if it's avoidable. 2, I really want to be able to add a pyrometer to it, the type K thermocouple needs to be protected inside the forge body, should I just drill a hole and weld on a smaller pipe to mount it in? Would that be enough protection, I have some Type K thermocouples I bought a while back, I found a great deal on them and bought several, I think they have a ceramic looking coating on them, but I know nothing about pyrometers or thermocouples. There are several on eBay that have the large read out screen, but not enough info for me to comfortably understand which one would work correctly. I have the pyrometer I took off my kiln, when I added my computer control to it, I will be attempting to make it work on the forge. Sorry this is so long, I get wild with the typing when I get excited about something that I've wanted for so long, hopefully this build will pay off, with a beautiful, new blown gas forge! And just maybe, others can learn from these threads. Thanks Rex
 
Hey Guys,
First of all I would like to ask if I did something wrong? This thread was going like a wild fire and after I posted that tutorial, it died, did I do something I shouldn't have? I need and appreciate all the support I get from you guys and never want to do anything that offends anyone in anyway. So if I did do somethig I shouldn't have done know that whatever it is, let me know and I'll fix it the best I can, if not, just say hey, so I know that everything is fine.

Update on the build, I know I had said I was going to give an update from my trip to town last Saturday, really there was nothing to talk about. Other than the fact I couldn't find but about a 1/4 of what I was looking for, I was planning on building mine similar to Ed's design, even though I don't need the extra power, I kinda felt like his design might be more efficient at the lower elevation. So, I ended up remembering the place I go to get mild steel, and remembered they have Iron Black Pipe there, and not just a little, they have ALL sizes! I was so happy to find everything I was looking for.
I planned to go from the blower to a 2" pipe, then reduce it behind a Tee, where I would also use a bushing to hook the gas line into, that was until I found out the 2" gate valve was 33.00 bucks! I did some fast back peddling, and went with a 1 1/2" pipe in place of the 2" and reduced it down to a 1" behind the Tee, then go up to a 90 degree elbow, and because I want the blower to enter the forge at a 30 degree angle I got a couple of 45 degree elbows (they didn't have 30 degree elbows, I don't know for sure if those are made) and a few extra feet of pipe for good measure, AND they threaded the ends as well. Spent a pretty good chunk of change, now all I have to do is wait for my Kaowool and Kast O Lite to get in from Wayne Coe. He has Kast O lite 3000, it is High Alumina Refractory, and he says with it you don't have to use the Mizzou, So I'm going to use that for the inside of the forge, also he sells Plistix instead of ITC 100. I've used the Plistix before and did get good resuts, I noticed an immediate increase in the time it took to reheat the piece of steel in my old forge. Anyone have any other experiences with it? Good and/or bad? The other side of using Plistix over ITC-100 is the cost, the Plistix is 9.00 bucks a pint, the ITC 100 is a lot more, I've seen it in the past but haven't seen it anywhere recently, I think it was over a 100 bucks for a container, can't remember what size the conatiner was, but it was high! I've got to do this on a budget.
Here is another question I've run into, what sizes does the gas hook up's come in? I'm referring to the size of the male end of the gas hose that is usually screwed in to a gas coupling that attaches to another gas fitting. The one on my old forge is 1/4, the ones I looked at, at Tractor Supply were 3/8th's, I'm not sure which is better, a larger gas hose or a smaller hose, or if it even matters as the gas is controlled by the regulator. The only thing I have left to buy is the blower. Me and the Pup are working on getting everything cleaned up, so we can start welding by this weekend, I decided on the KISS style burner, it just makes the most sense. So it will be nothing more than a pipe extended from where the gas line is hooked into the Tee. After a 90 degree bend, and whatever it takes to get it at the right angle to enter the forge.

Again, if I did something wrong I appologize, I would also like to know what I did, so I don't repeat it, Thanks for everything you all have done for me, Rex
 
Relax, you didn't say anything wrong, it's just the way some of the treads go. People will be posting daily about the subject and then all of a sudden the thread dies. I guess it just gets to the point where all that can be said has been said. Please post pictures of the finished product. I think that we're all interested.

Doug Lester
 
Let's see what you got Rex?

Thanks Guys, I was starting worry, I never want to offend or otherwise hurt anyone even if it's unintentional. Like I was telling my wife yesterday, the majority of you guys have never met me in person and even the ones that have don't really know me as a person, if you did you would know that even if I did type something dumb and it came out wrong, knowing me you would know it wasn't intended to offend, hurt or defame anyone EVER! We are represented by the words we type, that is how we all, for the most part "get to know each other", I do my best to show myself as I am, I'm not the best typist, or writer, I do take too long to type a post, because of that. Sometimes I don't have time to proof a post, you can always tell when I don't!

I took a few pics last night of the progression, which hasn't been a lot, I wanted to get the majority of the parts/pieces together before I begin actual assembly. I've run into it before when certain parts that were planned had to be changed for one reason or another and that made other parts to have to changed. We've had a problem at home with sick kids that has taken a lot of my time and some of my help. But I did get started last night and I got one of the frames for the end forged into a ring, I plan on welding that to 2 pieces of mild flat sheet steel with a piece of (I think) 1.5x 1.5 square tubing, once I get the the floor figured out, I will get that completed in a couple of days, I'm not going to be rushing this build but I do plan on spending a lot of time on it this weekend. When this piece of pipe was cut an Oxy/Acteyl torch was used, and they don't make the staightest cuts. Also, we got most of the (cut) end grinding done, the other was the manufactured end that is good and straight and will be the working end. ''The Pup" did most of the grinding on it and I staightened it out the best I could. The ''ring frame" will be used on the ends so it can be positioned square and also give me an easier piece to weld.

Guy's DO KNOW, I AM NOT A WELDER!!! Making fun of my welds, while enjoyable, is an easy target, I flat out suck at welding, I do enjoy it, and I'm hoping that this project will help me get better! I don't care if you poke fun at my welding, but do offer so tips if you have any. I've considered adding Argon Gas to the welder, I don't think it will make me any better, but it is a Harbor Freight welder, I dont know if that has any bearing or not, I'm practically self taught.

Anyway, I took pics last night of all the parts layed out on the work bench, and the forge body, I've got some pics of the pipes P-taped and screwed together, the rest will have to be a trial and fit to get the angle of the burner where I want it. Pictures to follow tonight, I don't know if this will be tutorial worthy, I would rather call this a build-a-long, than a WIP. That way, those of you that have been helping can prevent some of my mistakes (hopfully) before I make it.

Another additon to the forge will be a pyrometer, I did some checking last night and found a couple of good candidates for one, I also found a tutorial on how to build one using a Type K thermocouple and a digital meter from Harbor Freight, the one used in the tutorial is called a 7-Function Multitester, list price for it is $9.99, it states that it can be found on sale at times for 4.99, the thermocouples can get found at www.artglass1.com for around 7 bucks. The Tutorial is written by Wallace Venable, he has a web site it is
[url]www.wallace-venable.name/Glass/Controller/20_Dollar_Pyrometer.pdf[/URL]he gives permission to use this for many things. I wish I would have found this a long time ago! I'll post back tonight with pics and progress,THANKS GUYS for everything! Rex

Ok Guys here's an update on the pyrometer info I found, tonight.
I've been checking on this pyrometer, and the best I can tell this multimeter doesn't exist anymore. This must be an old tutorial, as most of the links are broken or gone, the Art Glass link is good, also the thermocouples are $9, now. Still a pretty good deal. Here is the link for the thermocouple, http://sundanceglass.com/pyrometer.htm , I was looking at the site and they have real pyrometers already to go for $39, $49 and a combo Pyrometer and Multimeter for $59, may still build a pyrometer, but I will probably buy one of these just for the better accuracy, at 39 bucks, having a couple around the shop aint a bad idea. Sorry about the bad lead, Rex
 
Last edited:
Rex,
Just read through this tread and you have me wanting to build another forge, round this time. And now I have a few questions, hope you don’t mind?

Are you going to build vertical or horizontal?
Why one over the other?
It looks to me that Ed’s is vertical with the burner in the bottom, but in my pumpkin little mind, I was thinking about horizontal with the burner towards the back facing slightly forward to elongate the swilling flame for a more even heat.

So if this is the right thinking how far back?
Would also like it to be a pass through forge, is there any reason this would not be possible?

And Rex please do post pics of each step that you do.

Todd
 
I don't know about angling the burner forward. Both of my forges have the burners straight in and they swirle just fine. In my heat treating forge, which is about 16" deep, I have the burner mounter just aft of the midline. My pass-through forge, which is 7" deep, the burner is on the mid line. The reason that I built such a shallow pass-through forge is that I want to basically only heat the section of steel that I want to forge. This protects the rest of the billet from carbon loss and grain growth. I think that that is one of the reasons behind a verticle forge. It also keeps the work out of the main flare of burning fue and thus reduces hot spotsl.

Doug Lester
 
1st Pics of Blown Gas Forge Build...

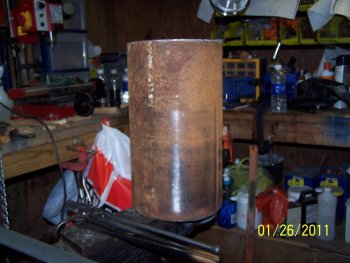
Gas blown Forge Build 1st pics 001.jpg

This is the 8" Pipe that will be the forge body, I've got a lot of clean-up to do on it, lots and lots more cleaning to do on it. I probably don't have to get it as clean as I will, but I plan on painting my new forge, just because. I guess that's a personal choice, it won't run any better, I guess I take a lot of pride in my work and I want it to show.


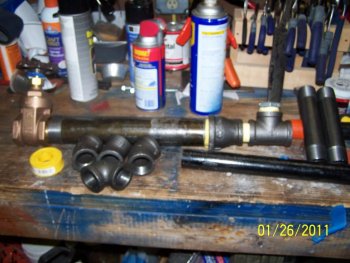
Gas blown Forge Build 1st pics 002.jpg

This is the blown gas assembly, you can see the 1 1/2 " Gate Valve, used to control the air flow, these are a little on the pricey side, I spent around $22 for it, the 2" was $33, so I did a quick redesign, I'm purposely building this as inexpensively as I can, so I will share the price of everything, and where the best place is to get certain items. The first place to start is the scrap yard, sometimes you might buy something that ends up being the wrong item for what your building, make a place for it, and every piece of scrap you have, you will use it one day. Next is the 1 1/2" pipe it may look long, but I plan on either mounting it through my work bench, or on the end, or later on building a rolling cart for it, I like the last option best because that way, when the temperature outside starts to warm up and it gets hot down this way, I have huge doors on my shop and with both open it creates a nice breezeway, on wheels I can take advantage of that. Next you can see a (I think it's called a, bell) reducer, to take it down to a 1" pipe, in between the reducer and the Tee is what's called a closed nipple,it's a section of pipe that is nothing but threads, about 2 maybe 3inches long, it's used to connect 2 pieces of pipe together, kind of like a connector, the next section is a Tee, this connects one pipe to another piece of the same size pipe with an open connector on the side, this is where I will attach my gas hose using a bushing. The size of the hole in the bushing is dependent on the size of your gas line coming in, the one on my old one is 1/4", some I've looked at so far have been 3/4" and a 5/8. It may look a little funny, that's because they didn't have a 1" X 1/4" bushing, but they did have a 1"X3/4" and a 3/4"X 1/4", I had to piece it together that way. It isn't the best way to do it, because I'll be creating another place for gas to leak from. If you can get the right one, it's best. Next I have another long piece of 1"pipe threaded, I left it like that and I also picked up several elbows in 45 degree and one in 90 degree. I was looking for a 30 degree that would make it a lot easier as I know my burner will be entering the forge at 30 degrees, but they don't carry that and to the guys knowledge, he said he didn't think they made one, so I have to work my way to it, I'll have to figure that one out. Also there is P-Tape, P is for propane, almost the same as Teflon tape but this is a lot thicker, this is the first line of getting (hopefully) a leak proof fit, it costs 3 x's what Teflon tape costs and what I recommend, there is also "pipe dope" that can be used, make sure you use the one for gas, I won't recommend using anything that isn't designed for use with gas. I got a few extra short sections of pipe that are threaded on both ends, these are normally called nipples, I think these are 6 or/and 8" nipples. The main reason why I got so many extra pieces is because I live to far away from town and they are closed on the weekends, also because I don't know for sure how I'll be attaching the burner to the forge.

Gas blown Forge Build 1st pics 003.jpg

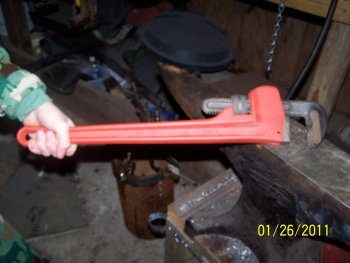
This last pic is a very important tool if your going to be using pipe for anything, some folks while say they can get it "just as tight with (insert dumb idea)" I guarantee they can't. Especially with the bigger pipe, it's difficult to screw it in by hand, always start the threads by hand, that should go with out saying but I'm not going to assume anything. Oh and I got this at Harbor Freight, it cost about a 1/3 of what one from anywhere else will cost. It has an aluminum handle with steel jaws, I originally got it because when I saw it, it is the one I will need to twist a Damascus billet with, after welding another bar on the jaw ends for a handle. It makes screwing the pipe in easy. I wouldn't want to do it without it. That's all for now, hope y'all enjoy! Rex
 

Todd here are the answers to your questions, if I missed something, ask again, I love learning new things myself am beginning to love teaching as well, as long as I'm comfortable with my knowledge of the topic, I'll give you and anyone else everything I can! So ask away, I never mind helping a fellow Bladesmith!

"Just read through this thread and you have me wanting to build another forge, round this time. And now I have a few questions, hope you don’t mind?"

Todd, and anyone else needing help, I will do my level best to answer any question you ever have, provided I know the answer, if I do I'll give you everything I have, if I don't, I'll tell you I don't know, there will be lots of opinions, if that is the case I'll say that as well. Time for the Disclaimer, 1st, I am passionate about what I do and I love to help anyone wanting it, if I can. That said, I tend to be long winded on my explanations, call it what you want to and I know there are some guys that hate to see a post as long as mine can be, but when I'm explaining something I take nothing for granted, I try to give as much information as possible to explain what I'm seeing in my head the way I understand it. 2nd I'm a NEWB myself, I've been making for around a year and a half, the people that like my work, are usually impressed with the fact that I've only be at this a short time, I owe most of that ability to this forum! But, I am NOT an expert, I will never claim to be one, I am wrong sometimes, if I doubt what I'm saying I'll usually tell you to check it to make sure or ask if others that know more than I do to chime in. If you or anyone else needs help, I'm an email away, if you need it faster PM me and I'll give you my phone number, my personal email addy is on here as well, so there are several ways to contact me. I'll try to answer some of your questions now, so here goes.

Vertical or horizontal, I like horizontal, only because that's what I'm used to, never used a vertical so I haven't got an opinion about it. I don't understand the benefits, what I do know is the horizontal works great already, I don't know what benefits that could do better than what I'm already getting, undersatnd I'm not saying the vertical is not a good design, there are enough of them in service by awesome makers, for them not to be.

Burner tilted forward, I don't think I will do that, mainly because I don't think it's needed, with adequate insulation and a 30 degree angle the burner should already have the swirl that improves the heated area, if I learn something different, I will change that, but until then I will just have the 30 degree angle.

Burner placement, I was planning on slightly back of center, that way you will be heating the main work area and keeping away from the cooler area in the front where the door is. Just my thinking, it could be that the entire forge gets to temp with no cold spots. That's why the round design is so great, (THANKS ED! Your web site has some wonderful info!)

Pass through hole, I'll wait to explain this with a drawing, it's not hard to understand, but expalining it would take a while. I do have a plan for that, that should be a nice feature. And no, I can't see any reason why this isn't possible, I've seen them on many forges, of course if the back is closed it would hold the heat better saving gas, but the size of the pieces you can work affects the size of your blades, so I think it's worth the extra effort to have a back door in it.

I will be taking lots of pics, this forge is basically a prototype. I'm not planning on getting into the forge building business, but I'm enjoying the process, I needed a break from knife making to take care of a few other things that needed to be tended to, after I get the forge done I'm going to begin work on a hydraulic press, I got plans from Bob Warner, they are 15 bucks (I think) and well worth it! You get an excellent detailed set of plans with the best explanations of everything involved, not overly technical and very easy to read. If I can understand it, most folk should be able to!

I'll get back to you with my drawings and plans for the forge build with explanations on how I intend to build everything, it should make everything much easier to understand. If I ever get this thing I've found for my computer, I don't know what it's called it's made by Wacom, it has a sensor pad where you can draw on it, it will help me be able to draw on my computer, and then have a digital copy that can be uploaded and sent.

I hope this helps you understand, at least the parts I could explain, once you see my drawings you'll understand more. Thanks for asking, I would like to say again that if anyone needs any help that I can provide ,I'm happy to do all I can! It makes me feel good to help others the same way others have helped me. Thanks, Rex
 
"a digital meter from Harbor Freight, the one used in the tutorial is called a 7-Function Multitester, list price for it is $9.99, it states that it can be found on sale at times for 4.99,"


I just got an email from harbor Freight, this multi tester is on sale http://www.harborfreight22.com/r2/r4.asp?r=14069_657447&i=Q31032C01H019&here here's is the link to the coupon.
It is on sale for 3.29, well worth the effort for a working pyrometer! You can make for around 10 bucks! WOW! Rex
 
Back
Top