An attempt at a Hamon

wmhammond

Well-Known Member
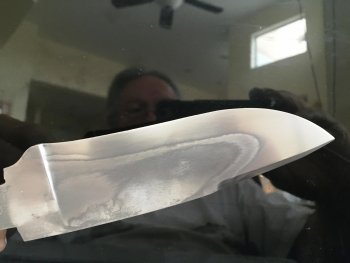
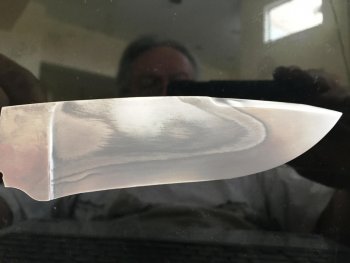
I would appreciate any comments. Here are pictures of both sides of a knife I am working on. This is a piece of W-2. To get it to this point I rough ground it to 100 grit, put on the heat resistant cement, quenched it for 2 seconds in a 205 brine solution and finished it in Canola oil, tempered 2 cycles of 450 for an hour and air cool, cleaned it up and finished ground it to 3000 grit, hand sanded 150 grit - 220 grit - 500 grit - 1000 grit, 15 minutes in heated vinegar and buffed with buffing compound. As you can see in the lower corner just next to the recasso the real bottom edge is just beginning to show. You can't see it in the picture but the entire real Hamon is just barely visible to the naked eye. I keep thinking that there is something I can do to bring out the real hamon line to look like it does by the recasso all the way around but I don't know what it is. I could sure use some help. Thanks,

Wallace
IMG_1355.jpgIMG_1356.jpg
 
You didn't sand through all the decarb first. That is the whitish looking film on the steel. Go back to 120g, and sand until you are on clean steel, then progress in the grits. You won't need to go to 3000g on the first few. Go to 1000g to 1500g, at most. Going finer is going to bring out more activity, if its there, but it takes a lot of practice to get all the elements to come together. I'm still not there yet myself. Sanding really cleanly at 1000g will look great, especially when etched well.
 
Yep. ^^^ I agree. And don't buff it either. That will wipe out a lot of the stuff you're trying to show.
 
also, curious why you would use a belt up to 3000 grit then start hand sanding at 150? Are you getting all the scratches out from previous belts with the 3000? If not, you're wasting a 3000 grit belt. And if you are, then you don't need to start sanding all the way back down to 150. If you had a true good 3000 grit belt finish, you should be able to start hand sanding at 1500. And if you did have a good 3000 grit belt finish, but start hand sanding at 150, you're also wasting that 3000 grit belt.

Did you mean 3000 grit? Or 300 grit? I suspect your just wasting your high grit fine belts.
 
Nothing I would add other than to support the statement, stay away from the buffer. Shorter etch cycles with a good cleaning in between. One minute in the vinegar clean, one minute in the vinegar.

Keep at it, they improve with practice.
 
OK, guys, here's the deal. I take it to 3000 grit on the grinder and I get about 75% - 80% of the blade to that level. Yes, there are still scratches from previous grits because I'm just not good enough on the grinder yet but doing it this way I don't have near as much to hand sand. I hand sand the whole blade but I only have to really work on the parts where the scratches are and it seem easier to me. Even though it looks like there is whitish spots on the blade I don't think that there is. I don't see how I could have failed to sand (grind) through the decarb because I only rough ground this blade to 100 grit so my cement would stick well. After heat treat I started at 220 on the grinder went to 400 then to 600 then to 800 then to 1200 then to 3000 then started hand sanding as described above. While it was in the etch I took it out about every 5 minutes or so and scrubbed on it with a paper towel wet with the vinegar. Now, after it came out of the etch I cleaned it up and then only buffed it with a facial pad from my wife and some buffing compound. Is the decarb you are talking about left over from the etch? Should I be hand sanding after it comes out of the etch? I really appreciate all the help, guys, thanks again.

Wallace
 
Just polish after etching don't sand or buff. Flitz or Simichrome will work. Use your fingers to polish with.

Taking quality pictures of knife blades is difficult, ones with hamons is even more so.
 
The only thing that I can add is to grind out the grinding marks from the previous grit before going onto the next grit. It's not a matter of being good at grinding it's staying with it until the job is done. There's no such thing as close enough. You also may not be changing your belts often enough. Treat them like they're free.

Doug
 
Here's the deal on my grinding. I'm trying to do a flat grind i.e. perfectly flat from the edge to the spine. What happens is that occasionally I get a slight tilt and I will place a line of fairly rough scratches right along the edge of the spine. because it got the by means of a tilt the next grit will not remove them unless I tilt again. At that point I am doing a convex grind which I don't want so what I do is continue on through the grits, keeping a flat grind on the entire surface except that bunch of scratches at the top near the edge. I'll take the blade to 1200 say on the grinder and then hand sand those scratches at the top. My problem with a flat grind is keeping the surface completely flat as I work my way down through the grits - I hope that makes sense.

Anyway, is there anything I can do to this knife to bring out the Hamon line that I can faintly see there? Is it really there and just not brought out or is it only barely there? Thanks for the help,

Wallace

yes, you can go back to 120 grit by hand, and sand to clean steel. Going up in grits on decarb is a waste of time, as it just seems to feel like it smears. Even 220g doesn't remove it very well. If there are any grinding scratches left on the steel, there is likely decarb on it. The decarb can be anywhere from a few thousandths of an inch to over 0.010" thick. It clogs paper and belts, taking longer to sand than clean steel. Trust me on this. Keep sanding until it's gone. The steel will reveal itself when you get through decarb. I can even see some pitting in the blade still on the one side. You have some elbow grease to app,y here.
 
Warren, you are the best to help me out and I really appreciate it. Just so I am clear, are you saying that the de carb is left over from the heat treat or from the etching? If it is from the heat treat it survived a full finish grind that started with 100 grit until until all of the black residue was gone and my flat grind was perfect. Then I progressed down through the grits 220, 400, 600, 800, 1200, & 3000 and then hand sanded and then buffed to a smooth similar-mirror finish. I'm so new to this that I would never dream that there could still be de carb on the knife after all that. If that is the case, how do you ever know when you have cleaned all the decarb from any heat treat process? Thanks again for all your help.

wallace
 
Wallace, I've copied your picture here and made some crude color coding lines with paintshop. Maybe some further explanation is required so we know just what we're looking at.


The areas circled with red, I'd say almost certainly are decarb. The location of them along with the description of your process makes sense too. They are in an area where you would try to stay away from with the belts and the small amount of hand sanding didn't remove it. It looks like kind of a 'flaky-frosty' type area. If the pictures are accurate, that would be decarb.

The blue areas circled, I'm not sure about. Maybe decarb? Maybe something else. Is there any oil, grease or relfections(other than of yourself ;) ) on the blade?

The two parallel green lines.....are they visible and on both sides of the blade equally? It looks like it to me. I'd have to say they are some sort of residual hardening line from your clay placement. Next time take a picture of your clay if you would before you heat and quench the blade. Maybe we could help you out there too.

The yellow line is what I see as the best part of your hamon. I think you said that too. It looks the most like a good defined line and it's apparently etched and polished decent. Can you see that line continue along the edge and wrap up around the tip? I'm unsure why we can't see that line continue. Is it because it's not etched and polished the same as the rest of it? Does it die out right there kind of where my yellow line does? Or is it just not showing up in the pics?

The answers to these questions can help us help you more. We need just a bit more info.
 
Also, to answer your question...decarb would be left over from the heat treating, not the etching. Another thing, and I hope you don't take this wrong as I'm really trying to help, your blade finish doesn't appear at all even or uniform. Maybe some of that is the pics. I know it's hard to get a good picture of a great blade finish the whole length of the blade. So maybe that's part of the issue.

Generally, here's what I do after heat treat:
Grind to finish thickness with a 120 grit belt. At this point the hamon should be clearly visible and distinctly defined along it's whole length in strong light.

Next, belt grind to 220
Belt grind to 400
Hand sand from ricasso to tip with 400
Hand sand at 45 degrees or so across my 400 lines with 600
Hand sand from ricasso to tip with 800
Hand sand at 45 degrees across my 800 lines with 1000
Hand sand from ricasso to tip with 1200
Hand sand from ricasso to tip with 1000

This will leave you with a very nice, VERY even (no scratches missed due to the alternating directions of sanding) finish that should require only a single 30 second etch in Ferric Chloride and a bit of polish with flitz to really make that hamon (at least the main line) unmistakeably visible. Further multiple etch/polish cycles will be required to make the most of the hamon and the fine activity therein.

I think you mentioned etching in vinegar? That's fine but will probably only be really beneficial if you have lot's of fine activity and want to bring it out in the later stages. You might try some quick dips in ferric chloride at first to really get a good look at just what you've got as far as hamon. It will also really highlight any decarb.
 
I just love you guys and I just love this site!!! Red line - I totally agree with you. Your assumptions about my grinding process about this area are accurate. Blue line- no oil or reflecTions - this area has a rougher feel to it than the rest of the blade - kinda feels a little "furry" or "fuzzy". I'm guessing it is de carb also. Green line - yes they are about the same on both sides of the blade and they. Follow the general lines of how I applied my clay. Yellow line - that line follows the line of the bottom of my clay. I cannot see it all the way around the tip but I can see it almost all the way to the tip. It extends about twice as long as the yellow line you drew and you are correct, it did polish out and the metal is very smooth to the touch all along the bottom of the blade. John, thanks so much, I really appreciate this.

wallace
 
You know, you guys, this thread has really opened my eyes. I thought I knew more about this than I really do. I have never given it one minutes thought that I might not be removing all the heat treat scale when I do my final grind. I have to rethink how much material I take off in my rough grind to be sure I have enough left to do the finish grind after heat treat - I've probably been taking off too much during rough grind and have been leaving scale on every knife I build in the upper corner next to the recasso because I am always careful not to grind all the way into the top line. Live and learn.

wallace
 
Okay...your reply tells me a lot. Yeah, I'd say the blue is also decarb then. Probably not as prominent because you ground a little more there with the belt.

The green lines are probably basically your main hamon then and the yellow is some secondary activity, which is why it doesn't go all the way around the tip. The geometry of your blade probably plays a role in that. Clay application is probably your biggest issue here with why this area looks the way it does.

I think you probably have your temperatures in the right ballpark. And the decarb area can be easily dealt with by leaving yourself more room near the top of your plunge line prior to heat treat. That way you have plenty of room to get rid of decarb without worrying about breaking the spine with your grinds.

Practice a little more on keeping your grinds flat (if you're not grinding on a glass platen, you REALLY ought to give that a whirl) and focus more on doing a more complete job with the 120 grit and 220 grit belts. Get those two grits down and nice and flat and all one single plane on your blade, and it's cake from there. Then just a quick pass or three with a good 400 grit belt per side and you can start hand sanding. I'd forget about those high grit belts for now. You'd be surprised how nice and flat of a finish you can get if you take some care at the 120-220 stage.

Then all that's left is the clay application to get some really good activity. You're almost there man. Not very far away at all from getting the results you're looking for. The issues you're having all are simple fixes.
 
Last edited:
I can't say much more then then the tips pointed out , the one thing that's very important is to stay away from the buffer , it closes the pore's of the blade and there go's your hamon you worked so hard to bring out.
 
John, thanks again.. I feel like I have learned a lot today. I like the idea of a glass platen - a where can I get one? Do they fit on top of the steel one that is already there or do they replace it?

wallace
 
Go to any glass shop, or in my case Ace Hardware and ask them to cut you a piece the same size as your steel platen. You'll want to make sure it's high temp fireplace glass. It should have an amber tint to it.

Then use JB Weld to stick it to your steel platen. Some guys 'break' or 'ease' the top and bottom corners and/or the edges but I don't. I did the first time but after that I let the back side of the belt do it over time. The belt will wear it eventually but WAY slower than the steel platen. You'll discover a whole new world of 'flat'. :)
 
How thick should the glass be and should I adjust the platen to accommodate the glass on the surface? Thanks,

wallace
 
Back
Top