An attempt at a Hamon

Wallace, glad you didn't take my comments as mean spirited. John answered all of your questions, so nothing more to add from me. :biggrin:
 
Wallace, you shouldn't have to adjust anything. Just put the glass on over the existing platen. I think the stuff I got was 3/16" thick. 1/4" would be okay too.
 
John & Warren: never worry about hurting my feelings. I'm 70 years old and I've heard it all. The important point is to let you guys know how much I appreciate all of your time that you guys spend helping me. The neuances of knife making are very subtle and learning to be good at it ain't easy. I'd be lost without this site and guys like you. Thanks again

wallace
 
keep the pictures you have of the blade, and compare them to what the blade looks like sanded to good steel. Once you do it a few times, you can tell right away when you have it where it needs to be. To me it looks like the effect when a windex streak clears when washing a window. Not the best analogy, but it goes from foggy looking to clear. The first time I sanded W2 through to good steel, I remember thinking "now I get it!"

I remember reading posts by guys like Nick Wheeler who discussed the process of learning hamons, who noted he remembered getting similar advice from Don Fogg, who was renowned for his hamon work. These guys including John and many others helped me, and being new at this all of my frustrations are fresh in my memory, and I create new frustrations all the time. I try to help with the things I have started getting a reasonable handle on, but am still quite new at this.
 
you got good advice. these things are an art, and they take some time. You are doing the right things. Personally, for me, after all of the grinding and hand sanding is done, then I get good results by etching in vinegar and using FF pumice on and below the hamon and 1500 or 1200 si carbide loose abrasive above the hamon (or sometimes Mother's Mag and Aluminum polish). Or both. Once you get good at it, you will have a number of resources to pull out and interact with each blade to play with the effects you want to enhance. It just takes time. You are well on your way.
kc
 
Sometimes taking off less steel is better . With too much grinding , you may remove some of the activity that you are seeking . Nothing worse than a hamon that is but a whispy line. Try polishing between the hardened edge and the side of blade (shinogi).

This offers a little better contrast than using single grit for the complete blade. Take off just enough but, not too much metal for increased activity. The Hamon and the shinogi should be cross- polished initially for some contrast also. It Takes a while to develop your own technique . good luck. Bubba
 

Attachments

  • New Wakizashi 040.JPG
    New Wakizashi 040.JPG
    105.3 KB · Views: 27
Sorry guys but I'm back on this again. I tried a new W-2 knife from scratch and the results were so close to the one I posted when I started this thread that I didn't bother to post new pictures. The problem still seems to be that I can't get through the scale after I heat treat. Here is what I did this time: This blade is W-2, as I said, from Aldo and it started out at .187" thick. I cut it out, profiled it and drilled it. I wanted to be sure that I left enough material on the knife pre heat treat so that I could really be sure I got all of the scale post treat. This is a flat grind hunter and I left at least .01" on the edge and only let the grind reach about half way up to the spine and stopped. I clayed it up and then heat treated it as I have described earlier. After heat treat it was pretty scaley but I took it back to the grinder and first flat ground the recasso on both sides and then I began to finish the blade grind. I took it all the way up to just short of the spine using 80, 220, 600, 800, 1200, 2500 and cork. Then hand sanded with 500 and 1000. Then 30 seconds in Ferric and hand rubbed with fltz. I got the same look I got last time and it still looks like I didn't grind or sand all the way through the scale up close to the spine. I guess my confusion is I don't want my plunge line to reach all the way to the top of the spine so I grind much less there and more lower on the blade closer to the edge. How do you get through the scale at the top of the blade near the spine?

Wallace
 
Hey Wallace. Good for you for not giving up! I think you improved for sure. Your main line is much more distinct and looks more like I would expect it should. It does look like there's still something not right in that one area near the top of the plunge line and on the ricasso.

A couple thoughts, just for trouble shooting:

1. Are you sure your blades are REALLY clean before etching? I don't even use acetone or denatured alcohol anymore. All I use is dish soap as a cleaner/degreaser and baking soda as a mild abrasive to clean my blades prior to etching. I know for 100% certain that those two things will rinse completely away in hot water. Acetone/alcohol/ammonia....I'm not so sure about anymore. I've had great luck with just dish soap and baking soda.

2. Are you sure it's not something that will even out or disappear with a little bit more polishing with flitz?

3. Starting to wonder about your heat source and the control. What are you using again and are you sure your temps are accurate? The reason I ask is that area where we are looking at SHOULD be underneath the clay. And while I have had decarb form under the clay (which surprised me since I thought the clay would totally shield the blade from the forge atmosphere), it has always been a VERY thin little skin because the clay does indeed help protect the steel underneath.

4. Are you coating the spine of the blades too or just the upper part of the blade bevels. I coat the spine, upper bevels and ricasso area with clay.

Do you have a forge? I'd try using a forge if you're using an oven currently.

Again, just helping to trouble shoot.

PM me for my phone number if you ever want to talk any of this over in person. I want to help you get this figured out.

If it really is decarb, then the solution is just more grinding. But from what I'm reading about your post HT grinding, it sure seems like you'd be getting it taken care of.
 
Wallace, looking much better! I think you are doing great.

I think you should abandon the grits above 220 on the grinder, and do the sanding by hand.

A shorter soak can help. I do a normalization, and thermal cycles to set the steel up. With Aldo's W2, a short soak for austentizing is all that is needed, after setting the steel up with the cycling. I have played with 3-6 minutes, with smaller knives getting the shorter soak. Longer soaks and higher temps really wash the activity out.

I agree with John, I only use dish soap to wash before etching. I buy name brand dawn. It works well for me.

Definitely on the right track! Keep it up.
 
Thanks, Warren. I'm posting this knife this morning (momentarily) so you can see the finished product. Still trying.

Wallace
 
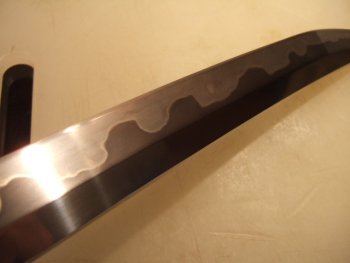
Anyway, is there anything I can do to this knife to bring out the Hamon line that I can faintly see there? Is it really there and just not brought out or is it only barely there? Thanks for the help,

Wallace

Wallace you're going through the same thing I went through several years ago. I contacted
Don Hanson III, I'll never forget his quote, "Aint Hamons FUN!". As far as getting this hamon back, I think there is a chance, but the problem or reason why its so faint is because of the buffer! Buffing laps the steel, it actually moves the cleaner steel below over the darker steel on the surface, buffing will actually cover up a Hamon. To save this one and all of your future hamons, start embracing the hand sanding!!! I sucked at the grinder for a long time,(until I got my Bubble.Jig!). I figured out that I could finish more knives the quicker if I got it off and away from the grinder!
Also, you really don't have to go that high of a grit, I generally stop at around 320, and my clay sticks fine. I usually will clay a knife up and let it sit until the next day, so its good and dry. Sometimes, I will use my forge to dry it quicker, or my heat gun, I just started trying the heat gun, it worked pretty well.
To save this on AND to get your grinds flat, I use a piece of steel, its flat, and start around 150-g, take it up to around 320-400'ish. Then do your etching again, if its not where you want it, repeat!!!
Hand-sanding is the most important part of getting a finish right! Its a part of knife-making that tends to be the least favorite part of the process, I hated it, until I realized that it was such a very important part of making a knife,and make it the way I wanted it to look.
I'll add that, once my blades are done they are so smooth they feel soft, I know that sounds weird, but it's the best way to explain it, and it's what my wife said when she felt one that I got a really sweet hamon on!

OK, on my table/laptop and I can type a little better now. Keep a few things in mind a hamon is only the visible line between the harder edge and the softer spine, when its been Heat Treated, with Satanite, or furnace cement or what ever, that hamon is there, you can sand it out, you will not be able to see it, but it's still there! During use, if you were to use it on acidic fruit, it could change your hamon a little.

Another thing you said, you're using W-2 steel, Don Hanson id he HT's that at 1450,( he also said to expect the Metallurgy guys to object, but I think he know what he's doing!) then, (PLEASE KEEP IN MIND i'M DOING THIS FROM MEMORY,AN MY MEMORY IS BAD!!!!) Into the oven at 400 degrees for 2 hours, 2 times, allowing it to cool in between cycles, then its on to the HANDSANDING!!!! I'll explain more about how I was taught to do it if you'd like. But ya gotta tell me you want it, because itsa long dran out process...well, not really all that long, just tedious, time consuming, but the rush you'll get when that hamon starts to peak through...., there is nothing like it!!!
Hope this helps, Rex
 
Last edited:
McClellan, thanks for the advice. I'm looking forward to the rest of it. I finished this knife and couldn't get the Hamon to show up so I just put a Satin finish on it. I just posted it a minute ago - see what you think. Thanks again

Wallace
 
Looking forward to seeing it, but I have 1 question,
after you put the satin finish on it, did you think to etch it, just to see? Most of my Hamons when I'm successful, will show up immediatly, not that it will look like a finished, polished hamon, but I will be able to see that there is something there.
When I get home tonight, after work and after workinh in the shop, I'll be happy to tell you exactly how I go about it. Remember, this 2 things Hamons HATE!!! Is Manganese and HEAT! High heat to be specific, I learned that from Bubba-san, he was a big help in helping me go past just a wavy line, now my hamons are all over the place, but off the edge.
See if you can zoom into my avatar, that one turned out SICK!!!!! The way I've learned to do it, is so simple, so easy, and most importantly is "usually successful", I say it like that, because ulimatley its the steel the determines how a hamon turns out some steel is better at it than others! I'll finish tonight, Im at work right now, when I get home, I've. got a few things to work on in thw shop and then I should be back inside no later than 10:00.....hopefully!
Thanks, Rex
 
IMG_1412.jpgIMG_1416.jpgIMG_1423.jpgIMG_1425.jpgIMG_1427.jpgRex,

Thank you so much. I posted the knife and, no, I didn't etch it after putting the satin finish on it.

I'm thinking that the problem is my Rube Goldberg heat treat system. Here is what I do:(See the photos above) I clamp the end of the handle of the knife with a long pair of vice grips and extend it over a 1' X 1' X 1/2" soldering pad. Then I build a small temporary forge with 2" wide strips of 1/2" soldering pads so at this point the knife is surrounded on the bottom and both sides with soldering pads. Then I begin to heat the handle portion of the knife with an Oxy-Acetylene (B-Tank) torch with a hot flame. As the handle begins to heat up I cover that portion of the knife with a 2' length of soldering pad and begin heating the Recasso area and the rear portion of the blade. As that area begins to turn red/orange I cover it with another length of soldering pad so that I am actually building a small, tightly enclosed Forge specially for this knife. By covering the top of each section it holds the heat and allows me to heat the entire knife. By the time the entire knife is covered with a top the color inside the forge is very consistent and I can test the front of the knife for magnetic very easily. One problem is that the handle end of the knife has been at (or above critical temp) for a longer period of time than the point. I've never tested hardness using this method but all my knives will skate a file and you sure can't drill them after heat treat. Do you think that I can get a consistent Hamon using this method?

As to clay. I coat the blade and the Recasso but not the top of the spine about 1/16' to 1/8" thick all over the covered area. When I heat the blade I do notice that the very edge of the clay ever so slightly begins to separate from the blade. Also, when I quench the clay seems to release from the surface of the knife very quickly - it has never stayed on during the entire quench. The knife is always black and it seems that the clayed up portion of the blade is blacker than the un-clayed portion. My temps are only a guess - at best, because of my method. I know when the knife becomes non-magnetic but I don't know how hot it gets after that. I do have a two burner Propane forge but I have never set it up because my method seems to work OK in a one off situation. No, I don't have an oven.

Thans again for your help.

Wallace
 
Last edited:
Wallace,
with several OTHER steels this would WORK!!! But with W2, it requires a specific heat treating, KNOWING exactly what the temp is, especially when you are ready to quench it. Now the steels that would work for this set-up, would be 1084 and probably CruForgeV. From what I've heard the CruForge is supposed to be easy to HT, basically get it hot and quench it. BUT! A Hamon is highly doubtful with it, too much Manganese, I think. I haven't tried to get a Hamon on it as of yet, since I've only made one knife with that steel, and it is basically a test knife, because I don't know the steel very well. It's supposed to be a high performing steel, great edge retention and extreme toughness. So, given the set-up you have, using 1084fg, I think you can get a Hamon, as long as its not too thick, and you can get the ENTIRE BLADE heated through out, that means inside all the way through the blade.

Get some 1084fg from Aldo, and I think I can get you going in the right direction, even with the set up you have.
There are a few more steels that will work, but for the best bet & cost, 1084fg from The New Jersey Steel Baron is the way to go! I'd suggest getting it in a thinner stock, just to be on the safe side. After you get the thinner stock figured out, then you maybe able to move onto the thicker stock, there is a way to do that, matter of a fact you can probably do it now, I just remembered another way to HT with a torch, that doesn't require using clay. You prolly should use the clay, for your first, you know walk before you run!

Also, there have been a lot of knives HT'd with a Oxy/Act, the main one that comes to mind right away is 5160, but a Hamon won't happen with it, if you edge quenched it, it would kinda look like a Hamon, but not a true Hamon.

Get some of Aldo's 1084fg, it doesn't cost much, and it's GREAT STEEL!
Rex
BTW, my Hamon polishing method is pretty cheap, pretty simple, the ONLY thing it requires is A LOT OF RUBBING!!!!
 
You might also want to consider some of Aldo's 1075. I've tried a hamon with the 1084 which is actually not quite 1085 as it has some chromium in it. I did get some hamon activity but it was restricted to the ricasso area though it might be because I didn't clay it up right.

Doug
 
Just a thought. What quality of water are you using? Is it very hard water that could leave a deposit on the steel? Is it reverse osmosis or deionized water that has no mineral residue in it but will etch metal if it contacts it for too long? Just trying to think outside of the box.

Grizzly Bear
 
Wallace,
A couple more things I noticed after re-reading this post, you say that you dont cover the top of the spine with clay, that is the main area that the clay should be ! I will start my claying by loading the spine and letting the excess drip, or slide down the blade. Keep in mind you only want to coat the top 1/3 of the blade, and if its blade that's not very wide, even less than that, Ive been meaning to figure out a rule,( of thumbs for lack of better terms), or formula that will estimate the distance the hamon will extend passes the end of the clay. In my experience, it will generally be between a 1/4 to a 1/2 inch passed the end of the clay, and if you dont have your temps dialed in even further! At one time, it was giving me fits, with the Hamon going so close to the edge of the blade! That is not acceptable, for many reasons, other than asthetics! To me, these knives are heirloom quality, that means they will be around for a while, if the owner sharpens it regularly, there is the chance they will sharpen passed the hamon line, which means they will be in the softer steel, instead of the hardened area.
The 2nd thing I saw, you said you start heating at the handle (TANG). I don't think that is necessary, you want the tang to be soft, steel that isn't hardened will be less brittle, tougher, bendable to a degree, which means if the user is abusing it, it WONT BREAK! Now thats the way I understand it, if anyone sees anything wrong with my thinking, please speak up. I'm no expert at this, but Hamons, I've got some experience with, since Ive clayed EVERY knife I've made.

So when you when you start heating your blade up with your torch, hold it with vise grips, pliers, tongs, whatever you have, start heating the thickest area of the blade first, (which should be the Ricasso) since it will be the hardest to get up to temp., once you see the color climbing up the blade, move your torch to the next section, keep in mind that the area you've already heated will still need some attention, the goal is to get the entire BLADE up to temp, also you will need to get you a good MAGNET! Not from your wife's collection of fruit mmagnets, off the fridge in the kitchen! If you've got a Harbor Freight, they sell several different types, dont get the most expensive or the strongest, you want one that will be easy to hang from a wire, a string might work, but being close to the high heat, I doubt a string will last, and it will probably fail! Are you familiar with heating a blade to non-magnetic? Its quite simple, once a certain type of steel reaches it's critical temp, it looses it magnetism, which fortunatley for us is the temp that you want to quench your blade at. Now, I read that you use an oil, and then a brine? The objective is to cool the steel as fast as possible without hearing (and feeling) that sickening "PING!",
sound, thats when you learn 2 things, 1. You will never forget that sound, 2., how to make 1 blade blank into 12 shards of useless steel! I say 12, because thats how many my first shattered into!
And I'll never forget it! I felt it when it happened, then the sickening feeling sets in! And I know that I dont know enough to use water!
If you have Canola Oil, that will work fine, I used it for around a year, until we made freinds with our buddy at Maxim Oil. He made a fast quench formula for us, and made it affordable, well the cheapest I've seen. And its a GREAT QUENCH OIL! For ths price, they also have another kind, I cant recall the name of it.
Next, I will go over the quenching, its nothing major, just one thing to avoid, and a couple things to do that should increase your chances of success! LET ME KNOW IF YOU UNDERSTAND HOW TO USE A MAGNET!
Hope all of this helps you, I still consider myself a newby, even though Ive been making knives for quite a while now. This phone it terrible for me to post with, but I LOVE HELPING NEWB'S!!! So I perservere!
Oh yeah, I'm Rex, nice to meet you!
 
Last edited:
Back
Top