Any advjce on building an etcher

Correct, incorrect, I dunno.

Not how I do it, but I practiced a lot to come up with what works for me !

I made a small pad out of brass with a g11 handle, and put a felt pad around that.
I have my stencils made large enough that I can set the pad down, off of the openings, and slide it across to the other side of my logo.

I do this a dozen times, shoot it with windex for a little rub on my way to the sink, where I sprinkle some Arm & Hammer on it for a scrub and a rinse.

Works for me, but you gotta figure out what works for you.

I'm afraid that 5 seconds with my system would be disastrous !

I tried a Q-tip yesterday, and hardly got a mark...
 
I was using an off brand Q-tip for a pad it must have been synthetic because it did not burn or turn black maybe a light gray at most. I have not tried to etch the D2 yet I have 5 blades drawn out on D2 and will start profiling them shortly. I will practice on some scrap before I try it on a finished blade. Fellhoelter you say "swipes" are you just using a pad with electrolyte and rubbing across the stencil. What I'm doing is dapping my q-tip in one spot counting to 5 picking up my q-tip and moving to another spot and repeating untill I have covered the whole stencil. am I doing this incorrect.

No That's pretty much how you do it. Just take your time and dont over heat the stencil and you'll be fine.
I would never swipe a stencil, you could mess up a detailed stencil by doing that.
 
I would never swipe a stencil, you could mess up a detailed stencil by doing that.
Hmmm... I never even thought about that...

These stencils I get from TUS are pretty darn tough though, and all mine are just text.

Maybe I'll try my bigger pad on the next knife and just dab it.
 
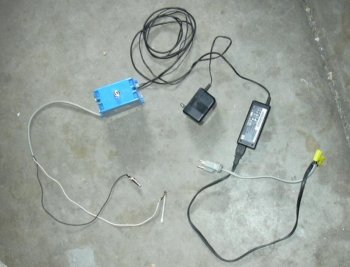
My new etching machine cost about 0 dollars and 0 cents before upgrades. It consists of 2 old transformers (a 12vdc and a 12vac, both were chargers for devices that have been discarded), four paper clips, and some q-tips. I am waiting for my stencils but tried an etch with a very crude home-made stencil and the "machine" works fine. I'm going to splurge 5 or 6 dollars to upgrade my paper clips to alligator clips, and maybe put a switch and a fuse on it just to make it look more complicated than it really is.
 
I would never swipe a stencil, you could mess up a detailed stencil by doing that.
Ok, I did some extensive experimentation today.
About 30 marks.

For me, with my setup and stencils, swiping is THE way.

I tried on carbon steel (D2), CPM154, and Titanium.

Tried Q-Tips, my small pad, and a larger pad that covers my whole mark.

Tried dabbing each letter with a Q-tip, and swiping.

Tried dabbing sections with my small pad, and swiping.

Tried dabbing with my large pad.

Tried different electrolytes with all methods.

What works for me, in my shop, is swiping with the small pad.

Counting these marks, this stencil is well over 60 marks in, and my logo looks like it was done with a laser.
And, the stencil looks like new.

For $5 an opening on the sheets I buy, I'm good with that...

Come look in Vegas if anyone will be at the show.
 
My new etching machine cost about 0 dollars and 0 cents before upgrades. It consists of 2 old transformers (a 12vdc and a 12vac, both were chargers for devices that have been discarded), four paper clips, and some q-tips. I am waiting for my stencils but tried an etch with a very crude home-made stencil and the "machine" works fine. I'm going to splurge 5 or 6 dollars to upgrade my paper clips to alligator clips, and maybe put a switch and a fuse on it just to make it look more complicated than it really is.

Could you show some pics of this please.
 
I will try to get a pic of it tonight but there isn't much to see. Basically a plug-in transformer with an alligator clip on the end of each lead. One clips to the blade, the other clips to the end of the q-tip. A little salt water has worked so far an an etchant.
You need a DC transformer to make the impression and a seperate AC one if you want to blacken it.

I have tried transformers of different voltages, it works with as little as 9v 200mA but I am getting the best impressions using an 18v 3A, although I have to use faster taps with this one to keep the stencil from heating up.

DISCLAIMER-
I cannot attest to the safety of doing this kind of "off the cuff" electrical improvisation. I am not an electrician. This is obviously done at one's own risk, use extreme caution if you decide to do this. If you are not familiar and/or comfortable working with electricity I don't suggest learning with this type of project.
 
Sorry it took so long to get a pic, I was frantically trying to finish a knife for a customer who happened to be in town for the weekend. I used the etcher yesterday as you see it in the pic, with an 18VDC 3A transformer from a laptop computer to etch and a 12VAC 1000mA transformer from some unknown device to blacken. It worked great but with the 18V transformer the taps have to be a second or two at most or it will heat up the stencil. I used vinegar mixed with salt for an etchant and the marks were deep enough to look like they were stamped.
I wired the transformers into a DPDT switch in the blue box so I can just plug in both transformers and use the switch to go from DC to AC. The 18V transformer was missing its plug which is why there are wire nuts and a different color end on the cord.
The positive leads should go to the clip that you clip to the blade. The nuetral leads go to the clip that attatches to the Q-tip. If the clip on the Q-tip starts to etch instead of the blade, you have it backwards.

marking etcher.jpg
 
i used a battary charger, it works the same as a etcheing machene change the wires around connect etcheing pad to positve wire uply electrolite fluid then etch
on moveing to newzeald canot optain electrolite fluid so changed to photo etching
hope what i said helps
 
Back
Top