Box full of little 5160 plugs... What to do with it?

I can't quit staring at this picture... That looks awesome Randy! I don't wanna jinx anything thing at this point, but I'm glad you didn't give up on the welding.

attachment.php
 
I just showed this to my dad and his first impression was that it looks like a diamondback rattle snake... Just a thought, unless you have already settled in on 'spotted fever'...
 
Brad, Ya know thats even a cooler name for it. and If I tighten up the pattern a little on the next one.. It will really look like a diamond back! :) 
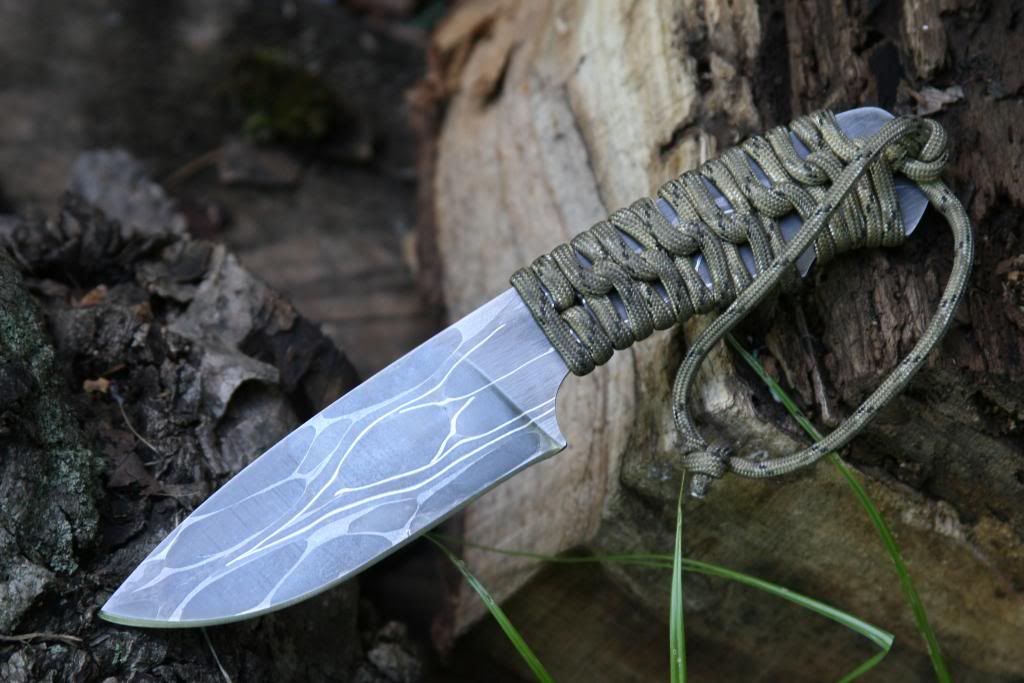
Tell your day I said hello and "Good Call"

I guess no matter what we call it. Its gona be pretty darn awesome! :) Im thinking Ill add a Tape handle to it and a good edge and do some testing with it. just to make sure! :) If it passes the test, I may raffle it off or something like that here on KD! :)
 
OK so I ground the blade yesterday. I went with a drop point style blade we call a Red Hawk! and I did full flat grinds. a quick dip in the enchant and took some pics.. It looks very unique! :)

Now dont get to excited. Its still gota make it through HT and testing.. But it looks like I got its welded pretty solid..

Spotted Fever sounds better the Chicken Pox ( sry Boss) so thats what we will call it for now! :) I dont think I could duplicate it again..

Thanks for looking and Happy Fathers Day to all you Dads!
Randy


Randy,
Thanks for posting this, that is freakin AWESOME!!!!
I have a couple of questions about forge welding or pattern welding in a can, do you use square tubing that you've welded a top and bottom onto after you have filled with the steel you plan to use? Is the tubing thin walled, or thicker, and lastly, is a press required for forging in a can? I just got a Tire hammer and experimenting with Damascus is on my agenda. But the can welding looks like it could be a hoot, and with this dream blade you've made here, it really has me wanting to pull something out of my ....err, brain, similar, not looking like it similar, innovative like it similar! Super duper nice work, Rex
 
Rex, Im new to this can damascus and this actually was one of our first attempts.. The "can" I used for this was about 3X3X5 and it was thin walled structural steel. and had to be ground away after setting the initial welds. I used a press to work the can and then again after the can was removed to forge out the block into a billet..

Your right its a blast!! and were in process on a few other can billets.. that will be different yet awesome.. Lots of fun..
If you have any other questions feel free to PM me, Ill try and help if I can.

Randy
 
Dang... I saw that you were the last one to update this thread and was hoping there were some picture/updates... LOL
 
Well Guys, I finally had a chance to clean up this blade and add a edge so I could test it out..
Testingtheblade018.jpg


After HT there were some obvious delams.. One down by the cutting edge and some near the spine. I tried to get a pic of it.. But its hard to see with the camera.. But it was easy to see that on the cutting edge there was a small crack, where the materials were not welded..
Testingtheblade025.jpg
Testingtheblade033.jpg


First Jr trimmed a tall pricker bush! :)
Testingtheblade037.jpg


Then to the real test, A 2X4
Testingtheblade059.jpg
Testingtheblade066.jpg


After chopping for a minute.. Mind ya, this blade is not designed to be a chopper so it was slow going but it did throw some chips!! :)
Testingtheblade090.jpg


After about half way through the blade showed signs that the areas I was concerned about were starting to separate more.. yet we continued the test.
Testingtheblade098.jpg


Almost through. and the blade failed.
Testingtheblade123.jpg

Testingtheblade124.jpg
Testingtheblade125.jpg


He finished the job with the broken blade. it was only 2 hits away from being through..
Testingtheblade131.jpg

Testingtheblade133.jpg


Then he did a edge test, well on some of the edge that was left intact anyways.. :) and it was still poppin hair like crazy!
Testingtheblade142.jpg


First I want to say thanks again to Brad for sending the plugs and letting us have some fun and experiment on this.. I will continue to try new stuff This time was not successful in some ways, yet was very successful in others.. I learned a little about pattern development and material colors etc. And to be honest. Im glad we tested it to destruction. :)

I was tempted to put it in a glass case with some other knives in my youngest son Hunter and my collection.. But just couldnt bring myself to do it..

God Bless
Randy
 
The knife came out looking great, and I agree, even ruined blades can be a success when you learn from them.

Maybe it needs to go in a glass case that says "This is why we dont weld 5160"... LOL
 
Randy
Great looking steel! Love the pattern.
I remember being told once when I started using my press to make cable damascus that billets with lots of small pieces benifited greatly from the harmonics of a power hammer. Not having one, I havnt tried it. If you have access to a power hammer, one cycle on the hammer while still in the can may help. Dont know what it would do distortion wise to the pattern though. Just a thought.

Keep us posted, this is some awsome steel!!

God Bless
Mike
 
Randy,

I've broke a bunch of blades, none of them broke with such STYLE though :)

Cool work
Cool thread
Cool steel
Cool blade
Cool test
Cool break

Thanks for sharing with us. Here's a little quote from the inventor of the lightbulb-

“We now know a thousand ways not to build a light bulb” - Thomas Edison

-Josh
 
Although I wish it would of worked out better. Im happy and learned a little about this new style of welding.. Next one may be better..

Thanks for the comments on the knife and for all the continued support.. You Dogs ROCK!!!
 
Boy, what a bummer!! That was a great looking knife. Too bad that one area didn't want to stick. Oh well, nothing ventured, nothing gained as they say.

Doug
 
Randy, Randy Jr,

DO IT AGAIN!!! PLEASE, that is the most innovative pattern I've seen in a very LONG time, PLUS, with using the plugs, y'all are using "enviromentally sound'' practices, these plugs could have ended up in the dump! Never know these days, while I'm sure they will keep them until they have a ton or so and then take them to salvage, people these days aint always the brightest bulb in the hallway!

But seriously, try this pattern again, and do tighten it up, it will be awesome! Rattlesnake Damascus!!!! Thanks Bud, I'll be getting started on my first Damascus billet this week or this weekend, I'll start preparing it tonight, then when I have plenty of time, it's on! Thanks for everything, Rex
 
I noticed that Alabama Damascus uses 5160 in their mix... I wonder what their trick is to make it stick???
 
Thats a good question . I dont know The guys from Alabama Damascus. Maybe one of you guys that does know him, can ask him what steel he faces the 5160 with in his stack. If you do please post the info on here for us.. So I can try this again!
 
Back
Top