Finally, Perfect flat grinds

No matter what it is, if it works for you it's great !!! After trying an idea or two with a similar idea of tilting the blade holding fixture instead of the table, I found there was several shortfalls in the set ups I TRIED.
1/ Having to change the blade from side to side and trying to get the same position each time does not work well even with making positions and taking measurements. Trying to readjust it as you go doesn't work well either.
2/ Having to move a big a fixture across the work table makes it hard to control.
3/ You still have to use the water pail to cool the blade on hardened blades as you go. A large fixture doesn't make that easy to do and the water is going to work on the fixture in several ways one is on the leather jaws.
4/ If you grind your blades with the metal soft you are going to have to change the blade over a minimum of four times from side to side
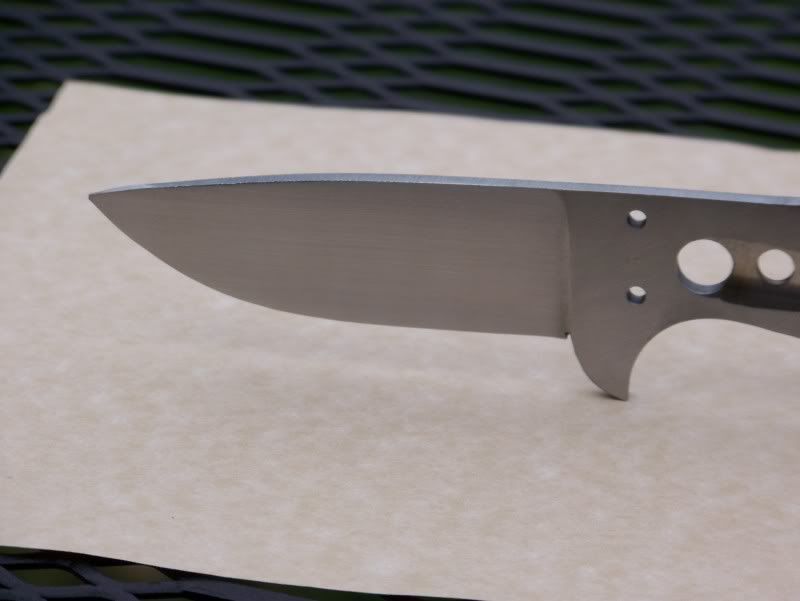
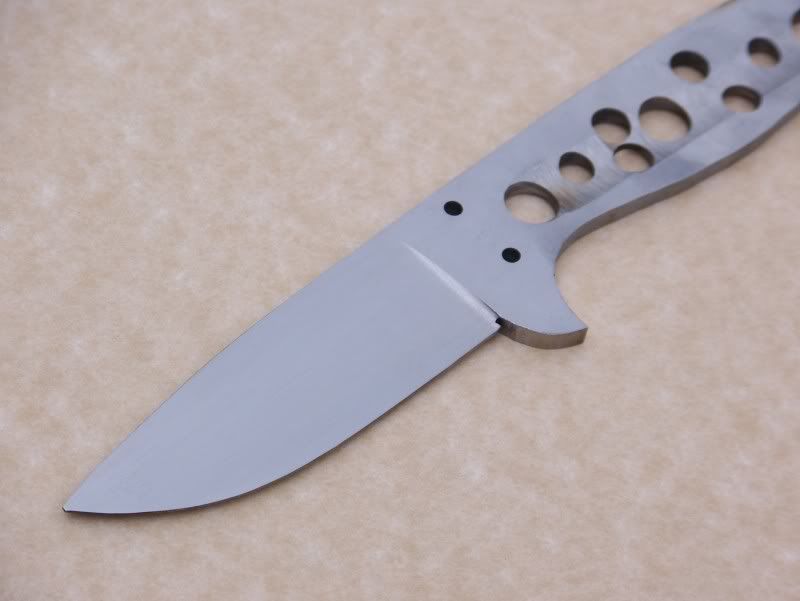
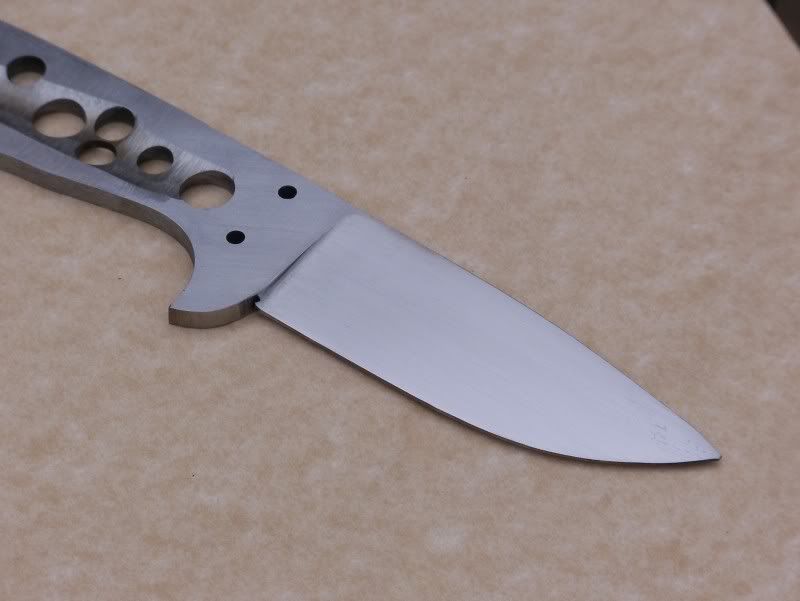
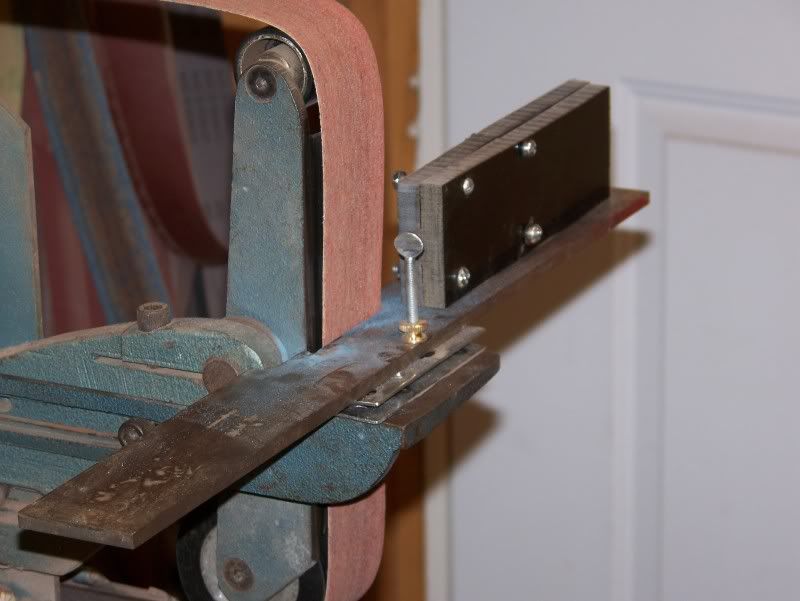
Of course I'm recommending a tilting table which just needs a one bolt (screw?) attatchment to your grinder and then the knife holding micarta blocks as I showed in the thread on jigs. You tilt the table as you find necessary for grinding the first side and no further adjustment is needed for the other side. Once the blade is positioned in the blocks which are not effected by water and hold the blade securely you do not have to change the blade from one side to the other, but of course you must position it back in the micarta holding blocks if you grind your blades before heat treating and you want to do more machine grinding.
Perhaps the simplicity of what I'm recommending seems just that. It's too simple to work. Well it works so very well and you can of course use it for hollow grinding or flat grinding. I don't think it's worth trying for convex grinding.
I'm not selling any part of this and am showing it for the first time in the Knifedogs forum.
I'm just offering another idea after trying and seeing several others.
 
Frank, Then how do you make fine adjustments with a tilting table ??? What if you want the grind a little deeper or not quit so deep??
 
It continues to be as simple as the fixture that holds your blade. I simply tilt the table a bit more up or down of course but in truth the table weight, if you don't back off the one screw where the connection is to your machine, will allow you to make a fine adjustment. And of course when you are set for one side you are set for both sides. Sure you still have to allow for using the finer belts.
As well the way to proceed is to grind the one side with the coursest belt, then do the same to the other side, then go to the next size of belt you would use on each side , and so forth. Doing all the grinding from course to fine on one side and then doing the other side the same way, does not work out well. Remember no matter what angle is wanted, you can still grind right through from one side to the other. So you must decide how much is going to be removed. Frank
 
Heck all I did was Set my angle, Grind with my course belt and then switch belts, grind with the finer belt. Then I put back in my course belt, Switced the blade around and then ground, switched belts and ground then I was done!!
 
Good for you Ernie !!! And I say to you if that works for you stay with it and of course pass along your remarks. That's all I'm doing, but I have tried a blade holder like yours and after giving it a good length of time trying it on several blade shapes for me it wasn't going to do a good enough job. In the end after a lot of trys at several ideas this one which is the simplest of all works great for doing quality work on drop points, spear points, skinner tyypes , boots asnd yes even Persians. Frank
 
Frank, I haven't used fixtures before, but after seeing yours and it looks the easyest to make I'v just about have it done today and may get to try it tomorrow.
 
I was always told it's not a good idea to grind all one side before going to the next. Those are the blades that will warp to beat heck. Best to take a little off each side as you go.
 
Ernie - Cliff has a good point. While that has never happened to me with 01, it has happened to me with 440C - even when plate quenching. I had four blades move halfway down the blade 1/4"- ruined them! After some good advice from some sage makers, I have changed my grinding sequence and have avoided that catastrophe. If you are using a steel that you can ramp up slowly or soak at a lower temp or "normalize" some way, you may not have a problem.
 
Yesterday a built a flat grinding fixture like Franks, and this is the first knife off the fixture. All three pictures are the same knife. I only took them to 220 grit and then hand sanded. I had trouble keeping the top flat stright like I wanted, so I ended taking the flat grind to the top of the blade. This is all new to me so in a week or two when I get some more free time I'll try another. And Frank I didn't take your advice I used ATS34, I didn't have any mild steel this size.
100_1205.jpg

100_1206.jpg

100_1207.jpg
 
Wow Art that looks good. I may have to make a fixture like Franks. Right now I'm using 1" angle iron clamped to my tool rest. The results are better than free hand but not as good as they should be. Do you have pics of your version of Franks grinding fixture? I still can't get my head wrapped around how the guide rods work.
 
They lost me on the guide rod . The fixture isn't much, I'll take pictures in the morning and post them. I'v doing free hand and it's getting harder for me to do not as steady as I once was.

PS: The guide rods are used to stop the grind up the blade so you have a flat at the top of the blade. Is what I get but don't see how they work, but I need them because I had to take the grind to the top of the blade.
 
Last edited:
Super job first time out ARTinNC !!!!
People . Sure wish I could do more or better pictures. I will try to explain again. First the blades top eedge or spine should already be complete, or very near exccept maybe for had finishing. When you place the blade in the fixture there should be a spacer at the back the same thickness as is the width where the blade makes contact at the front of the fixture or close to it. If the blade is the same width all the way on the handle, no spacer is needed. Now for the rod. Once the blade is installed and the screws are tightened slide the rod into the holder (fixture). You can now use the rod to give you an idea of where the top of the grind will be on the blade. Remove the rod and do your thing. The fixture should always be held flat on the table and your guide lines to follow are the ones you placed on the edge of the blade for blade edge thickness.
Art, if it helps you improve your work , super. It isn't a milling machine, surface grinder, or another very usefull but expensive power machine but it sure can help your work to pop !!! Frank

Frank, At my age I'm not going out a buy any expensive power machines. I'v only ground two flat grindes in my life and the one I just did is the third. I'v been making knives since 1987 and have all been hollow grinds. Just thought it would be nice to do some flat grinds.
Thanks much.
 
Art.
I'm very pleased it's working for you. I use mine for hollow grinding but do a few flat grinds once in a while. By the way unless you are 77 or more you are still younger than me. Frank
 
70 this year, I'm still able to do knives free hand but just looking for a easer way. This wasn't easer for me on the first knife that I ground on your style fixture, just because it's new to me, and I never could do a flat grind very good .
So thanks to you and Ernie for this thread.
 
Wow Art that looks good. I may have to make a fixture like Franks. Right now I'm using 1" angle iron clamped to my tool rest. The results are better than free hand but not as good as they should be. Do you have pics of your version of Franks grinding fixture? I still can't get my head wrapped around how the guide rods work.

Here is a picture of what I have. I tried to make the table adjustable and don't like the adjustment it's in my way so I think I'm going to do it over and put the adjustment under the table out of the way. The table is 1/4" D2 and that is all I had in the shop to make it. And I don't like the hinge it's to sloopy . And I need a bigger micarta blocks to hold the blades but this is all I had. I'm going to redo all of it to fit my other grinder .
100_1214.jpg
 
Great looking jig Ernie!

Ive got a questions.

1.) If you had a channel machined into the support table, and a type of keyway on the bottm of the support plate of the jig, would there still be a need to adjust the angle when changing sides? My thought here would be if you had a known fixed location (the channel / Keyway) shouldnt the adjustment on the fixture stay the same once the blade is replaced pointing the opposite direction?


Looks like a great tool!

One suggestion I would make would be to replace the leather with a high duameter rubber (like tire rubber) in these applications it seems to grip tighter and doesnt take a memory as quickly as leather.

Thanks for posting this! Photos make these things soooo much easier for me to understand!

God Bless
Mike

I didnt have to adjust the angle when I switched sides. The problem with a groove and key like you are saying is if you were to make it for say 3/16'' stock it would not grind right for say 1/8''.

Thanks all for the comments!!
 
Back
Top