Getting back into the shop...some new mosaic

EdCaffreyMS

"The Montana Bladesmith"
Been feeling a little better the last few days, and since I've not been at the forge in a while....I just couldn't stand it anymore. After chatting with Bing on Saturday morning, I had an idea........

I built a "can".....4"x4"x6".....plugged one end with a piece of 3/8" place, laid out a stack of 1080 & 15N20 diagonally. Filled the remaining space in with 1/4" W1 rods, then took up all the air space with 1095 powder, to which I added 10% nickel powder.


After about 45mins in the forge, this was how far I got..... 3"x3"x16".....then the forge lining failed on me. NUTS! Thankfully I had another welding forge ready to go that I spent the rest of the afternoon putting in place and setting up.


Got the replacement forge going, and the heat that I'm used to......


Worked the billet down just a bit more, let it cool, then because it was so large, I saw cut it in half, just so it would be easier to handle.


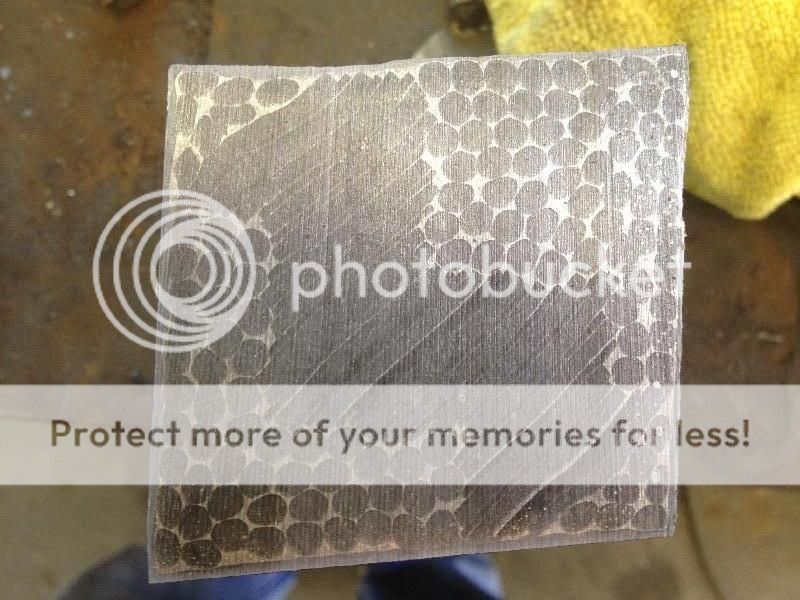
Next step is to forge the two halves down to about 1 1/2" square, anneal, and mill off the can, then cut each in half again. That will give me four pieces to decide how to orient and 4-way. Depending on what I come out with, it may go to an 8, or even a 16 way.

More to come.
 
Last edited:
Hi Brad!

What I envision is a 4-way, with the staggered line creating an "X" with a small square full of dots in the middle. OR, if I orient the pieces differently, there will be a wavy edge square in the middle, full of dots. Then, IF I accordion cut/fold it, there should be a stagger edged ribbon cris-crossing the blade lengthwise. That's why I never get tired of mosaics.....a single initial pattern can end up in so many different variations! :)
 
Honeycomb!!! That's what some of it looks like. That Damascus always amazes me. WOW!!!

Ken H>
 
That last shot is amazing, Ed! Looking forward to seeing this billet progress. Thanks for taking the time to share with us.
 
Forged the billet down to 1 1/2" sqaure. Ended up with about 30" of material. Sawed it in half, then sawed both those pieces in half...


So now I have 4 equal pieces of 1 1/2" sqaure material....


A quick clean-up of the ends with a 220 belt and an etch so I can orient everything....


The cool thing about Mosaic is that simply by rotating the pieces before welding, you change the end pattern.....


The "trick" to getting what you want is being able to visualize in your mind how the pattern will look after welding and accordion cutting/folding....you might be surprised at just how different a pattern will look from where it is now.....to what the end product will look like.

Finally, I facemill off the mating faces of each piece.....then it's just a matter of placing them together and forge welding. It can be wet welded, dry welded...or whatever you'd like...each method will have an effect on the finished product.


More to come!
 
Last edited:
Hi Scott!

Both.....I make the inital weld(s) on the press, then because it's so much quicker, I use the hammer to draw things out. One of the "tricks" that I've learned over the years is that I actually like squaring billets on the power hammer better then the press...to explain, the press tends to "squash" the flux and scale into the surface of the billet(s), whereas the power hammer "pops" the scale off the billet(s)....which means a cleaner as forged billet, and less milling/grinding between restacks/welds.
 
Looks like it will be next week before I can get the 4-way welded up and posted....have a student in the shop for a few days, and another stupid Doc appt on Friday morning. I'll try not to leave everyone hanging any longer then it takes me to get this one welded and accordion cut/folded.
 
Ed, good luck with the Doc's appt - our Prayers are with you and your family.

Thank you for the explanation of using press as well as power hammer. I was thinking the press was the way to go for pattern welded steel rather than power hammer. From your explanation, it sounds like both are used to advantage.

Ken H>
 
Got some more done on the "can" yesterday after church.

I got so involved in what I was doing, I didn't take an many pics as I intended to, but here goes.....

Here's the 4-way, after milling off the mating faces. (4 pieces of 1 1/2" square)


After welding the 4-way, I forged down part of the billet to 1 1/4" square and because things were getting too long to handle, cut off 10" and got it into the annealing tub (that's the part I forgot to photo!)

The other portion of the billet was forged down to 1 1/4" X 12" and 1 1/2" X 11" That means from the initial 4x4x6" can, I'll have 33" of mosaic to accordion cut/fold.


It's all in the annealing tub right now, so next steps will be to clean up each piece, layout the accordions, and spend half a day at the bandsaw! :)

More to come!
 
Last edited:
I noticed you never told us which way you orientated the squares. Is that to build the suspense? Looks great
 
Back
Top