today I tinkered at the warehouse.
First though, earlier in the week a lady calls up and tells me she saw an article about the Midwest Knifemakers Supply in the paper. She says she has some old time saw blades she used to paint and resell. She says she has cancer and is in too poor of health to even move them around and would I like to buy them? I tell her I will try and help. I went over to her place this morning. She turns out to be a wonderful, nice lady that needs a little help cleaning stuff up. I couldn't say no. She really needed these saw to go away. I end up buying these for a $100. I am not sure what I can do with them but maybe some one will take them off my hands some day..
the tape measure is locked at 3 feet to give you an idea of size

Anyway..
10 years ago I took a run at stabilizing wood. It was a huge failure. This time I am taking another run at it with a better set up and more knowledge than I had last time. I really don't have a choice. I need to be able to stabilize and dye wood on a small lot basis for my business. I want to be able to buy large slabs, cut them and offer an assortment.
I have 3 kinds of chemicals to test and a 4th on the way. I will test others but this is a good start I think. Today I worked on setting up my hardware and then ran a quick batch to see how it was all going to work. Today I tried out Ultraseal and Cactus Juice. Both are available on the web. The Ultraseal was $100/gallon plus shipping, the Cactus Juice was $80/gallon plus shipping. I also bought a few powdered and one liquid aniline dyes.
This is not a tutorial, WIP or anything like that. It's just "a day in the life" and I will be glad to share what I get done and learn on stabilizing but it won't be all the answers you are seeking. If you have any other stabilizing set ups, experience, insights, post them here and we will try and take the voodoo out of if for everyone. This will be like trying to duplicate Kentucky Fried Chicken. You can try all the recipes you want and you won't duplicate KFC...but you can come up with some pretty darn good chicken also.
None of the "pro" shops that stabilize are going to tell you what they are using. It's a trade secret and that's fine. I respect that and it's not my intention here to reverse engineer their process or proprietary chemicals. We will try and come up with our own chicken recipe.
We can guess that most use a some kind of MMA (methyl methacrylate) (edited 1/12/13 to add: some are also Methacrylate Esters or a blend of both chemicals) . There are dozens of kinds of MMA's. Enough that your head will spin. My research tells me the services that have been doing this for some time are using a blend of chemicals, mostly acrylics. Several of the stabilizing services that are newer to the game are using readily available MMA's.
The basic process is:
Immerse the wood into the chemical and pull a vacuum until the wood is soaked through. This is trial and error and practice to know when you have it soaked enough.
Push pressure into the your vacuum chamber the vacuum. The thought process here is the pressure should push that much more into the wood. The Cactus Juice guy (Tex - good guy, do business with him) emailed me and said his tests showed less retention of material if pressure was used. He is thinking, and I agree with him because I have seen it happen, that if you vacuum, then use pressure, then release pressure -- a lot of that goop is seeping back out of the block under pressure. More than would just weep out if you pull it out of a vacuum. (edited 1/12/13 to add: Cactus Juice is a blend of proprietary methacrylate esters. I have attached the MSDS for Cactus Juice to this post)
Once you have the wood soaked, heat cure it to around 194F to 200F (chemical mix dependent) for ten minutes to catalyze the acrylic. The cook time depends on how thick the wood is. Cooking wet wood, even chemical wet wood, curls wood. Another reason to use oversize pieces and trim down after processing.
Done.
Unless you are going to dye the wood, then add the dye to the chemical when you are soaking.
I have sent wood off to be treated by a half dozen services over the years. Some of it comes back, very much heavier and harder with the wood pores clearly filled in with acrylic. Other services come back just as hard but the wood pores are not as filled in. I do not see the wood with the less "filled in" pores as inferior to the services that have a, heavier, more dense finish. Unless someone tests these side by side, I'm going to say they perform about the same. I am entitled to be completely wrong about this. What do I know? I have collected wood for years, just like many of you. I know that stabilized wood moves, just not as much as unstabilized wood. Want proof? Send off some scales of Amboyna (expensive amboyna no less) to a couple different places to be stabilized. Both places come back just fine. Wait a couple years and dig out the scales. Find them curled up like a toe nail clipping - from both stabilizing services. That is how I learned stabilized wood moves and sometimes badly. Dig out the unstabilized Amboyna scales from the same block and find them curled up into nearly a U shape. The blocks also had a slight curl but nothing that couldn't be worked around. The scales were a total loss.
Expensive Lesson 1. Don't collect scales of wood. Collect blocks of wood and cut them to scales closer to when you finish your knife. When you have them mounted to a knife, the curl won't be such an issue.
Lesson 2. Stabilized wood is going move, just not as much.
Safety..
These chemicals stink to high hell when you are heating them up in the oven. There is no way around that. On my second batch today, I had to open all the doors to the warehouse including the big roll up door and leave for a bit as the fumes were getting noxious and I didn't want to breathe them in.
Lesson 3. Don't try to cure this in your oven in the house. Seriously.
In reading the MSDS (I always read the MSDS sheets), the chemicals can blind you. They are also sensitizing so at some point you may develop a possibly severe allergic reaction to acrylic and you are surrounded by acrylic. The fumes also explode. They also are toxic and absorb through the skin easily. Serious stuff. I washed my hands at least a dozen times today even when I was wearing gloves. I hate chemicals. They kill you slowly with liver cancer.
Nuff of that...
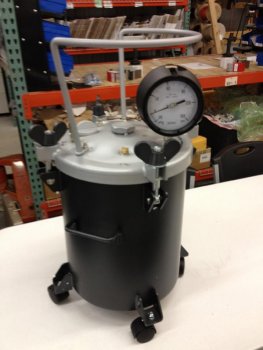
OK, so I went to Craigs list and searched for Convection Oven. I was originally looking for a bakers type 1/2 size oven but stumbled onto a brand new laboratory type convection oven with digital control and timer for $1000. This was a $2500 oven which is what a beat up used bakers 1/2 size convection oven runs. It was for sale right in Mankato. Huge win. I paid $950 for it and I feel pretty good about it. The day before I went and bought a similar industrial model (different manufacture) "mechanical" (convection) oven for $200. This oven did not have the digital controls and I didn't use it today. I have to calibrate it and get some racks. Lot's of guys use small counter top toaster ovens. I just didn't feel safe using those due to fire. I can't take that risk in the warehouse. It had to be a convection oven.
So here is my cool new laboratory grade convection oven. 110v which is better than the 220v bakers oven I was originally going to go with.

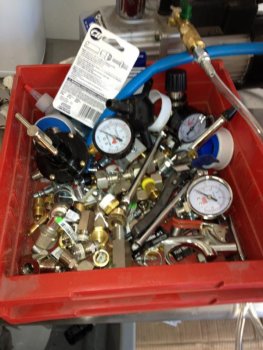
I am using a cheap vacuum pump I bought on eBay for around $150. It's a noisy little guy. I don't know the ratings on it. I just know that it is noisy and requires pump oil. When it is running plumes of this smelly vaporized pump oil spits out the exhaust port on top. This also stinks to high hell and my sense of smell is not that acute. I had to plumb up some typical 1/4" quick connects. The large white round tube to the right is my small vacuum chamber. I can't recall where I bought it. Some small casting company online. It is nothing more than a large PVC tube with a top and bottom acrylic sheet with rubber gaskets. A vacuum gauge with relief valve and fitting has been tapped into the side. I wanted to see what was happening so being able to see through the acrylic top was nice. You can see the quick connect I have plumbed between the pump and the vacuum chamber.

I had some pecan wood blocks. This is light stuff, not all that hard and fairly porus wood. I am testing Ultraseal and Cactus Juice today. I weighed the blocks dry and marked them. Naturally I couldn't see any of the marker afterwards so I had to figure out which piece was which from looking back at this picture. The little black bottle is Aluma Analine black dye. I put several drops into the chemical to check penetration. The dye made the wood slightly darker and enhanced the grain a bit.

The Cactus Juice came in a gallon jug and you have add the activator. The activator is the chemical that allows the thermal catalyzation to take place. Shelf life on all the MMA stuff that I have seen is about a year and all warn against storing in anything over 80F.

View attachment cactus juice MSDS.pdf
First though, earlier in the week a lady calls up and tells me she saw an article about the Midwest Knifemakers Supply in the paper. She says she has some old time saw blades she used to paint and resell. She says she has cancer and is in too poor of health to even move them around and would I like to buy them? I tell her I will try and help. I went over to her place this morning. She turns out to be a wonderful, nice lady that needs a little help cleaning stuff up. I couldn't say no. She really needed these saw to go away. I end up buying these for a $100. I am not sure what I can do with them but maybe some one will take them off my hands some day..
the tape measure is locked at 3 feet to give you an idea of size
Anyway..
10 years ago I took a run at stabilizing wood. It was a huge failure. This time I am taking another run at it with a better set up and more knowledge than I had last time. I really don't have a choice. I need to be able to stabilize and dye wood on a small lot basis for my business. I want to be able to buy large slabs, cut them and offer an assortment.
I have 3 kinds of chemicals to test and a 4th on the way. I will test others but this is a good start I think. Today I worked on setting up my hardware and then ran a quick batch to see how it was all going to work. Today I tried out Ultraseal and Cactus Juice. Both are available on the web. The Ultraseal was $100/gallon plus shipping, the Cactus Juice was $80/gallon plus shipping. I also bought a few powdered and one liquid aniline dyes.
This is not a tutorial, WIP or anything like that. It's just "a day in the life" and I will be glad to share what I get done and learn on stabilizing but it won't be all the answers you are seeking. If you have any other stabilizing set ups, experience, insights, post them here and we will try and take the voodoo out of if for everyone. This will be like trying to duplicate Kentucky Fried Chicken. You can try all the recipes you want and you won't duplicate KFC...but you can come up with some pretty darn good chicken also.
None of the "pro" shops that stabilize are going to tell you what they are using. It's a trade secret and that's fine. I respect that and it's not my intention here to reverse engineer their process or proprietary chemicals. We will try and come up with our own chicken recipe.
We can guess that most use a some kind of MMA (methyl methacrylate) (edited 1/12/13 to add: some are also Methacrylate Esters or a blend of both chemicals) . There are dozens of kinds of MMA's. Enough that your head will spin. My research tells me the services that have been doing this for some time are using a blend of chemicals, mostly acrylics. Several of the stabilizing services that are newer to the game are using readily available MMA's.
The basic process is:
Immerse the wood into the chemical and pull a vacuum until the wood is soaked through. This is trial and error and practice to know when you have it soaked enough.
Push pressure into the your vacuum chamber the vacuum. The thought process here is the pressure should push that much more into the wood. The Cactus Juice guy (Tex - good guy, do business with him) emailed me and said his tests showed less retention of material if pressure was used. He is thinking, and I agree with him because I have seen it happen, that if you vacuum, then use pressure, then release pressure -- a lot of that goop is seeping back out of the block under pressure. More than would just weep out if you pull it out of a vacuum. (edited 1/12/13 to add: Cactus Juice is a blend of proprietary methacrylate esters. I have attached the MSDS for Cactus Juice to this post)
Once you have the wood soaked, heat cure it to around 194F to 200F (chemical mix dependent) for ten minutes to catalyze the acrylic. The cook time depends on how thick the wood is. Cooking wet wood, even chemical wet wood, curls wood. Another reason to use oversize pieces and trim down after processing.
Done.
Unless you are going to dye the wood, then add the dye to the chemical when you are soaking.
I have sent wood off to be treated by a half dozen services over the years. Some of it comes back, very much heavier and harder with the wood pores clearly filled in with acrylic. Other services come back just as hard but the wood pores are not as filled in. I do not see the wood with the less "filled in" pores as inferior to the services that have a, heavier, more dense finish. Unless someone tests these side by side, I'm going to say they perform about the same. I am entitled to be completely wrong about this. What do I know? I have collected wood for years, just like many of you. I know that stabilized wood moves, just not as much as unstabilized wood. Want proof? Send off some scales of Amboyna (expensive amboyna no less) to a couple different places to be stabilized. Both places come back just fine. Wait a couple years and dig out the scales. Find them curled up like a toe nail clipping - from both stabilizing services. That is how I learned stabilized wood moves and sometimes badly. Dig out the unstabilized Amboyna scales from the same block and find them curled up into nearly a U shape. The blocks also had a slight curl but nothing that couldn't be worked around. The scales were a total loss.
Expensive Lesson 1. Don't collect scales of wood. Collect blocks of wood and cut them to scales closer to when you finish your knife. When you have them mounted to a knife, the curl won't be such an issue.
Lesson 2. Stabilized wood is going move, just not as much.
Safety..
These chemicals stink to high hell when you are heating them up in the oven. There is no way around that. On my second batch today, I had to open all the doors to the warehouse including the big roll up door and leave for a bit as the fumes were getting noxious and I didn't want to breathe them in.
Lesson 3. Don't try to cure this in your oven in the house. Seriously.
In reading the MSDS (I always read the MSDS sheets), the chemicals can blind you. They are also sensitizing so at some point you may develop a possibly severe allergic reaction to acrylic and you are surrounded by acrylic. The fumes also explode. They also are toxic and absorb through the skin easily. Serious stuff. I washed my hands at least a dozen times today even when I was wearing gloves. I hate chemicals. They kill you slowly with liver cancer.
Nuff of that...
OK, so I went to Craigs list and searched for Convection Oven. I was originally looking for a bakers type 1/2 size oven but stumbled onto a brand new laboratory type convection oven with digital control and timer for $1000. This was a $2500 oven which is what a beat up used bakers 1/2 size convection oven runs. It was for sale right in Mankato. Huge win. I paid $950 for it and I feel pretty good about it. The day before I went and bought a similar industrial model (different manufacture) "mechanical" (convection) oven for $200. This oven did not have the digital controls and I didn't use it today. I have to calibrate it and get some racks. Lot's of guys use small counter top toaster ovens. I just didn't feel safe using those due to fire. I can't take that risk in the warehouse. It had to be a convection oven.
So here is my cool new laboratory grade convection oven. 110v which is better than the 220v bakers oven I was originally going to go with.
I am using a cheap vacuum pump I bought on eBay for around $150. It's a noisy little guy. I don't know the ratings on it. I just know that it is noisy and requires pump oil. When it is running plumes of this smelly vaporized pump oil spits out the exhaust port on top. This also stinks to high hell and my sense of smell is not that acute. I had to plumb up some typical 1/4" quick connects. The large white round tube to the right is my small vacuum chamber. I can't recall where I bought it. Some small casting company online. It is nothing more than a large PVC tube with a top and bottom acrylic sheet with rubber gaskets. A vacuum gauge with relief valve and fitting has been tapped into the side. I wanted to see what was happening so being able to see through the acrylic top was nice. You can see the quick connect I have plumbed between the pump and the vacuum chamber.
I had some pecan wood blocks. This is light stuff, not all that hard and fairly porus wood. I am testing Ultraseal and Cactus Juice today. I weighed the blocks dry and marked them. Naturally I couldn't see any of the marker afterwards so I had to figure out which piece was which from looking back at this picture. The little black bottle is Aluma Analine black dye. I put several drops into the chemical to check penetration. The dye made the wood slightly darker and enhanced the grain a bit.
The Cactus Juice came in a gallon jug and you have add the activator. The activator is the chemical that allows the thermal catalyzation to take place. Shelf life on all the MMA stuff that I have seen is about a year and all warn against storing in anything over 80F.
View attachment cactus juice MSDS.pdf
Last edited: