Surface grinder questions

Stang Bladeworks

KNIFE MAKER
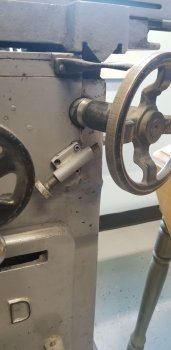
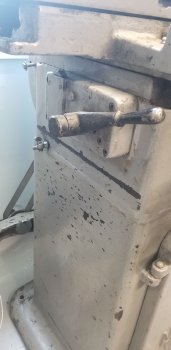
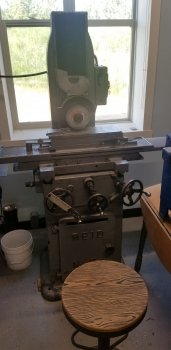
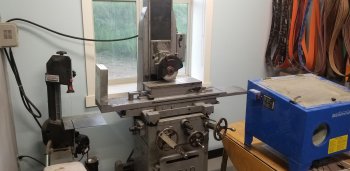
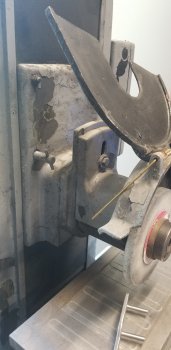
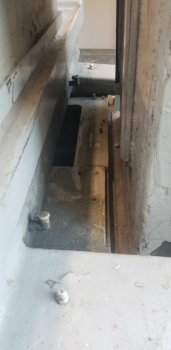
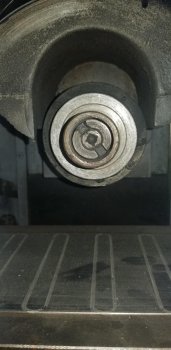
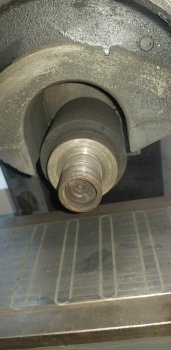
I have been doing a bit of research about surface grinders and I quickly learned that the wheels should be balanced. I have watched several videos on the topic now and im left with some questions. My older machine does not have a tapered arbor and im not sure if it can be removed for use in a balancing stand. The wheel has a small amount of play when on the shaft so if I cant balance it on the actual arbor the balancing seems useless because the wheel could be mounted slightly differently. I am wondering if anyone has any tips for balancing wheels on this type of surface grinder or if it is really necessary for a knifemaking application. I want to avoid stress on the bearings and get the best finish possible but im not sure how possible it is with this machine. As always any help is greatly appreciated. I will include pics below. On a side note if anyone knows what some of the levers and fittings are for I would love to know. Other than the 3 main wheels I dont know what anything else does. I realize that this is alot of questions all at once
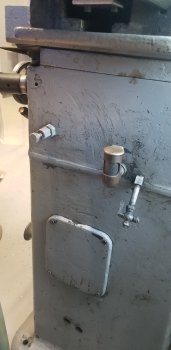
20190701_094245.jpg20190701_094234.jpg20190701_094213.jpg20190701_094152.jpg20190630_213556.jpg20190701_094337.jpg20190701_094301.jpg20190701_093921.jpg20190701_093900.jpg
 
If you are using the "stone" wheels, balancing is usually and exercise in futility...... in other words it can drive you nuts trying to balance those stone wheels. More important than balancing stone wheels, is dressing them to ensure they are true and have a flat contact surface. That being said, IF the arbor, bearings, and other mechanics are in good condition, balancing wheels for knifemaking usually isn't necessary.

OK.... Where the machine mine, the first thing I would do would be to go completely through it, and ensure everything is mechanically sound. IF everything is mechanically sound, I would.... #1 Replace the standard pole chuck, with a fine pole chuck. (that will save you from having small/knife sized pieces of work go flying across the shop) ;) #2 I would convert is to run 2x72 belts. I did it a couple of decades ago, and would never go back to "stone" wheels. It involves replacing the "stone" wheel with a super hard contact wheel, and then constructing an idler wheel setup.... Here's a few pics of mine........ As with anything, there are pros and cons between using "stone" wheels and belts...... for me there are far fewer cons with belts.....plus it saves $$$ because I use the same belts as my grinders......so I don't have to order surface grinder wheels/stones. One of my biggest issues with stone wheels, and a large factor in me converting to belts, is that stone wheels wear away as I'm running the machine....meaning that I can't even remotely rely on the measuring marks on the hand wheels or the machine...... constantly stopping and using the mic or calipers to measure where I am on the workpiece.... a big time consumer.

Surfacegrinder3.jpg


Surfacegrinder2.jpg


Surfacegrinder4.jpg


Surfacegrinder5.jpg


Surfacegrinder6.jpg


Surfacegrinder1.jpg
Thanks for the detailed response. The belt conversion is tempting and I may have to try it. I was under the impression that stones are more accurate but it may not be enough to make a difference. I will try the stones and if it is a pain I will likely convert. The machine seems sound. I dont know alot about the machine and I am a little worried that I may do more harm than good. If my parts come out flat and parallel I will likely leave it be for a while. I intend to get a diamond dresser and I may put a dro on the z axis. Im hoping that the stone will not need to be dressed halfway through a blade. I intend to use it mostly for folders sk the blades are smaller. I have a SGA that i use for fixed blades. Thanks again.
 
I intend to use it mostly for folders
If that's the case, I'd strongly recommend replacing that mag chuck with a fine pole....the finer the better. I learned the hard way.... using a standard pole (like yours), I had a folder part "let go" and it got shot through the shop door, and out into the backyard...... it messed the door up to the point that I had to replace it...... which I spent the rest of that day on. o_O
 
If that's the case, I'd strongly recommend replacing that mag chuck with a fine pole....the finer the better. I learned the hard way.... using a standard pole (like yours), I had a folder part "let go" and it got shot through the shop door, and out into the backyard...... it messed the door up to the point that I had to replace it...... which I spent the rest of that day on. o_O
I will look into one asap. Thanks for the info. I didnt even know that was a thing. Sometimes you dont know what you dont know... ill start researching. Its funny how most problems can only really be solved with $$$. Oh well. Any recommendations on where to source one for a reasonable price? Also do you have a ballpark estimate on what I should be looking to spend?
Thanks.
 
https://www.grizzly.com/search?q=(magnetic+AND+chuck)+OR+(magnetic+OR+chuck) Surprisingly, these imports from Grizzly are darn good chucks for the money. They call them "dense". What's being referred to is the magnet spacing....on you're it appears to be 1/2" meaning there is magnetic "hold down force" every 1/2"....... that's fine for large, heavy pieces of steel, but as the pieces get smaller and thinner, you want closer spaced magnets to hold it down.
Alternately, you could keep an eye on Ebay, and look for whatever size (I assume your chuck is 6"X12"), and "fine pole chuck". What I would type in/search for is "6x12 fine pole chuck" I purchased my file pole off ebay...... it's a Magna-Chuck Corp 6x12"..... that I paid $475 for......but that was before Grizzly was selling their desne pole chucks...... I wouldn't hesitate to buy on of them.
 
You can buy magnetic parallels with very fine divisions that will work on a coarser pull chuck. Dress the chuck with a stone...superglue the magnetic parallels down to the chuck and then grind the tops of the magnetic parallels. buy enough to cover as much surface as you plan to use. much cheaper than a mag chuck. about$70 should get you two sets of parallels...8 sq inches of hold...prolly more than enough to grind a folder.

The other thing to check is the pull. The cam inside the chuck (behind the handle shaft) becomes worn with time and will quit full engaging/disengaging because it's not moving the plates far enough. The way you check is seeing if a smaller item really hold down with the chuck on...and there is no (to very little) magnetism when the chuck is off. The cam is easy to make...but not a fun job. had to do this on the first clapped out mag chuck I bought. A knifemaker could make the cam easy with a drill press and belt grinder is necessary.

[/URL]
 
You can buy magnetic parallels with very fine divisions that will work on a coarser pull chuck. Dress the chuck with a stone...superglue the magnetic parallels down to the chuck and then grind the tops of the magnetic parallels. buy enough to cover as much surface as you plan to use. much cheaper than a mag chuck.

The other thing to check is the pull. The cam inside the chuck (behind the handle shaft) becomes worn with time and will quit full engaging/disengaging because it's not moving the plates far enough. The way you check is seeing if a smaller item really hold down with the chuck on...and there is no (to very little) magnetism when the chuck is off. The cam is easy to make...but not a fun job. had to do this on the first clapped out mag chuck I bought. A knifemaker could make the cam easy with a drill press and belt grinder is necessary.

Thats a good idea. Thanks. I will look into this if I cant source a chuck for a fair price.
 
also...when grinding mag parallels with aluminum in them...put crisco or tranny fluid on top of them while grinding...or you will load your wheel with aluminum.
 
I typed all this below and then saw you already had a surface grinder so you probably know this stuff already. Sorry about that but I'll leave it for the guy that doesn't have one but is looking.

As for balancing the wheel, I tried all that when I started and couldn't make it work. I just put the stone on and hold my breath now.


The following is all learned the hard way:

Surface grinders are very slow to remove stock. You take at most .001" per pass, if that. I usually take no more than .0007 or .0008" per pass. My last pass is a ghost pass, or no down Z and pass over it until I stop getting sparks. Some of the larger surface grinders can take a bit more but not much.

small 1/16th pieces of flat stock can be used on your mag chuck to help hold things in place.

You have to keep thin stock cool or it will move just enough from the heat to really be chasing your tail. If you can't touch it and hold your hand on it after a few passes, it's already way to hot. I use a small Kool Mist spray to keep the heat down. I dress the stone every single time I use it to help: keep it cool, better finish, more accurate. Let you machine run for 5 to ten minutes to warm up. The machine will move as it warms up. Use your one shot oiler right away when you start your warm up and then do not use it again for the rest of your session. The oiler will move things up to a thou so just use it once at the start. When things are warmed up, move your table both ways a bit to spread out the oil on the ways from the one shot.. Try different stones. Some work better than others. Check them from cracks by a "ring test". It should ring like a bell with struck with the handle (wood, rubber end) of a hammer. Don't hit it with the metal part. If it sounds dull, don't use it.

Your parts should be slightly over sized before surface grinding and then you profile back after. Surface grinders will give you a small edge roll as the stone hits and leaves the part giving you a small gap when mating up to another part - like a back spacer between liners on a folder.

Start out with .0005" passes with a .050" step over.

Stones on rare occasion explode and I have heard of at least one guy getting killed by running a surface grinder with no guard and it exploded.

Stones are more accurate than belt conversions but some guys are holding pretty good tolerances with belt conversions too. Some guys try a belt and go back to stones. Some try and belt and love them.
Thanks good to know. I have been looking at getting some oil for my mill and surface grinder. Is there anything specific you recommend? I assume you just put a couple drops on the ways before each use. I just got the mill and I only got the grinder working last week. I am VERY new to any "machinist" machines. Up to this point I have got by with a kmg and sga. Any tips or tricks are welcomed, I appreciate the advice.
 
you ONLY use way oil on you surface grinder or mill tables (that's where the "ways" are) Surface grinders have sealed bearings that don't need oil. A mill usually does not have sealed bearings and will need a light spindle oil. Find what each machine recommends and get it or the equivalent.

When you dress your chuck or parallels you want to take a couple tenths (.0002) at a time max on depth and a fairly good cross cut (a couple hundred thousandths(.200) at a time) with a fairly "open" wheel...nice large pores. This is to keep heat from building up....and spray mist is highly recommended! If you are moving across the chuck and you start to see heavier sparks than the previous pass you are heating the chuck and need to lift the wheel and cool it down. if you let the chuck get warm it creates a large dip or wallow in the table...as small as folding knives are it may not matter but the chuck should be made flat to .0001 or so...IF the ways aren't shot.

When doing toolmaking I would often have to grind hardened tools (why I like A2...lol) for many hours a week. I loved finish grinding...some guys hate it...it's relaxing but you have to watch that spark...and dress the wheel often. I have not used my surface grinder in 8yrs....I think what Ed did makes sense....and I'll probably go that route. A nice variety of wheels is very expensive...and belts are relatively cheap. Even if that polyurethane wheel is not perfect....I think you could still get a part very flat by sparking out across the part completely. I just don't do toolmaking to the level I used to (only in house stuff) and having a nice belt grinder/surface grinder would be great...
 
most older machines have a "one shot" oiler...it's got copper lines to the different areas that need way lube. You pull the spring loaded oiler and it sends the right amount of oil. do not oil your grinder while going for a finish grind...it will raise the table enough to make you sorry...'specially if the machine is worn. Some old machines have a cam oiler that has an eccentric wheel (cam) in a pocket built into the casting and is constantly bring up oil to the way surface. most methods are realible...make SURE on an old machine (mill or grinder) that lines are not plugged and you are really getting the way lube where it needs to be.
 
Also, most modern wheels are made very accurately...balancing is usually not an issue. The abrasive company's are trying to sell wheels not scare the crap outta people...and an exploding wheel will just about do that. You first dress on a new wheel should be fairly deep...you can tell when the factory OD is all cleaned up by lightly touching the wheel surface while on (don't let osha watch) it will feel very smooth...if it has a tick to it...your not cleaned up yet.If that freaks you out just take about .030 of in .005 increments while dressing. Also...only use a diamond...I know some guys use norbide or other stuff...waste of time...make sure your diamond is behind the centerline of the wheel pointing up and away from the wheel at about 30 degrees...this will keep you from "spitting" the diamond outta the steel holder. Just like you spark out a part for finish...spark out your wheel with the diamond...this will pull any loose grit out of the pores and keep it from marking your part later...if you ever see a pattern on your grind that looks like a line of saddle stitching...that;s what happened...lol.

Hope we're not overloading you...you can read this thread as you need it.
Thanks for the info. Definitely not worried about being overloaded. Im always keen to learn from others with experience. I will happily listen for as long as im tolerated. I always refer back to these as time goes on to refresh myself. I hope eventually I am able to help others as much as I have been helped myself.
 
never...never...never grind without safety glasses. I had the misfortune of being close to the shop goof when he exploded a wheel. He didn't have glasses on...I did. He didn't have a scratch...(why do these type of knuckle heads always come out unscathed) I think some debris hit my glasses...but I don't really know...it happens so fast. The guy was frozen for about 15 seconds...lol. Never went near him and a surface grinder at the same time again...lol.
 
never...never...never grind without safety glasses. I had the misfortune of being close to the shop goof when he exploded a wheel. He didn't have glasses on...I did. He didn't have a scratch...(why do these type of knuckle heads always come out unscathed) I think some debris hit my glasses...but I don't really know...it happens so fast. The guy was frozen for about 15 seconds...lol. Never went near him and a surface grinder at the same time again...lol.
Yeah. Good point.
 
What I have been told by a mold maker friend is that dress your wheel and do not shut it off until you are completely finished. He said that every time you stop and start the wheel will move a little bit. In their shop they turned it on dressed the wheel and left it running all the shift
 
Back
Top