You are using an out of date browser. It may not display this or other websites correctly.
You should upgrade or use an alternative browser.
You should upgrade or use an alternative browser.
Stabilizing Wood - Setting up and testing - Cactus Juice and Ultraseal
- Thread starter BossDog
- Start date
Hey Boss, in your opinion, how do you think Cactus Juice and Ultraseal would work for making phenolic-like or laminated scales using fabric?
Hadn't thought about that. It might make some interesting material. It wouldn't be required but for denser material, you would want a heated press. They are out there commercially but they are expensive.
...
next step in my stabilizing journey...
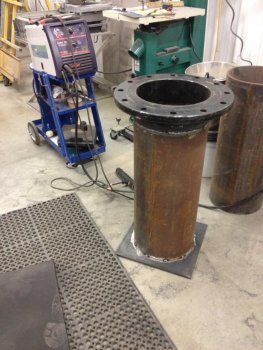
I am making a bigger set of tanks to scale up a bit.
Larry S scrounged up some 12" diameter 3/8" wall thickness pipe for me awhile ago.
i found a 12" weldable pipe flange on eBay. The flange should have slipped over the pipe but instead lined up with it like a butt joint. I welded it on any way.
I welded a 1/2" plate on the bottom. Both seams are triple welded as the tank needs to handle at least a 120PSI and a near 30" vacuum. Welding the triple seams took an hour of surface prep with an angle grinder and then a couple solid hours of welding.
Now I need to get lucky and find a 12 hole pattern cover or fabricate one out of 3/4" plate, which is probably what I will have to do.
This will be my first tank and I will test it to see how it all works. If it works OK, I will have to make a few more. Be on the look put for any pipe flanges and thick wall, large diameter pipe that needs a home and a mission.
Since this all started, I have recently been visiting with a stabilizing chemical manufacturing company about bringing consumer quantity packages in quart, gallon and five gallon to the knife industry that would be easily accessible for the average knife maker. Once the packaging is developed, we will work on developing a hardware setup for stabilizing small batches of wood. The chemical packages are fairly easy and we should be close to having releasing that. Developing a hardware kit will take longer and may not be ready until next summer.
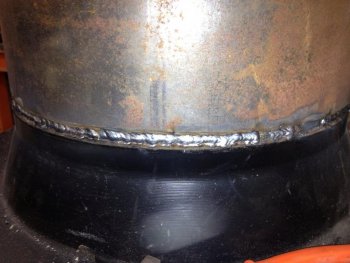
The close up picture shows the first weld bead pass. I filled in with two more passes but did not get a close up picture of the finished bead. I love welding but by the time I was done with all of this, I was ready to be done for the day. This pipe with the flange stands about 3" tall and weighs well over a hundred pounds. I will need to find some heavy duty casters and weld them on the bottom to help with moving it around.
next step in my stabilizing journey...
I am making a bigger set of tanks to scale up a bit.
Larry S scrounged up some 12" diameter 3/8" wall thickness pipe for me awhile ago.
i found a 12" weldable pipe flange on eBay. The flange should have slipped over the pipe but instead lined up with it like a butt joint. I welded it on any way.
I welded a 1/2" plate on the bottom. Both seams are triple welded as the tank needs to handle at least a 120PSI and a near 30" vacuum. Welding the triple seams took an hour of surface prep with an angle grinder and then a couple solid hours of welding.
Now I need to get lucky and find a 12 hole pattern cover or fabricate one out of 3/4" plate, which is probably what I will have to do.
This will be my first tank and I will test it to see how it all works. If it works OK, I will have to make a few more. Be on the look put for any pipe flanges and thick wall, large diameter pipe that needs a home and a mission.
Since this all started, I have recently been visiting with a stabilizing chemical manufacturing company about bringing consumer quantity packages in quart, gallon and five gallon to the knife industry that would be easily accessible for the average knife maker. Once the packaging is developed, we will work on developing a hardware setup for stabilizing small batches of wood. The chemical packages are fairly easy and we should be close to having releasing that. Developing a hardware kit will take longer and may not be ready until next summer.
The close up picture shows the first weld bead pass. I filled in with two more passes but did not get a close up picture of the finished bead. I love welding but by the time I was done with all of this, I was ready to be done for the day. This pipe with the flange stands about 3" tall and weighs well over a hundred pounds. I will need to find some heavy duty casters and weld them on the bottom to help with moving it around.
Attachments
Last edited:
Tracy when you take the vaccum off of the pot isn't the atmospherical pressure enough without adding pressure. I don't remember what it is but it is fairly high.
Now when I want to dye the giraffe bone I get I just put it in a jar of the leather dye and leave it for a few weeks and have most of the time had it dye all the way. I really like the mottled look where is it white and colored the best though.
Good luck with your stabalizing, one thing for sure you are eating up a lot of profit to learn this so make it worth it for you.
Percy
Bruce Bump
Forum Owner-Moderator
Now thats a nice big tank. Pretty good looking weld too.
Thanks for going to all this trouble for us. I plan to spend some of my hard earned money with you when you get it done.
Thanks for going to all this trouble for us. I plan to spend some of my hard earned money with you when you get it done.
Boatbuilder
Well-Known Member
Tracey
Just remember that 120 psi in that vessel is a lot of pressure. Hope you got full penetration on the flange(weld went thru to the inside). If not you can just weld it from the inside so that you penetrate to the weld that you put on from the outside. As for the weld on the bottom plate. did you weld it from the inside as well. having a square plate on the bottom of a vessel is the most dangerous. Make sure you weld the plate from the inside as well. This is very important. I dont want anything to go wrong and someone getting injured or killed.
Also, make sure you put a weld fitting on the bottom of plate. When you are ready to take wood out of vessel you can leave the pressure in the vessel and have a hose hooked up to your valve on the bottom of vessel and just open the valve and empty juice into original container.
Hope I didnt sound to negative on the safety side of things but this is dangerous if not done properly.
Jim
Jon Kennedy
Member
It will work as long as you keep it compressed during cure process, you are basicly making martica,soak fabric in resin prior to placeing in the form or clamp, clamp can be made with two pcs of thick metal with a bolt system on both sides of plate to keep fabric compressed, pull vacuum on it when its all clamped just as we do stabilizing wood to get all the air out of it.
Jon
Jon
Dennis Paish
Member
Tracey,
I agree with Jim and please take precaution as this can go wrong real fast QUICKLY. Please hydro test your vessel before using it. I recommend 2x your operation pressure to ensure safety. If that welder is a Hobart 175 (which is what I own too) I am not sure it will provide the penetration unless you're an experienced welder.
Regards,
Dennis Paish
DonL, check out the West System 105 series or the MAS Epoxies Low Viscosity Resin system to laminate materials to make something similar to Micarta or G10. You will need something to apply pressure to the material though; thick wood boards or metal plates and C clamps work well for stacked laminates.
Meridian Blades
Moderator - Knife Maker
T
That is a MONSTER tank.... Glad you found a flange. I been looking but they seem pretty scarce. I think that idea of a drainage valve on the bottom might be good, since that thing weighs so much. You gonna set the other one up for dyes?
Larry
That is a MONSTER tank.... Glad you found a flange. I been looking but they seem pretty scarce. I think that idea of a drainage valve on the bottom might be good, since that thing weighs so much. You gonna set the other one up for dyes?
Larry
I need to find or make a cap. The other tank will wait until I test this one.
The lower drain really going to be needed. It's at least a 150lbs right now. I have to add a couple more braces along the bottom for safety and some heavy duty castors.
The lower drain really going to be needed. It's at least a 150lbs right now. I have to add a couple more braces along the bottom for safety and some heavy duty castors.
Meridian Blades
Moderator - Knife Maker
I need to find or make a cap. The other tank will wait until I test this one.
The lower drain really going to be needed. It's at least a 150lbs right now. I have to add a couple more braces along the bottom for safety and some heavy duty castors.
Sounds like a plan... I built a platform for my bandsaw with double layers of plywood and the casters that lever up to move and then set back down... I believe either Rockler or Woodcraft is where I got mine. I bolted the saw to the platform so it wouldn't be so "tippy".
Diamond G Knives
Well-Known Member
Tracey
Not wanting to jump on the worry you band wagon, but I am a safety manager for a large non destructive testing company and have seen first hand how catastrophic a pressure vessel failure can be.
My reccomendation on this type of closure would be to cut or have cut a 1/2" to 1" plate that will fit snugly into the ID of the pipe.The plug should be slighty beveled on both sides to allow a greater depth of fusion of the weld. Once in place drill several (6-8) 1/4 holes thru the pipe wall into the bottom plate. Drive solid pins into the plate unit tight. Weld both the inside and outside seem. making multiple passes as needed to fill the beveled area. A pressure test up to 2X your intended working pressure would be a minimum in my opinion. Also if you look in your phone book, you can probably have it Xrayed for less than $200.
If you need help finding someone to test it shoot me a PM.
Thanks for taking the time, effort and expense to make this happen!
God Bless
Mike
good idea. I had to pause on this for a bit but will be taking it back up in February.
I will see what I can go there. I am not taking this large of a pressure pot lightly.
I will see what I can go there. I am not taking this large of a pressure pot lightly.
Tracey
Not wanting to jump on the worry you band wagon, but I am a safety manager for a large non destructive testing company and have seen first hand how catastrophic a pressure vessel failure can be.
My reccomendation on this type of closure would be to cut or have cut a 1/2" to 1" plate that will fit snugly into the ID of the pipe.The plug should be slighty beveled on both sides to allow a greater depth of fusion of the weld. Once in place drill several (6-8) 1/4 holes thru the pipe wall into the bottom plate. Drive solid pins into the plate unit tight. Weld both the inside and outside seem. making multiple passes as needed to fill the beveled area. A pressure test up to 2X your intended working pressure would be a minimum in my opinion. Also if you look in your phone book, you can probably have it Xrayed for less than $200.
If you need help finding someone to test it shoot me a PM.
Thanks for taking the time, effort and expense to make this happen!
God Bless
Mike
Sorry for slow updates here. It's been busy at the ranch. I will get back to this and continue it in a month or so...
anyway, I heard from Curtis Seeback, owner of Original Cactus Blank(TM) and MesquiteMan's Cactus Juice. (nice guy btw)
So I don't mess up what he says, I'll quote
"... Cactus Juice is NOT an MMA. It does not contain any methyl methacrylate. It is a blend of various methacrylate esters. There is a bid difference in this. Methyl methacrylate is the bad chemical that is very flammable and dangerous to work with. Cactus Juice is NOT flammable and is consider non-hazardous. Typical safety measures for working with chemicals in general should be followed such as safety glasses and nitrile gloves when in direct contact but otherwise, it is actually quite safe. It does NOT absorb through the skin as someone on that thread stated. As a matter of fact, it is so safe that I have written permission from the USPS to ship it via Priority Mail as it has no shipping restrictions"
That to me is impressive as the results of using the stuff were quite good. He sent a copy of his MSDS as proof.
Further, he provides some additional benefit of his experience...which we appreciate and what this thread is all about...
"...On your comments about some of the various resin you tried being rubbery...this is a prime indicator of contamination. Contamination can come from using the wrong types of dyes, other chemicals, or moisture form the wood. The foaming you mentioned is absolutely caused by too much moisture in the wood. The moisture content needs to be as low as possible and for the very best results, oven dry (0%) is best. To get there, try putting your blanks in your oven at 150-200° for 12-24 hours prior to stabilizing. This will get them to oven dry in most cases and will eliminate the foaming and help get even more Cactus Juice in the blank....." (the bold font I added to emphasis on a best practice around getting the wood dry as possible before putting it in the juice)
Curtis, thanks for your email. Welcome to KnifeDogs..From what I have seen and personally tested, I think your chemical is the real deal and works well. It's great to see that it is safer than many if not most out there.
smithy
Well-Known Member
When I started to follow this thread, and having a vacuum set-up, I decided to stabilize a bear jaw using "Cactus Juice". This product works like intended and is easy-peasy to use. When all was done, I couldn't believe how heavy the bear jaw got and the teeth are solid. The only mistake I made was not adding some color to the bear jaw before stabilizing. Oh well...Teddy
Meridian Blades
Moderator - Knife Maker
Forgot the link to the hardware kit for the mobile base, if its of interest. Rated up to 600lbs.....
http://www.woodcraft.com/product/2080750/33126/woodriver-universal-mobile-base-hardware-kit.aspx
http://www.woodcraft.com/product/2080750/33126/woodriver-universal-mobile-base-hardware-kit.aspx
CriticalThinker
New Member
This has been a fascinating older thread, Tracey. I joined to have an opportunity to thank you for sharing all of the experience you gained back then. Did the conversation and your testing pick up elsewhere in another thread? It seems like this one stopped short and I could not find where it might have picked up again elsewhere.
I'm about to do some experimentation of my own stabilizing and vacuum forming wood veneers and various weights and types of leather. As I get things rolling I'd be happy to share my results as well in an effort to pay it forward.
I'm about to do some experimentation of my own stabilizing and vacuum forming wood veneers and various weights and types of leather. As I get things rolling I'd be happy to share my results as well in an effort to pay it forward.