WIP -- 1st knife from scratch

attachment.php


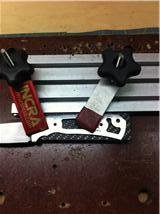
Here is the fixture I made to drill through the blade and scales at one time. I also use this to glue up spacer materials.

It also works great to clamp a knife will epoxy sets, but you must use waxed paper so knife doesn't stick to fixture.

These parts are from WOODCRAFT but should be available at any woodworking store.

Steve
 

Attachments

  • fixt2.jpg
    fixt2.jpg
    7.3 KB · Views: 68
Kept shaping more of the knife.
Top
img1011tl.jpg


Bottom (sorry for the pic being so fuzzy)
img1012n.jpg


Had to take a pic of all the shavings and dust under the knife.
img1013z.jpg
 
Other side.
img1020p.jpg


ready for pins.
img1022g.jpg


I wanted to get as much work done as possible with the wood rasp, before I put the pins in.
 
pins were a really tight fit. In fact, I couldn't get the pin in all the way. I put it in as far as I could, and then I marked it,
where I would have enough left over.
img1023g.jpg
 
Once I had it marked, I pulled the pin back out, and cut it with a hacksaw.
img1024k.jpg


Then, I put it in the drill, and, while it was spinning, hit it with some 50 grit emery cloth.
img1025m.jpg
 
Then, what I wanted to do, was notch the pin, so the epoxy would have some extra places to grab.

So, using my fancy sharpie, I marked 3 places.
img1028s.jpg


Then, I put the pin back in the drill press, and, again while spinning,
I touched the pin with the hack saw. It gave me 3 nice groves.
img1029b.jpg
 
moment of truth. No turning back now.

I mixed up the epoxy.
img1030tc.jpg


smeared a buch on the pins, and tapped them into place
img1031g.jpg


One pine was nice and clean, another had a gob of epoxy. Oh well, nothing a file
won't fix when it's hard.
img1034el.jpg
 
took the tape off the bolsters. (Nice job on the battle scars in the bolsters. *yuck*)

Now, I want to try and get the handle flush with the bolsters. Felt like it took hours. Sanded with 150 and 200, to try and flush them up.

this pick doesn't do it justice, but I'm trying to show the unevenness of the handle being higher than the bolster.

img1038q.jpg
 
got some more 220 sanding to do. Quite the gap there.
img1045h.jpg


Getting better
img1046z.jpg


Almost there..
img1047g.jpg


And...and...and I forgot to snap a pic of it being done. oops.
 
ok, then I started getting into finishing the handle.

I got involved with working it down;
400 to 1000 to 4000 to 6000 to 8000.

I totally forgot to take pictures between each step. I was really getting frustrated, because I would find a scrach that I forgot to take out, and then would have to back up a previous step (grit), and start that grit over. I don't think I have any skin left on my thumbs.

I'm kinda miffed at myself that I didn't take pics between grits.

I tried to take an angle shot, to show off the bolter finish.
img1050uo.jpg
 
I can't believe i'm done. I wish I could bring out more of a shine. If anyone has any ideas of what I can do, I'm all ears.

img1052x.jpg


Some more shots of my baby!
img1053a.jpg
 
Back
Top