KDM designed by HHH Knives WIP

SHOKR

Well-Known Member
Hey guys

I am new to knife making yet decided to make a WIP on this (for me) advanced design, it will force me to be more committed, will probably work as a DO NOT DO most of the time for other beginners and will help me learn (through the advice i would hopefully get)

THE Randy Haas from HHH Knives thankfully gave me permission to use his design, under harsh terms though!

if you are looking for an experienced maker doing a WIP on the this same design check this out http://knifedogs.com/showthread.php?22806-Hometown-Hero-build-WIP
Josh Dabney did great work!!

Now please bear with me, because i'll be doing this mostly from my tablet (lap top went cuckoo) also pics are taken by tablet

The steel is 4.7mm (3/16") O1

Here we go!

First i got the pic of the scanned design, traced it on AutoCAD to get it right, printed it out, cut design, put on plywood, profiled it, set it on the steel and cut it

Thats what i ended up with (using angle grinder)

(im using the KD app and found images are uploaded as attachments so will try to find a pc to do the rest from later)
 

Attachments

  • 20121027_171213.jpg
    20121027_171213.jpg
    93 KB · Views: 127
  • 20121116_185336-1.jpg
    20121116_185336-1.jpg
    96.3 KB · Views: 100
Last edited:
after profiling i cleaned the surface from the marker with Acetone (note: J.D. Smith told me acetone is carcinogenic, i looked it up and opinions contradict ( scientists disagreeing,shocking right?) but if there is even a remote chance i would like to avoid it, so wear gloves when using Acetone guys)

(i would love to use Dykem, but i don't have that here, i use a sharpie with chisel tip to cover more space then scribe)

thats after clean up

20121116_185519.jpg

you can see in the picture that the wood template was not precise, plastic or metal would probably be better

so i lay the paper on the blade, use a drop of glue (something like uhu) on both ends so it would be held in place for few seconds while i mark it yet doesn't stick or tear while removing

20121116_185618.jpg

you can probably see the reflection of the steel from around the paper design, i marked it with a red sharpie and here it is after marking

20121116_190925.jpg

profiling complete (if you notice the red at the finger groove/choil, that's left there because i realized my CAD drawing was not exactly like Randy's design, now profile is correct)

the only thing i changed from the original design is the recurve edge, since i'm new to this and this design is complicated enough for me i went with straight edge.

20121118_225440.jpg
 
Last edited:
Next i lay the paper again to punch where i want the pin holes and lanyard hole, an automatic center punch would be great this time since i can hold with one hand and punch with the other, but i couldn't find i had to glue once more and use regular punch

i started drilling the holes

i skipped showing the original pin holes because i forgot that i'm doing a WIP :D not a big deal anyway

20121119_150917.jpg
20121119_150936.jpg

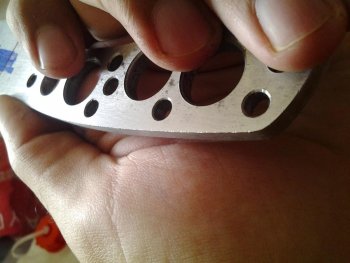
after drilling the pin holes i needed to lighten the handle (as you saw before it's skeletonized in the original design)

i used one of those circle rulers (ruler with different circle sizes on it) to determine how to proceed, on a knife once before i went by 'feel', but you end up making mistakes or at least not placing holes as best as you could.

used a marker to place them

i decided to go with 3 15mm holes and 1 10mm and fill in between if needed

here lies a problem for me, using the 15mm drill bit scares me poopless!! but it was the best thing to remove steel. if you think like me you will wonder if 2 10mm holes would remove more than 1 15mm bit, specially since using them is MUCH easier. they don't, with quick calculations the 15mm hole removes more than 2 10mm holes (is this confusing yet?)

so as i said, i marked three locations for 15mm holes, 1 10mm and will try to fill the rest if needed (which later on i found i did)

SAFETY FIRST!!! this drill bit is seriously scary...
1 drill a hole completely by a smaller bit (i used 5mm)
2 slow the drill press to lowest speed (actually starting from 8-9mm bits i go to lowest speed on my drill press, which is 300rpm) (advice given to me by Bill Harsey)
3 oil. oil again. it helps keep things cool and helps with drilling (i use it with all bits, another advice from Bill)
4 don't even think about holding the piece with your hand. work piece in vise! vise fixed to table.
5 this drill bit is most dangerous near the end when its about to come out from the other side completely, it grabs the work piece. once before, i was holding the work piece in the vise but still holding them down with my hand, the drill bit caught them near the end and pulled them out if my hand. the only thing that saved me was one of them got stuck against the main drill stand. (so might want to keep this in mind whenever drilling, make sure the work piece would never complete a single rotation if a bit gets hold of it and come back to you by placing it near the drill press stand.)
let me tell you thats one of those moments when you find your heart beating hard and body sweating before you realize whats happening.
6 near the end of drilling (you will know by feel or you can keep checking often) ease up on pressure, use oil again and hold that arm as if your life depended on it (because it actually does :D)

note: Wayne Coe on a video on his website advises to use foot switch. as he puts it: (paraphrasing) if anything goes wrong, you don't want to let go of the drill arm or the work piece (or you create a nice mincer right there) so you cant reach the switch and turn drill off, but with foot switch you can easily stop the drill (or disc sander)

i know i kept this long, but lets face it we need those limbs and fingers!!

i put the oil bottle in the picture just to show you, keep the table clear of anything that could distract you, could get in teh way, could fly, could get caught in anything, you get the idea. the drill chuck, sometimes its forgotten too, make sure the first thing you do after tightening is removing the chuck. i know its obvious, and i thought so too until one time i actually forgot, and yes it does fly!!
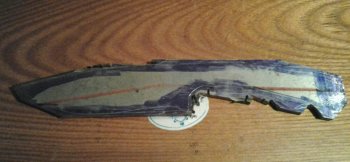

back to wip :)

i used those scrap plywood pieces to protect the knife from the vise jaw. this is the first time i use them and i'm really happy with the result. with previous knives i ended up with deep scratches around the edges. i wanted to use leather but didn't have any.

i didnt need to punch where those holes will be as long as i am close to the center of those circles.


20121119_152120.jpg
20121119_152751.jpg

after drilling the large 15mm holes, you can see the burr on the other side. thats clean cut btw, sometimes its worse. thats about 1mm high. i skipped cleaning these in the middle because they are just done to lighten the tang, if that was precision drilling i would have cleaned after each one, just so they wouldnt affect the angle of holes or wobble during


20121119_155259.jpg

done with drilling, i countersunk the holes except the one for lanyard. but even after countersinking still had some burr. from what i know countersinking works in 3 ways, 1 removes bur and anything that can prevent handle material from lying perfectly flat against tang, 2 the 'sink' can be filled up with adhesive which increases its stength, and 3 it removes the hard edge of the holes which can cause stress during heat treatment.

used 220g sand paper to get rid of the burr.

you can see a spot where i wanted to drill but stopped, was using the 5mm drill bit and it wont fit well, might be too big for that area. (see why determining hole locations beforehand is important?)

the handle still feels heavy. the balance point now i think was at the plunge cut, which means the tang will need to get considerably lighter, so will do more drilling later or hollow the tang.

let me tell ya, as soon as i start making standard designs i'm going for water jet!!!

coming next, the choil (which i really hate, i would avoid it if i can), scribing the edge, marking the bevel and actually making some steel cloud!
 
Last edited:
thanks Shawn


Randy, thanks a lot! and thank A LOT for the design. hope i can make you proud :)
 
thanks Josh

i feel this is cluttered though or i'm not explaining well.

any pointers?
 
A closer inspection showed this

Seems when repositioning thecknife in the vise some filings got between the tang and the wood.

this could cause cracks during the HT process
Guys,what do you think is best, sand spine ( have 90 degrees), sand the edge (have a small chamfer) or both in same order?
 

Attachments

  • 20121123_102300.jpg
    20121123_102300.jpg
    87.5 KB · Views: 53
  • 20121123_102339.jpg
    20121123_102339.jpg
    92.2 KB · Views: 56
Last edited:
Guys,what do you think is best, sand spine ( have 90 degrees), sand the edge (have a small chamfer) or both in same order?

I wouldn't bother with chamfering, especially if you're going to put scales on it.

Just clean it up. It looks like you have plenty of material there. :biggrin:
 
Your doing a great job with the WIP ! Just keep up what your doing.

I just give the entire perimeter of the blade a hand sand with 220 prior to heat treating.

-Josh
 
Shawn, thanks. i actually meant like a 45 degree pass over the edge with sand paper, not a complete chamfer.

like Josh suggested will do the spine then see if anything needs to be done about tang sides. thanks Josh

Stew, thanks. cant take credit for the deaign though, the designer is Randy Haas from HHH Knives.

thanks Laurence, but im still in the pre HT stage, i just wanted to have 'smooth' edges to avoid cracks during HT

thanks guys

will post more soon
 
Stew, thanks. cant take credit for the deaign though, the designer is Randy Haas from HHH Knives.

Yep, I know. :D I followed the original local hero builds. I asked Randy for permission to use his design to do a build that I could use to fundraise for UK soldiers. :)
 
i replied before! the KD app has a mind of its own, just sayin

Stew, thats great news, do share photos when done!! :)
 
second finger groove jimping

20121124_151539.jpg

i use triangle and round needle files, couldn't find my good round one tho (for some reason 2 days later for reasons beyond my apprehension discovered it near the drill press. thats why i need a real workshop!!)

20121124_152234.jpg

after bit of calculations i decide where the little grooves will be(long marks), i readjusted them (short ones). and a bit of Community to keep my company while working :D

20121124_153643.jpg

setting the grooves with the triangle file then switched to round file

20121124_161943.jpg

done with jimping, i went slightly deeper than what i want because a slight level will be removed when cleaning after HT. it looks bit messed up because the file was really terrible and i used a dremel with diamond bit( not one of my best decisions)
 
i now start marking the edge.

first start by measuring the thickness of the steel, most people will know the thickness of the steel, but it wouldn't hurt to check :)

20121123_095801.jpg

here i colored the edge with a chisel tip sharpie as i mentioned before, and used the same caliper to scratch those lines. its a simple way to mark the lines, there are other ways of course (personally i'm waiting for the rightly priced height gauge with carbide tip to come along ;)) you can find simple ways to scribe a knife here http://knifedogs.com/showthread.php?25527-simple-ways-to-scribe-the-edge

20121123_095609.jpg

i decided the middle line will be 1.2mm. so i subtract that from the thickness, divide by two and you end up with the length to mark from the side. this is better to do that just a line in the middle, specially since you need thickness at the edge for heat treatment (unless you're doing all the grinding post HT, thats different of course)

keep in mind that the caliper used to mark (if it doesn't have carbide tip) will eventually have a ruined tip, you can probably see it in the next picture, so if you can keep one just for precision measuring

next up i mark the height of the bevel

20121123_100235.jpg20121123_100334.jpg

this is not really set in stone, you can always go as high as you want or higher(but once you grind you can never go lower ;)), i did few knives without that, but this makes life A LOT easier.

20121123_102052.jpg

this line is to set the plunge cut, i use a square, mark one side, then mark bottom of the plunge to decide where the line will be on the other side. this line won't be the final plunge line, i just don't have a good track record with plunge cuts, so always stop bit shorter before HT (have room for mess up)
 
Last edited:
i start the bevel using a used 40g belt (the reason to use an old one is the hard edge of the knife can knock off the grit on a new belt)

i do this free hand and don't have a very good handle on it yet, hence the two bevels on the first side

20121126_112315.jpg20121126_112326.jpg20121126_112331.jpg20121126_113028.jpg

two sides taken to 80g(you probably can see at the tip where it got slightly deeper than the intended grind), i alternate between sides when doing the main bevel to avoid stress build up, i noticed some makers do them one side at a time however.
20121126_115121.jpg

on a knife like this i alternate two or three times.

20121126_120221.jpg
both sides taken to used 120g

knife ready for heat treatment! :)
Copy of IMG_20121126_120818.jpg

i missed this weeks chance for HT though, so can only get the knife in 10 days! also thinking about changing my HTer, but don't know anybody now. so this will be a while...
 
Last edited:
Back
Top